No party or picnic is complete without the new, Royal-approved Coronation Quiche. This simple version of the recipe is stuffed with seasonal greens and surrounded by a lusciously creamy savoury custard. Add crispy, buttery pastry and you’ve got a winner of a bake, fit for a (literal) King.

The official dish of King Charles III’s coronation was announced ahead of his coronation in May 2023, and while I’ll forever be a coronation chicken girl, this lovely fresh coronation quiche is well worth trying. It’s essentially a very green, veggie-packed tart, but the good amount of grated cheese and the crispy pastry make it extra special.
However, when I read the official coronation quiche recipe, I thought it was a little tricky to follow. So I’ve played around to make it easier to follow, with clear, straightforward instructions.
A couple of key things for me were missing. There’s no information about HOW to cook the spinach or how much salt to use, and I also found the timing was off. The original recipe instructs you to cook the quiche for 20 minutes, but it took my oven 40 minutes to achieve a lovely golden result. This will rely on the heat of your oven, so I would check it after 20 minutes and see how it’s going. I also found that the pastry needed another 5 minutes, sans rice, after blind baking to dry out the base.
I also tested a mini-party quiche version of the recipe and I actually love these even more than the original size. These cute little ones are PERFECT for parties as they’re a lot easier for guests to pick up and eat. Plus, you don’t even have to blind-bake the crust.
In this post – everything you need to make the Coronation Quiche
- Shortcuts and swaps
- Ingredients you’ll need
- Step-by-step guide on making it
- Watch how to make it
- How to make mini-versions
- Your questions answered
Swaps and shortcuts
- I’ve swapped out fresh tarragon for fresh mint. Tarragon has a divisive aniseed flavour, and it’s a herb not often used (or is one you buy for one recipe and then end up wasting). Mint provides a lovely, springtime freshness and pairs perfectly with the other ingredients.
- I’ve gone for edamame (soya) beans rather than broad (fava) beans. The official recipe states you can use either or, and I find the skins of edamame beans less tough.
- I’ve amped the flavour by using garlic (I can’t resist!), spring onions (scallions) and parmesan, but you can stick to the original and leave them out if you like.
- I tested the quiche using homemade shortcrust pastry and using storebought. Storebought is undeniably easier – it cuts at least an hour off prep time. However, the flavour of homemade pastry is far superior. I also swapped the lard in the original recipe for butter as butter is much easier to find, and keeps it vegetarian-friendly. If you have the time and inclination, make your pastry, but if you’re looking for a quicker version, storebought is the way to go. You can also make the pastry the night before (or up to 5 days before) you want to make the quiche – that makes things a lot more manageable.
Ingredients
The great thing about this recipe is the relatively simple list of ingredients.
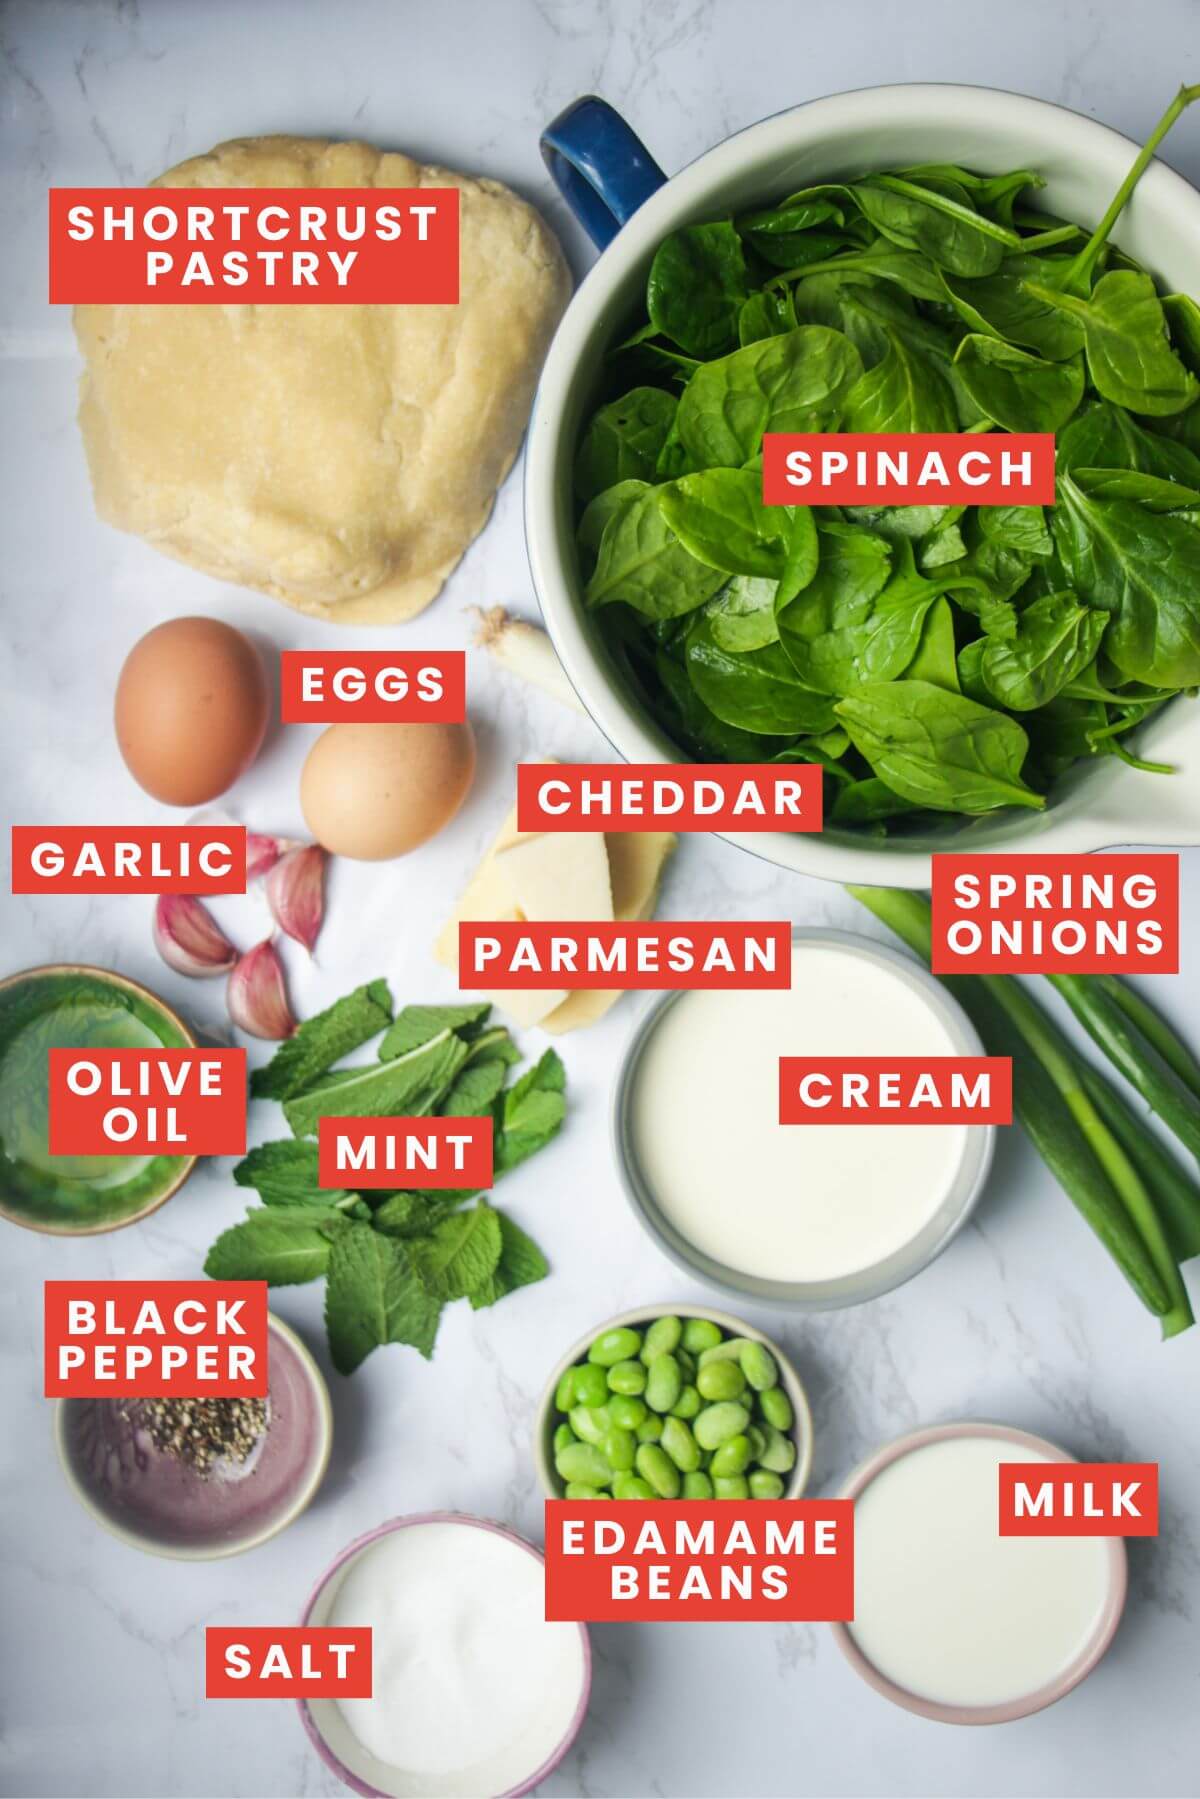
- Mint. As I’ve said above, I’ve swapped the tarragon for mint here, but you could of course use tarragon. Flat-leaf parsley or coriander (cilantro) would also work well and pair with the other flavours. I’ve also increased the quantity to 2 tablespoons.
- Spinach. There really is a MOUNTAIN of spinach in this recipe, but once you wilt it down, it becomes much more manageable. I’m using fresh spinach leaves, but you could use frozen. You’ll just need to defrost it and squeeze as much moisture out as you can before using it.
- Edamame (soya) beans. I‘m using frozen edamame beans because they’re much easier to find. Broad beans have a tough outer pod which usually needs to be removed, so we’re keeping things simple by using edamame. You could also use frozen garden peas.
- Milk. Ideally, use whole milk for extra creaminess, but you can use skimmed or semi-skimmed here, or use your favourite plant-based milk.
- Shortcrust pastry. If you’re making it yourself, you’ll need plain flour, butter, salt and a little milk or water. You can of course use a packet of ready-rolled storebought pastry for ease, or switch things up and use puff pastry.
You’ll also need a tart tin, ideally nonstick and metal with a removable base. The original recipe calls for a 20cm tin, but this recipe will work in a 23cm tin as well. You’ll also need baking paper or aluminium foil, uncooked rice or dried beans (like chickpeas/garbanzos) or baking beans to blind bake the crust.
OPTIONAL ADD-INS: You could add more seasonal ingredients like asparagus, broccolini or wild garlic, or add smoked salmon, crispy bacon, chorizo or ‘nduja to spice things up. A dollop of sweet chilli jam on the side would also be fab!
How to make it
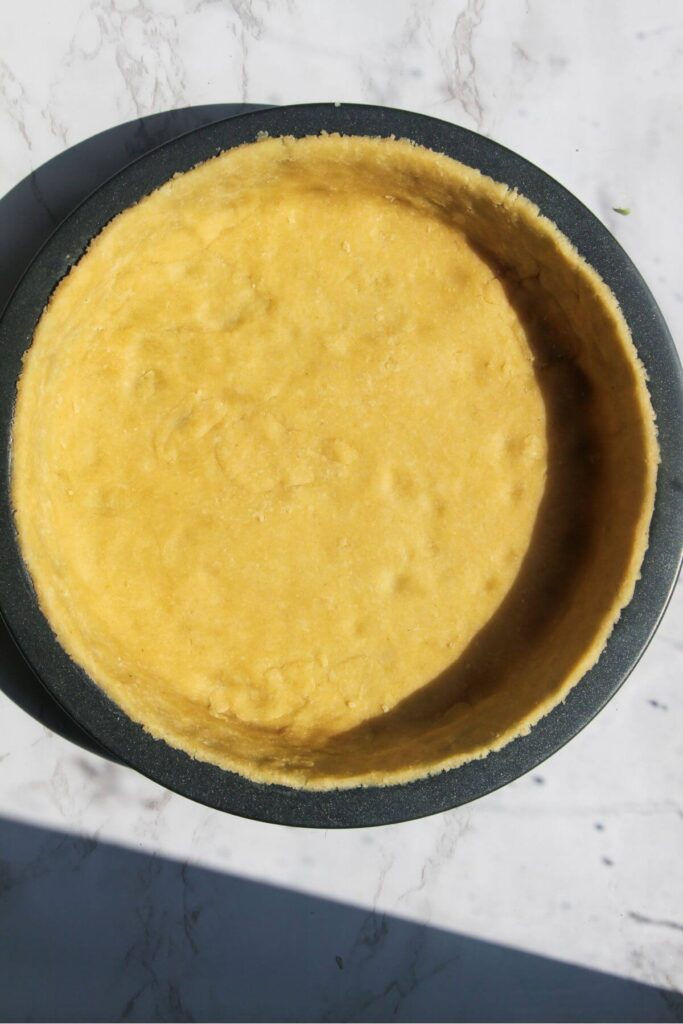
If you’re making your pastry, you can do it in either a food processor or by hand. Just make sure you let it rest in the fridge for at least 30 minutes before using it.
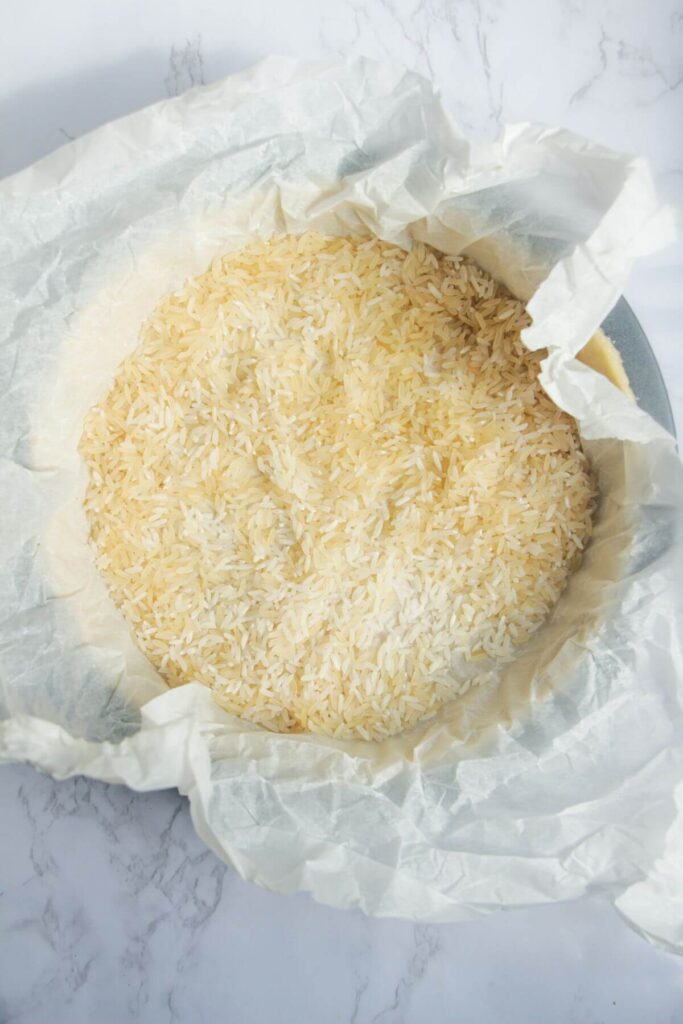
Roll the pastry out on a lightly floured surface, until it’s about 1/2 cm thick and is just larger than the top of your tin. Press the pastry into the tin, gently pressing into the edges. If it tears don’t worry, you can use any pastry scraps to patch it up. Line your pastry base with baking paper and either uncooked rice, dried beans or baking beans, then bake the pastry for 15 minutes. Remove the baking paper and weights, then pop the pastry in the oven for another 5 minutes just to dry out the base.
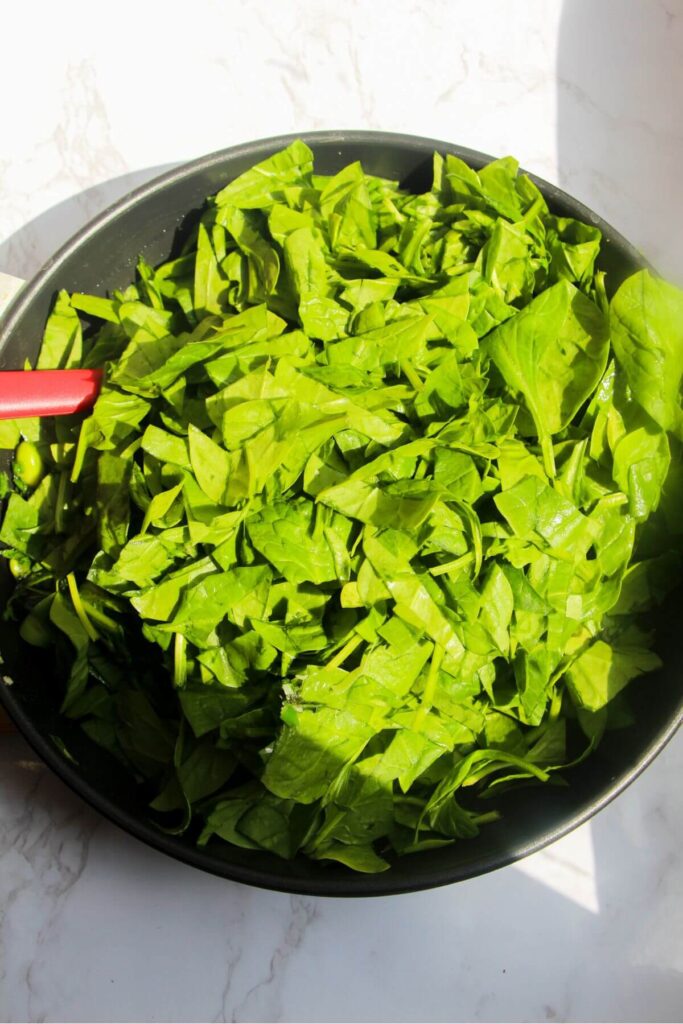
Cook your spring onion (scallions) for a few minutes with a little salt, then add the edamame beans and mint, then the spinach and stir as it wilts, softens and the water releases from the leaves.
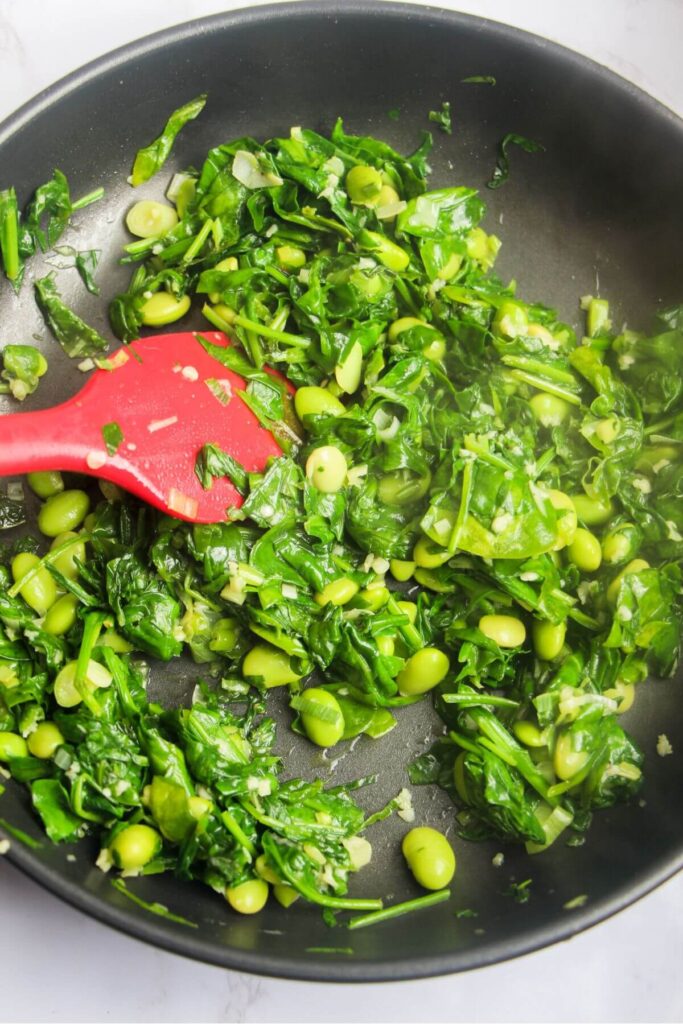
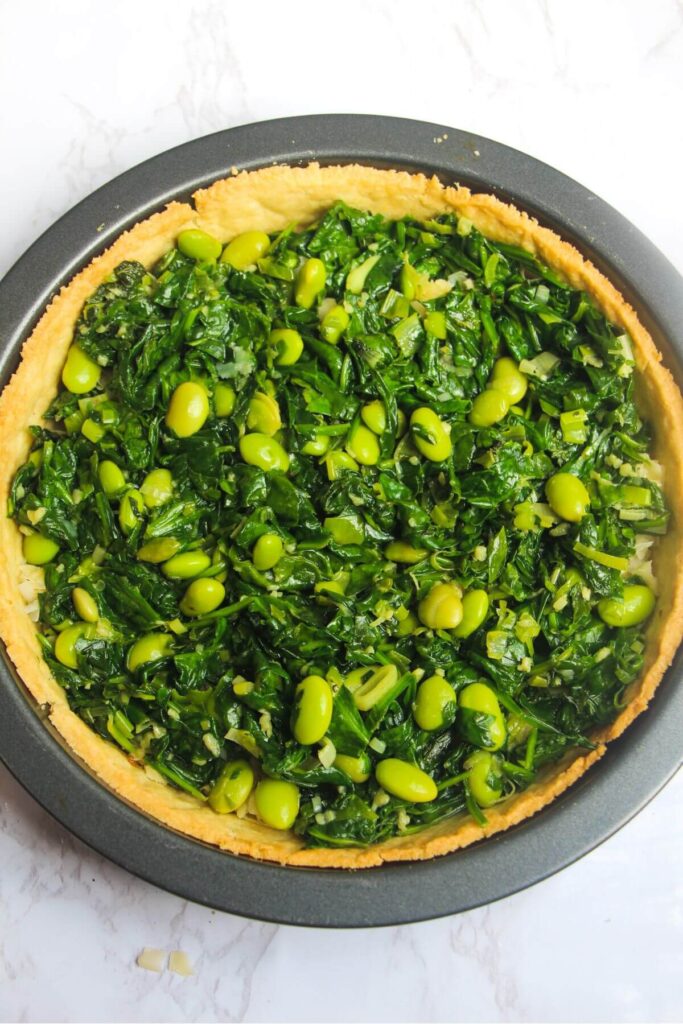
Scatter half the grated cheese all over the base of the pastry, then top with the spring onion, mint, edamame and spinach mix. Whisk your eggs together, then add the cream, milk, 1/2 teaspoon of salt and a very good grind of black pepper. Pour this mixture all over the greens in the pastry, then scatter the remaining cheese on top. Bake the quiche until lovely and golden and just set in the middle. Let it cool for 15 minutes in the tin, before CAREFULLY removing it and placing it on a wire rack.


Watch how to make it
Want to make mini quiches?
Making mini versions of the coronation quiche is PERFECT for any party. They’re much easier for guests to eat and there’s no need for plates or cutlery. Making the mini version is essentially the same process as the full-sized quiche, BUT, there’s no need to blind-bake the pastry crusts.
I have a whole post that breaks down the recipes for mini coronation quiches in more detail if you’re interested!


Got a question?
I really recommend it, to avoid the dreaded soggy bottom. If you add the wet filling directly onto the uncooked pastry, the pastry won’t have a chance to crisp up and cook, and the filling will just seep into it. Blind baking helps stop this happening, as the pastry is already on its way and a little drier. I know it’s tempting to skip this step, but you’ll end up with a soggy mess.
The reason it’s soggy is that the fat in the pastry melts before it gets a chance to form a strong structure – blind baking is the best way to counteract this. Sometimes, even if you do blind-bake your pastry crust, you’ll still end up with a bit of a soggy bottom. This is especially tricky with very wet fillings (like this one!) If you end up with a soggy bottom, don’t stress too much. Your quiche will still be absolutely delicious, and it’ll become less obvious once it’s a little cooler.
The official recipe calls for a celebration of seasonal spring ingredients – spinach leaves, broad beans or soya beans, tarragon and cheddar.
Yes! Like any quiche recipe, this one will keep really well and is perfectly fine to make the day before you want to serve it.
Yes! This recipe is honestly a lot quicker and easier using ready-rolled shortcrust pastry. Homemade has a better flavour, so if you do have the time (or you just want to give it a go!) I really recommend trying it.
If you notice your pastry crust has cracked while blind-baking, don’t panic! There’s a really easy fix. Mix 1 tablespoon of plain flour with 1 tablespoon of water into a paste. Use this paste with your fingers to patch up the crack, much like you would patch a wall. Pop it back into the oven for a couple of minutes to set, then you’re good to go.
Like this recipe? Here are more party ideas


If you make this recipe, I’d love to hear from you! You can leave me a comment below.
Print
How to Make the Coronation Quiche
- Total Time: 55 minutes
- Yield: 1 quiche 1x
- Diet: Vegetarian
Description
No party or picnic is complete without the new Royal approved Coronation Quiche. This simple version of the recipe is stuffed with seasonal greens and surrounded by a lusciously creamy savoury custard. Add crispy, buttery pastry and you’ve got a winner of a bake, fit for a (literal) King.
You can make this recipe in a 20cm/8inch OR 23cm/9inch tin (ideally with a removable base to help you get the quiche out).
I’ve included instructions for how to make the shortcrust pastry in case you want to try it, but to make things even easier, use a packet of ready-rolled store-bought pastry here, and then start the recipe at step 3.
Looking for mini versions? Here’s my recipe for mini coronation quiches, perfect as a bite-sized party snack.
If you’re looking for cup measurements, use the ‘Units’ section next to the ingredients list and click ‘US’.
Ingredients
For the shortcrust pastry (if you’re making it) –
- 250g plain flour
- 125g butter, fridge cold and cubed
- 1 teaspoon salt
- 3 tablespoons milk
For the quiche filling –
- 1 tablespoon olive oil
- 2 spring onions (scallions), sliced
- 2 tablespoons fresh mint leaves, chopped (or use tarragon, coriander, flat-leaf parsley or basil)
- 1/2 cup edamame beans (or use broad beans or garden peas)
- 4 garlic cloves, crushed
- 180g (7 cups) spinach leaves
- 1/2 cup whole milk (or use skimmed, semi-skimmed or your favourite plant-based milk)
- 3/4 cups double (heavy) cream (use regular pouring cream if you’re in NZ/AU)
- 2 eggs
- Black pepper
- 1/2 teaspoon salt
- 1/2 cup grated cheddar cheese
- 1/4 cup grated parmesan cheese
- Butter, for greasing
Instructions
- Make the pastry (if you’re using storebought pastry, skip this step). You can do this in a food processor, or by hand. If you’re using a food processor. add 250g of plain flour and 1 teaspoon of salt into the bowl. Add 125g of cold, cubed butter and pulse until the mixture looks like rough breadcrumbs. With the motor running, drizzle in 3 tablespoons of milk or water, until you see the pastry starting to come together. If you’re making the pastry by hand, add 250g flour and 1 teaspoon of salt to a large mixing bowl and mix to combine them. Add the 125g of cold, cubed butter and use your fingers to press the butter into the flour. Continue in this way until the mixture looks like coarse breadcrumbs. While mixing with a wooden spoon or spatula, drizzle in 3 tablespoons of milk or water and continue mixing until the pastry starts to come together. Lay out a piece of clingfilm on a flat surface, and turn the pastry straight out onto it. Use your hands to bring it together into a rough ball, then wrap it tightly in the clingfilm, and pop it into the fridge for at least 30 minutes.
- Roll out the pastry. After the pastry has rested, lightly flour a flat surface and unwrap the pastry. Use a rolling pin to roll the pastry out into a circle, just larger than the tin you’re using. Don’t worry if it’s not perfect, you can patch it up as you go.
- Press the pastry into your tin (start here if you’re using store-bought shortcrust pastry). Grease the base and sides of your tin with butter (or cooking spray). Lay the pastry on top of your tin, and use your hands to gently press it into the base and sides of your tin. If the pastry tears, use any scraps to patch them up. Place the tin in the fridge while you make the filling.
- Make the green filling. Add 1 tablespoon of olive oil to a frying pan or skillet, then add the sliced spring onions and 1/2 teaspoon of salt. Cook, stirring for 1 minute, then add the edamame beans, crushed garlic cloves and the mint leaves. Cook for another minute, then add the spinach. Stir for another 2 minutes, until the spinach has softened and reduced in size, then let it continue to cook for another couple of minutes, so all the water evaporates. Remove the pan from the heat. PRO TIP: It will look like a scarily large pile of spinach but it will wilt down and become much more manageable, I promise.
- Blind bake the pastry. Heat your oven to 180C/340F fan. Press a piece of baking paper on top of the pastry in your tin, then cover the paper with uncooked rice, dried beans or baking beans to weigh it down. Transfer to the oven for 15 minutes, then remove the paper and weights and put back in the oven for another 5 minutes, then remove and set aside.
- Assemble the quiche. Lower the heat of your oven to 160C/320F fan. Add the eggs to a large mixing bowl and whisk well. Add 1/2 cup of milk, 3/4 cup of cream, 1/2 teaspoon of salt and a very good grind of black pepper. Whisk again to combine well. Scatter half the grated cheese onto the base of your pastry shell. Spoon the spinach edamame mix on top, spreading it out so it’s covering the pastry evenly. Slowly pour the egg/milk/cream mix into the case, leaving 1/2cm of space at the top. Scatter the rest of the cheese all over the top.
- Bake the quiche. Transfer the quiche to the oven, and bake for 20 – 40 minutes, or until the pastry and the top of the quiche is golden, and the middle is just set (give it a little wobble to check!) The official recipe states 20 minutes of cooking time but mine did end up taking longer, so just check it and give it a little more time if it still looks a bit blonde. Remove from the oven, and let it cool for about 10 minutes before removing it from the tin. Serve hot, at room temperature, or cold. A dollop of sweet chilli jam on the side would be lovely too.
Notes
TIMING: I’ve based the timing on using storebought pastry (because that’s the most accessible and easiest way of doing it), and the official cooking time of the recipe. The quiche took longer to cook in my oven, but it will depend on the heat of your oven so I’d check it after 20 minutes as it might well be cooked and golden for you.
PASTRY NOTES: The quantity of homemade shortcrust pastry in the recipe is enough to make two large quiches. I’d still recommend making this amount if you’re just making one, as it’s always good to have extra for patching up any holes, and if you’re using a slightly larger tin you’ll need the extra anyway. Plus, it’s a good opportunity to make mini coronation quiches. Leftover pastry can be wrapped in clingfilm and frozen for 6 months. You can make the pastry 5 days in advance and store it in the fridge until you’re ready to use it, and you can blind-bake the pastry crust 3 days in advance. Just let it cool, then store it in an airtight container at room temperature.
CRACKED CRUST? Don’t worry! If you see cracks in your crust after blind baking you can easily fix it. Mix 1 tablespoon of plain flour with 1 tablespoon of water, to make a paste. With your fingers, use the paste to patch up the cracks, then pop the pastry back into the oven for a few 2 minutes so it can set. Then you’re good to go!
INGREDIENT NOTES: I’ve switched up a couple of the ingredients from the official coronation quiche here, just because of accessibility. I’m using mint rather than tarragon which isn’t a common or widely used everyday herb, and I’ve replaced the lard in the pastry with more butter (if you’re making the pastry). I also added garlic, spring onions and parmesan for extra flavour, but you can of course leave those out if you like.
SUBSTITUTIONS: The official recipe states it can be “adapted to suit different tastes and preferences”, and that’s very true here. Use the official tarragon in place of the mint, or use coriander (cilantro), basil or flat-leaf parsley. Use frozen broad beans (I’d pod them first though), or garden peas, or fresh broad beans if you can find them. You could mix up the cheese too – I’ve added parmesan into the mix, but gruyere, blue cheese, gouda, pecorino, feta or manchego would also be great. Adding more seasonal greens like asparagus, broccolini or wild garlic would also be wonderful, as would crispy bacon or chorizo.
STORAGE INSTRUCTIONS: You can make the quiche up to 3 days in advance of when you’d like to serve it, then store it covered in the fridge. Either serve it cold, at room temperature, or you can reheat it in the oven. To reheat, cover the quiche with foil and heat in your oven at 150C/300F fan for 30 minutes, until warmed through. You can also freeze the baked quiche – let it cool completely then cover with a few layers of tight clingfilm and pop it into the freezer. Defrost in the fridge overnight (or at room temperature), and then you can heat it for 20 minutes at 160C/320F.
- Prep Time: 15
- Cook Time: 40
- Category: baking
- Method: oven
- Cuisine: british
Nutrition
- Serving Size: 1 slice
- Calories: 331
- Sugar: 1.8g
- Sodium: 458mg
- Fat: 23.7g
- Saturated Fat: 10.4g
- Carbohydrates: 19.8g
- Fiber: 2.1g
- Protein: 11g
- Cholesterol: 70mg
Keywords: quiche recipe, kings quiche recipe, spinach quiche, vegetarian quiche


Amazing recipe – great idea re swapping out the tarragon for mint – it has that fresh spring taste without having to track down tarragon. Highly recommend.
★★★★★
SO pleased you enjoyed it!! And exactly, I feel like mint is a great substitute 🙂
Best idea to add mint, this was so easy and will make a tasty lunch
★★★★★
Yay!! This makes me very happy
Fab recipe – looking forward to rolling it out on the big day!
★★★★★
Woohooooo!! Great to hear
LOVE the idea of making them mini!! will totally be doing that for our coronation party xx
★★★★★
Yessss that’s what I thought!! So pleased you’re going to make them 🙂
Thank for breaking the recipe down so well! Makes it so much easier to approach
★★★★★
You’re so welcome!!
I’m making this today – just put it in the oven and it already smells so great!!
★★★★★
Amazing!!
Thanks for posting this great recipe. Was really easy to follow. Just used it for a party and everyone loved it.
★★★★★
Thank you for posting this easy to follow version – I tried it yesterday and worked so well 🙂
★★★★★
So pleased to hear that Pat!
What size tin do I need? Thanks
Ideally a 20cm/8inch tin (one with a removable base will make it easier to get out) – but a 22/23cm (9inch) tin would also work – there is quite a lot of filling 🙂
Yum!!!!! Gave this a go yesterday – so tasty and even better this morning
★★★★★
Ahhh Holly I’m so pleased to hear that 🙂
lovely – great for lunch and will definitely be making again next week!
★★★★★
It is a great lunch isn’t it! So many lovely veggies 🙂
so much clearer than the official recipe – thank you!!
★★★★★
Yayyy that was my goal!! 🙂
I cooked this earlier today. It’s really easy to follow the steps and I am really happy with the quiche. I am going to try the smaller ones this weekend.
★★★★★
I’m a little confused with cups being in the UK. Any chance of a translation into ounces or grams? I’m really looking forward to trying it but don’t want to slip up. Thank you. Gill
★★★★★
Hi Gill 🙂 If you click the little ‘M’ next to the ‘Units’ title (at the top of the ingredients list), the recipe will auto-convert into grams/mls – hopefully, that helps and is clear, but let me know if it doesn’t work for you!
Kate – thanks so much for pointing that out. I had not noticed it – so easy. I will be heading for the kitchen shortly. Gill
Oh wonderful! Let me know how you get on 🙂
Loved it – tried it hot & cold – really good either way.
Just one question what can I use to stop the pastry sticking to the bottom and sides of the removal bottom flan ring
★★★★★
That’s so great to hear!! It’s a lovely versatile one, isn’t it 🙂 Ah if it’s sticking, I’d grease the tin with a little butter or you could use cooking spray – it is very annoying when it sticks a bit.
Kate
Number 2 made today – and number 3 tomorrow. Just one last question – do you mix your Cheddar and Parmesan together. So pleased to have found your recipe the flavours work so well and the cooking aroma is heavenly. Thank you so much. Gill
★★★★★
Amazing!! I’m making another one today too 🙂 Yes, I try to mix them so you get a nice combination of the cheeses throughout. That’s so lovely to hear Gill, you’ve made my day x Kate
Made this for a pot luck at my work yesterday and it was all gone before anything else! First quiche I’ve made and I’ll be coming back here for more!
★★★★★
Amazing!! Absolutely love to hear that Mark, so pleased it went down so well 🙂
Perfect – stayed with the tarragon but did the suggested tasty adds!
Amazing! So pleased you enjoyed it Kim 🙂