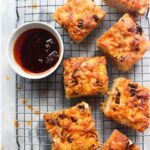
Easy No-Knead Cheesy Chili Oil Focaccia
If you're new to bread making, this super easy no-knead cheesy chili oil focaccia is the best place to start. No fancy ingredients, no special equipment - just mix, then let the dough rise and do its thing. It's gorgeously light, airy, and loaded with pockets of gooey cheese and spicy chili oil. Pair with loaded bread dipping oil for a wonderful appetizer.
Equipment
- 1 Deep-sided baking pan or tin I use a 24cm/9.5" x 35cm/14" pan - But, you can use something that's a similar size so don't worry too much. If your tray is smaller, your focaccia will end up thicker and will take a little longer to cook, so just keep an eye on it. Similarly, if your tray is larger, your focaccia will end up thinner and may cook a little faster. Shallow-sided trays work fine as well, just make sure it has a little bit of a lip or your dough will be spilling everywhere when it's rising!
Ingredients
For the focaccia -
- 600 g white bread flour
- 1 tablespoon salt
- 2 teaspoons instant yeast
- 2 tablespoons olive oil
- 535 g lukewarm water
- 3 tablespoons chilli oil to top the focaccia - if you don't like chilli or don't have chilli oil, use olive oil
- ½ cup grated mozzarella or cheese of your choice blue cheese is also delicious
- Extra olive oil for the pan and to top the rising dough you'll need 2 tablespoons for the pan and 1 tablespoon to drizzle over your dough before it rises.
Instructions
- Mix the dough. Add 600g bread flour, 1 tablespoon of salt, and 2 teaspoons of instant yeast to a bowl, then add the 2 tablespoons of olive oil and 535g lukewarm water.Give it a really good mix with a large wooden spoon until a shaggy dough starts to form, and there are no dry patches of flour. It's going to look wet, but don't worry! Cover the bowl with a tea towel and let it rest for two minutes.
- Perform three sets of stretch and folds. While you're not kneading the dough, you do need to develop a little strength to end up with lovely airy focaccia at the end. You're going to give the dough some 'stretch and folds'. With a wet hand in a 'C' shape, pick up a section of the dough and fold it back onto itself. Rotate the bowl and do this 4 more times, going all around the dough.Cover the bowl for another three minutes, then do the stretch and fold process again. Cover the bowl and let the dough rest for two more minutes, before repeating the stretch and folds one more time.
- Give the dough its first rise.Drizzle 1 tablespoon of olive oil over the top of the dough, then with wet hands, lift it up and turn the dough over to coat it in the oil. This is going to make transferring it from the bowl to your oven pan a lot easier and will stop it from drying out.Cover the bowl with plastic wrap and let it rise until it's doubled. This will depend on the temperature of your kitchen - in summer it can take 45 minutes, but can take 1.5 hours, or more in winter for me. Watch the dough, rather than the clock. You want it to be puffy, with visible air bubbles on the top.
- Transfer the dough to the pan and let it rise again. Drizzle your large pan with another tablespoon of olive oil, then tip the risen dough onto it, carefully using your hands to release it from the bowl if needed. Drizzle another tablespoon of olive oil on top of the dough, then gently stretch it into a rough rectangle. Leave it to rise again until it's very puffy, bubbly, and jiggly.Again, I recommend taking a photo of the dough as you transfer it to the pan so you can easily compare - it will roughly take another 45 minutes. You're looking for it to have almost doubled, and be really pressing against the sides of the tin.
- Top your focaccia.When the dough is rising in the pan, heat your oven to 400℉ (210℃ fan bake). When the dough is super wobbly, jiggly with lots of visible bubbles and doubled in size again, it’s time to bake.Drizzle the 3 tablespoons of chili oil all over the top of the dough, and then, using oiled fingers, dimple the dough all over. Pretend you’re playing the piano on the dough, pressing right to the bottom of the pan.Finish by scattering the grated mozzarella and 1 teaspoon of flaky salt all over the dough.
- Bake the bread. Transfer the focaccia to the oven and bake for 30 minutes or until super golden, crispy, and you can see the edges are starting to pull away from the sides of the pan.Let sit for five minutes in the pan before transferring to a large cooling rack.
PRO TIP. I like to take a photo of the dough so it's easy to compare and see how much it's risen.
PRO TIP. You can do the 'poke test' to see if your dough is ready to be baked. With an oiled finger, gently press into the dough. If the dough bounces back right away, it needs more time.If it slowly bounces back, it's ready to go. If it doesn't bounce back at all, it may be over-proofed (focaccia is forgiving though, so don't worry if this happens - it will still bake well and taste great).
Notes
STORAGE INSTRUCTIONS: You can store the focaccia in an airtight container at room temperature for a few days, but it's best the day it's baked. It also freezes really well. I like to cut small sections in half (so that they'll fit in the toaster) and then freeze so I have lovely fresh bread ready to be easily defrosted in the toaster whenever you get a focaccia craving.
TOPPING IDEAS: Switch up your toppings - chilli oil is a real favourite for me but you can let your creative juices fly. Chopped sundried tomatoes, rosemary, thyme, olives, sesame seeds, everything bagel seasoning, za'atar - you can have fun with it!
MAKE AHEAD: The best thing about this recipe is that it’s super flexible – you can make the whole thing in a couple of hours or pop the dough in the fridge for the first rise then finish it later or the next day, do the first rise at room temperature then pop in the fridge for the second, do both rising times in the fridge – it’s great for working around busy schedules.
Nutrition
Serving: 200g