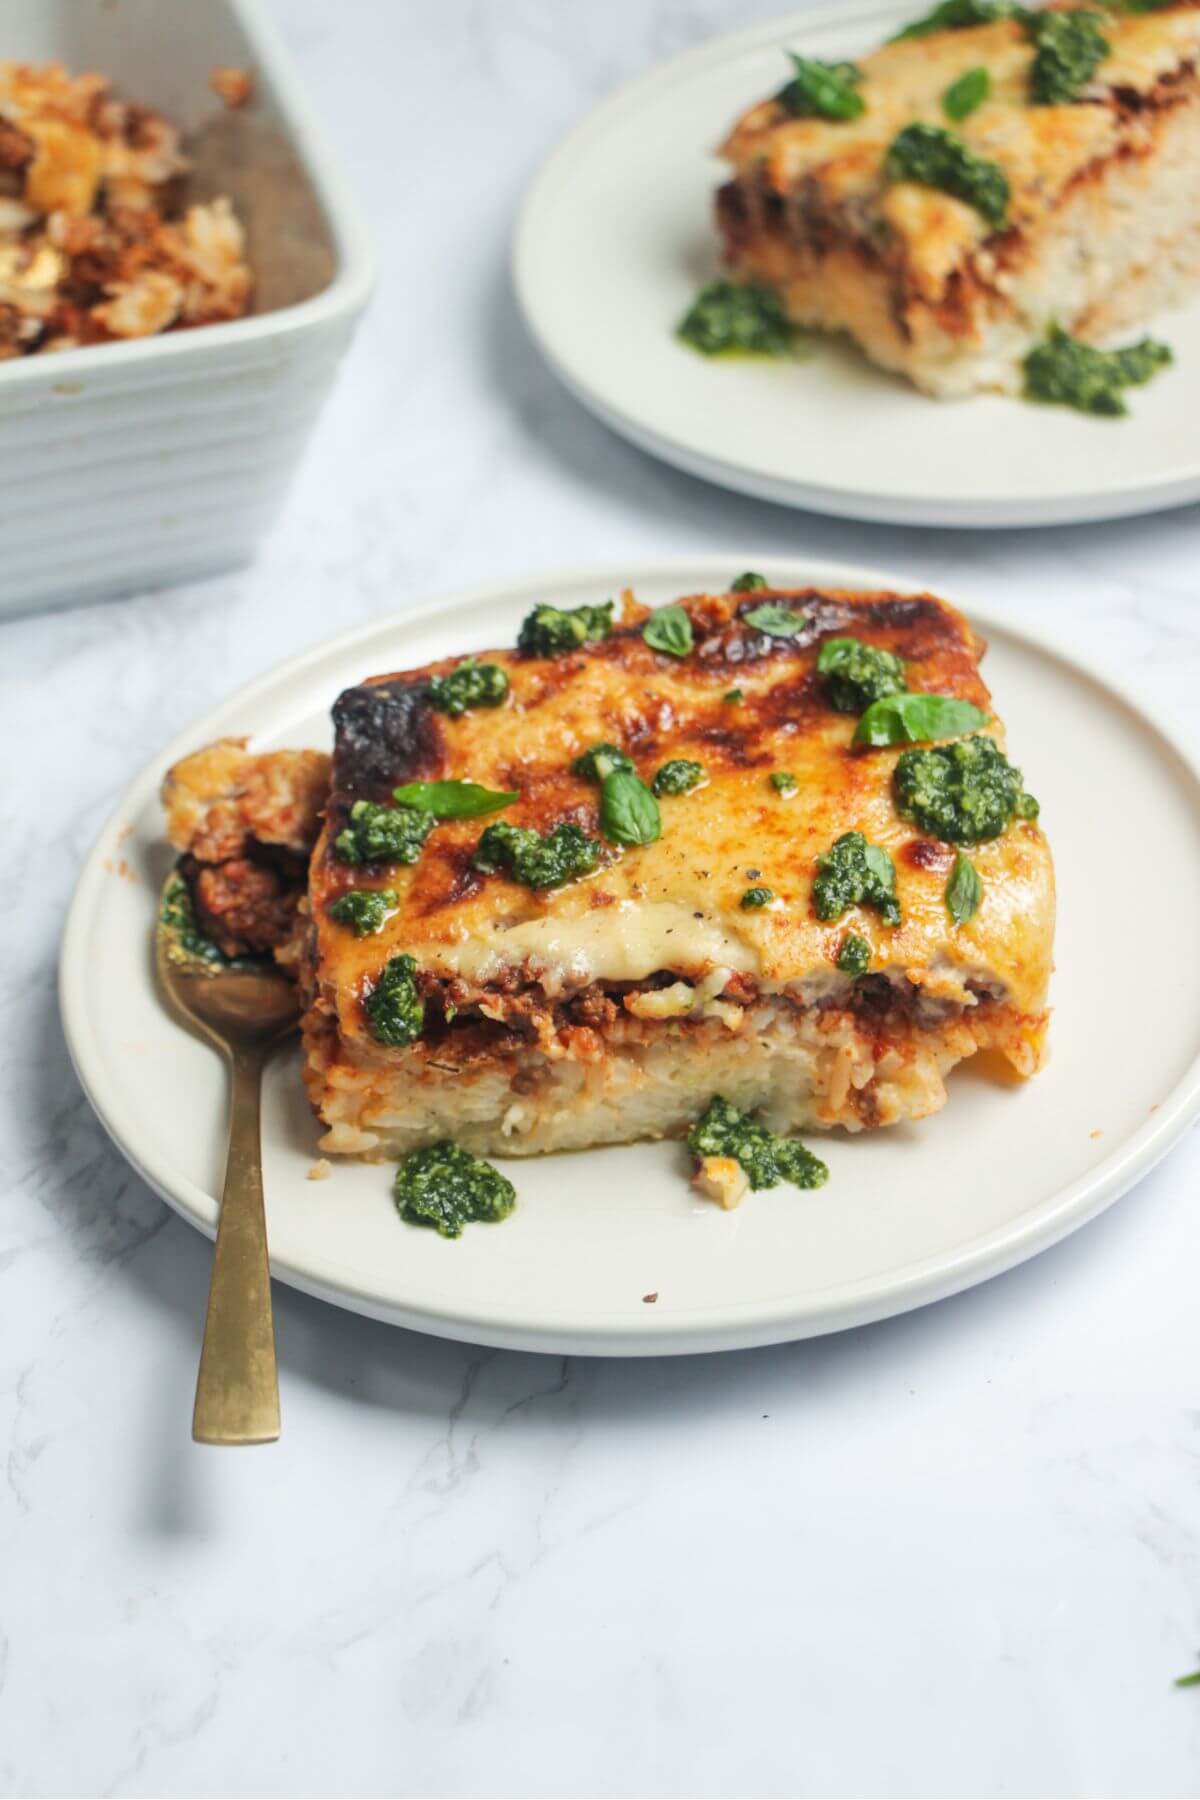
Say hello to your new family favourite. This cheesy bolognese rice bake has all the flavours of lasagne, with a little twist. A layer of seasoned rice and rich bolognese is topped with gorgeously creamy, cheesy bechamel sauce, making a wonderful family-friendly recipe, fab for making ahead of time. Plus, it’s easily made gluten-free.
Food has the power to transport you back to a certain time or place, and this bolognese rice bake is a big example of that for me. It’s something my mum used to make all the time when we were kids (we called it mince and rice pie) and it really is a huge dose of comfort for me.
Think of it as lasagne, with a twist. That twist is rice instead of pasta sheets, and no need to deal with fiddly layers. There are three main elements that make up this recipe – the rice base, the bolognese sauce and the cheesy bechamel sauce.
All three elements can be made in advance, then you can assemble the bake when you’re ready. Or, assemble the bake and pop it into the fridge for up to 2 days before you bake it.
This is cosy comfort food at its best. The rice gets lovely and crispy around the edges in the oven, and the combination of rich bolognese and cheesy, creamy bechamel sauce is an unbeatable classic pairing.
Ingredients
You’ll be able to find everything you need at a regular grocery store.
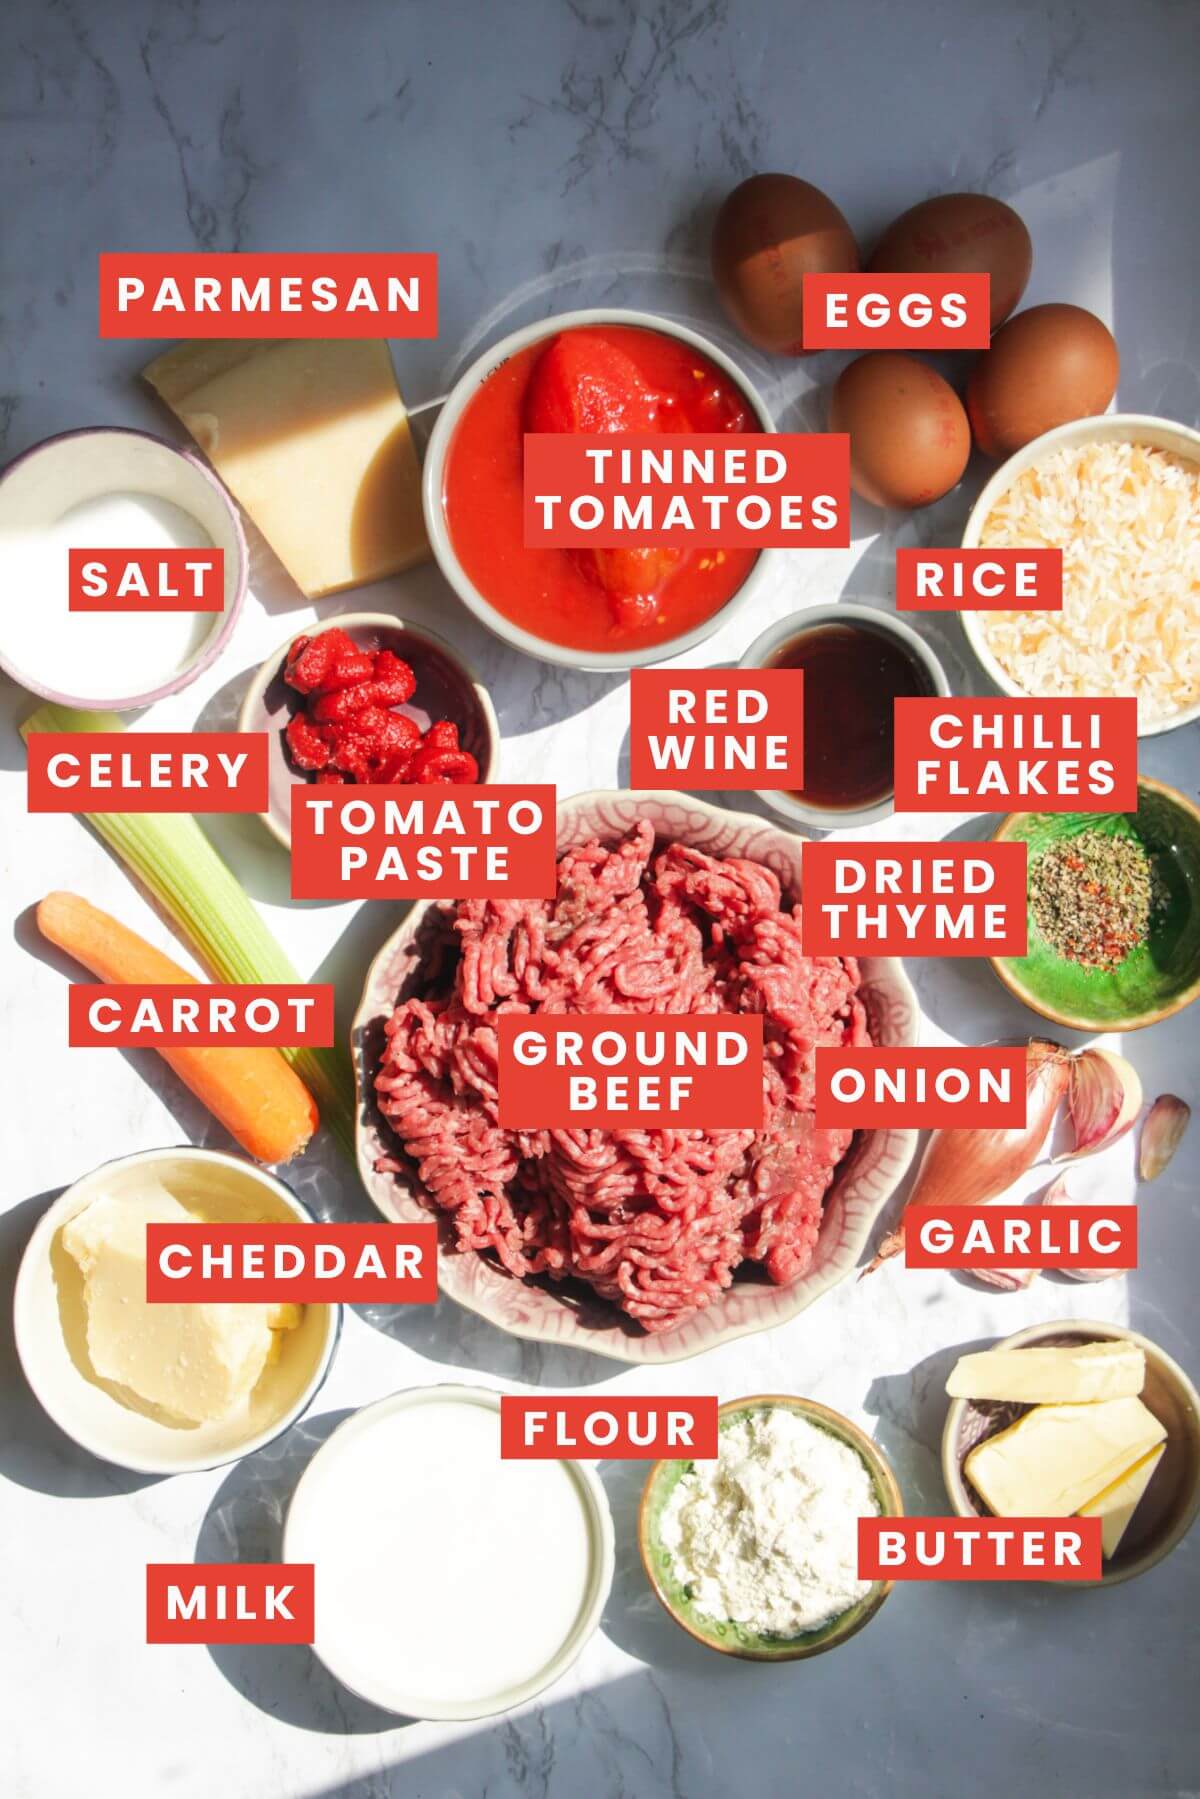
- Ground beef. I’m using lean ground beef mince here, but you could also use one with a higher percentage of fat for even an even juicier sauce if you like.
- Rice. Regular long-grain rice (like basmati) is perfect here. You can use different grains, like brown rice or jasmine, but you’ll need to make sure you follow the cooking instructions on your packet as they cook differently and generally take longer.
- Flour. I’m using regular plain flour, but to make this gluten-free, use gluten-free flour in your sauce.
- Cheese. I like to use good, strong-flavoured cheese when I’m making a cheesy bechamel white sauce. Here I’m using mature cheddar, but you could use your favourite. I love mixing in a little blue cheese too, or parmesan, for extra flavour.
- Tinned tomatoes. I’m using plum tomatoes, but you could use crushed tomatoes, or even passata, for a smoother sauce.
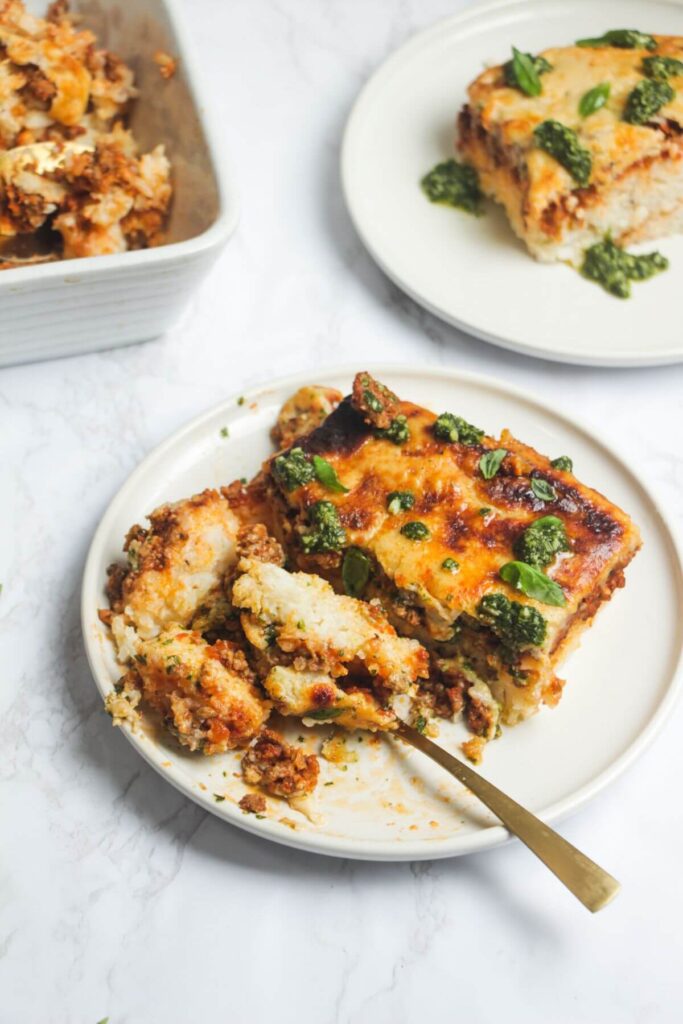
OPTIONAL ADD-INS: I love to add a dollop of miso paste (roughly 1 tablespoon) to my cheesy bechamel sauce to give it an extra savoury flavour. I also add a little fish sauce to my bolognese, but you can skip that if you don’t like it. Spooning over a few tablespoons of basil pesto after baking is also a lovely way to finish it off – it’s bright and fresh and complements the flavours well.
How to make it
All three main elements of this recipe can be made at the same time, to make your prep quicker. Start your bolognese sauce, then when that’s simmering over low heat, start your rice. While that’s cooking, you can make your cheesy bechamel sauce.
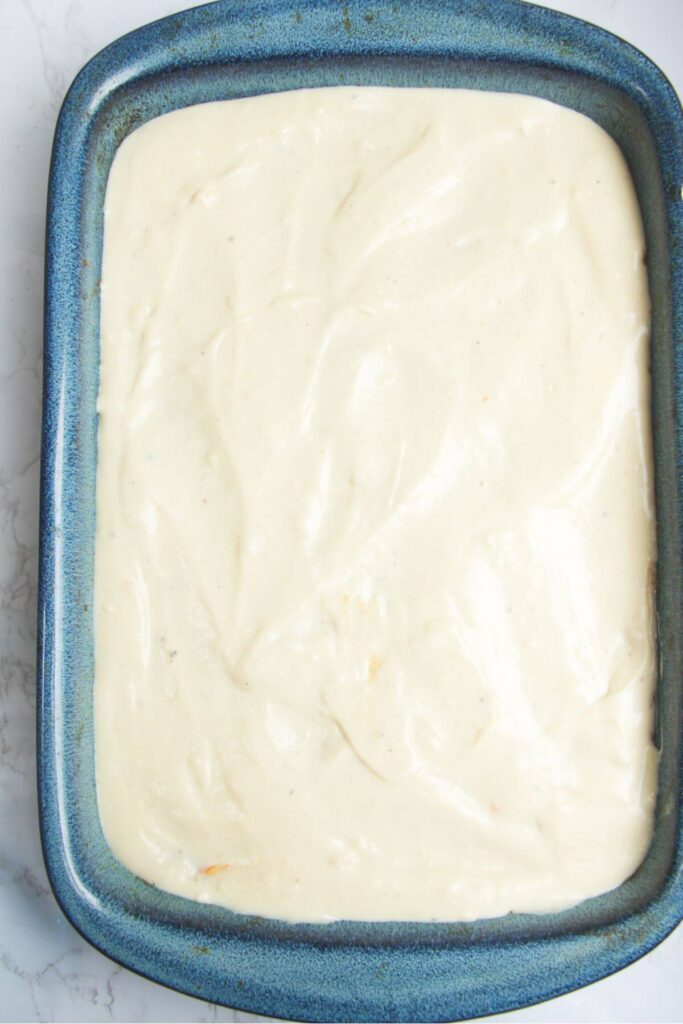
Let your rice cool a little bit (about 10 minutes), then mix through the grated parmesan, garlic, butter and a whisked egg. Grease an oven dish, then press that rice mix onto the bottom, spreading it out onto an even layer. Spoon on the bolognese sauce, spreading it out to the edges evenly. Finish with the cheesy bechamel sauce on top. Scatter over the remaining cheese, and pop into the oven.

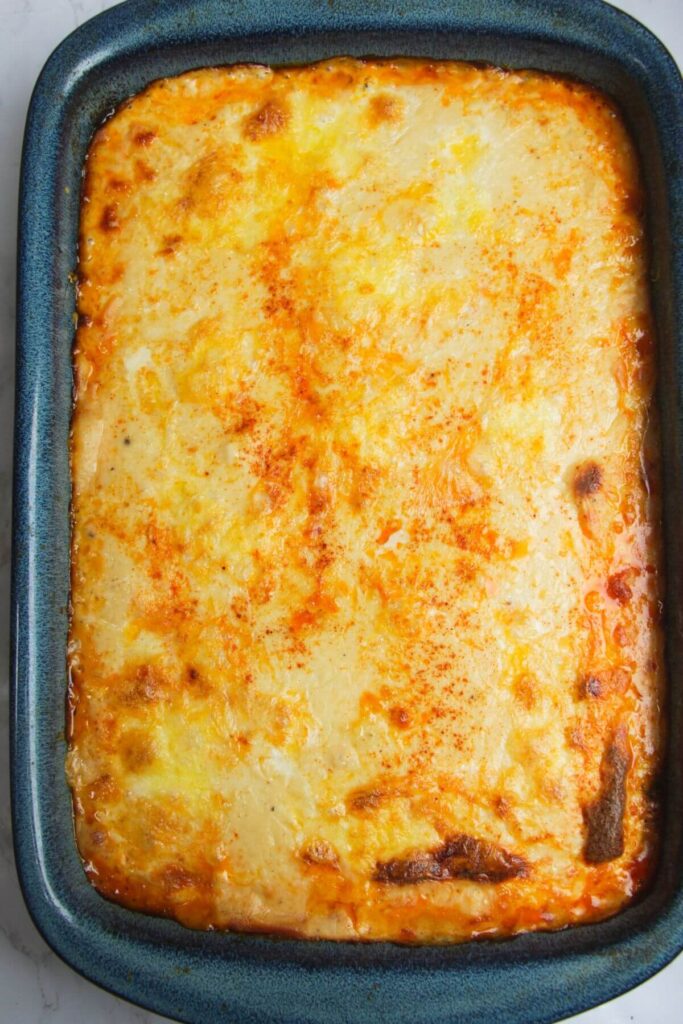
After 30 minutes, it should be looking golden, bubbling on top and around the sides and smelling absolutely glorious. Let it cool for about 10 minutes before slicing and serving it up with fresh basil pesto if you like!
Got a question?
You sure can! This is a perfect recipe to make ahead of time. There are a couple of ways you can get ahead:
– Make the three elements of the bake in advance, pop them into the fridge, then assemble it and bake when you’re ready. The bolognese will keep well for at least 5 days (and in fact will develop even more flavour), the cheesy bechamel will be fine for 4 days, and the rice will keep for 2 days. If you’re doing this, don’t mix the egg/cheese through the rice until you’re ready to assemble.
– You can assemble the whole thing in the baking dish, then cover it with foil and pop it into the fridge until you’re ready to bake it. It will be fine for 2 days assembled in the fridge.
I’ve used regular white long-grain rice here, but you can really use whatever you like. Short-grain, jasmine or brown rice will also work but you’ll need to make sure you follow the cooking instructions on your packet, as different rice grains cook quite differently.
A nice fresh green salad on the side works really well – I like a big plate of arugula (rocket), drizzled with a little balsamic vinegar, olive oil and salt and pepper. Likewise, steamed greens like broccoli, asparagus or green beans will freshen things up. Or, go all out on the comfort front and serve it with some soft, fresh focaccia or rosemary parmesan bread and roasted garlic butter or garlic confit.
Like this recipe? Here are more make-ahead favourites


If you make this recipe, I’d love to hear from you! You can leave me a comment below.
Print
Cheesy Bolognese Rice Bake
- Total Time: 1 hour
- Yield: 6 servings 1x
- Diet: Gluten Free
Description
Say hello to your new family favourite. This cheesy bolognese rice bake has all the flavours of lasagne, with a little twist. A layer of seasoned rice and rich bolognese is topped with gorgeously creamy, cheesy bechamel sauce, making a wonderful family-friendly recipe, fab for making ahead of time. Plus, it’s easily made gluten-free.
Ingredients
For the bolognese sauce –
- 1 tablespoon olive oil
- 500g/1lb ground beef mince
- 3 garlic cloves, crushed
- 1 onion, finely diced
- 1 celery stick, finely diced
- 1 carrot, finely diced (or grated)
- 1 teaspoon dried thyme
- 1 teaspoon chilli flakes (optional)
- 2 tablespoons tomato paste
- 1 tin plum tomatoes (roughly 400g/14oz)
- ¼ cup red wine
- 1 teaspoon fish sauce (optional)
For the rice –
- 1 cup long-grain rice
- 1 teaspoon salt
- 1 egg
- 2 garlic cloves
- 1 tablespoon butter
- ½ cup grated parmesan
- 1 tablespoon butter or olive oil (for greasing your oven dish)
For the cheesy bechamel sauce –
- 2 tablespoons butter
- 2 tablespoons plain flour (use gluten-free flour for a gluten-free version)
- 1.5 cups whole milk
- 1 cup grated cheddar cheese + 1/2 cup to scatter on top of the bake
- Black pepper
- ½ teaspoon chilli flakes
Optional, to serve –
- 2 tablespoons basil pesto
- Handful of fresh basil leaves
Equipment –
- Oven-proof baking dish (either a small rectangular, roughly 28cm/11″ x 18cm/7″ or a small square 21cm/8″ x 21cm/8″ dish). If you have a larger dish, I’d double the amount of bolognese as you may find it becomes a very thin layer.
Instructions
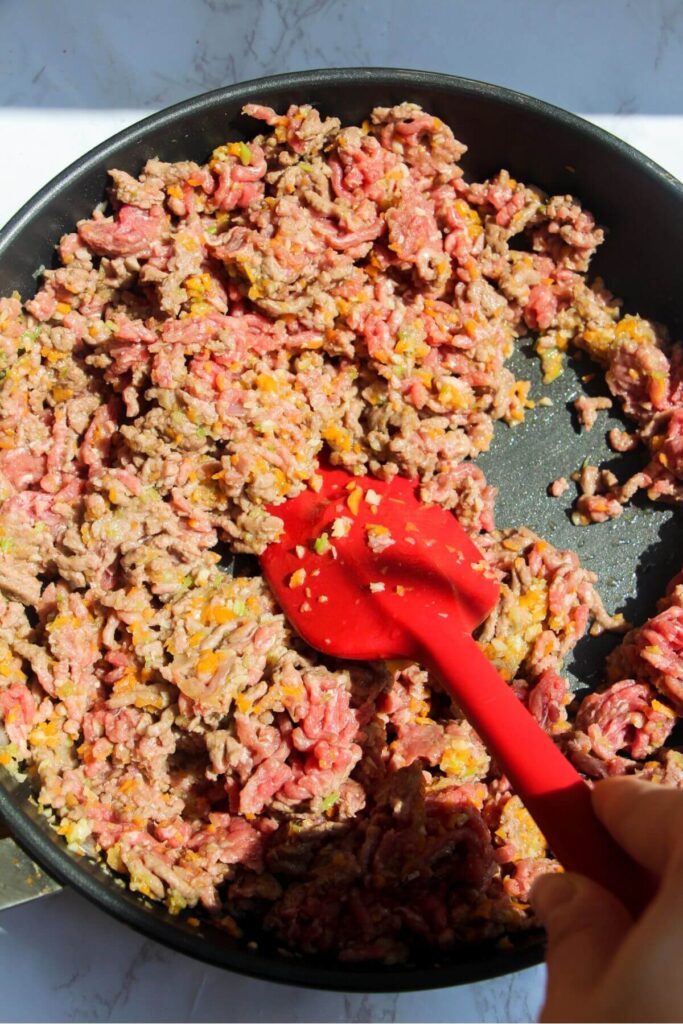
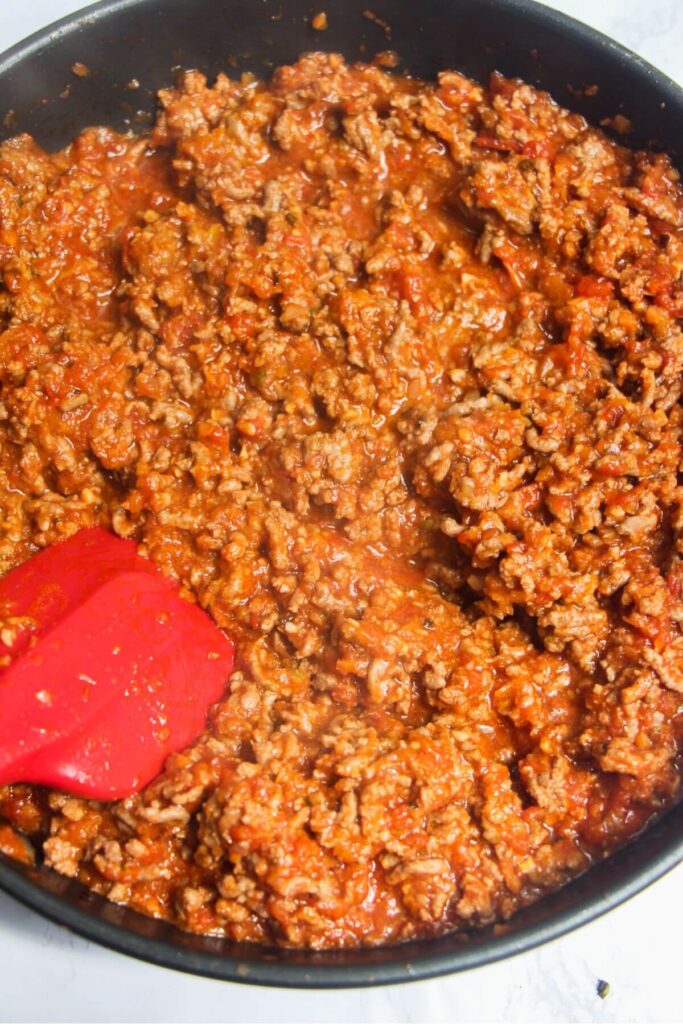
- Make the bolognese sauce. Add 1 tablespoon of olive oil to a large pot over medium heat, then add the diced onion, carrot, celery and 1 teaspoon of salt. Cook, stirring for about 5 minutes, until they start to soften up nicely. Add the crushed garlic, stir for another minute and then add the ground beef mince. Break up the mince with a wooden spoon and cook until brown. Add 2 tablespoons of tomato paste, the tin of tomatoes, 1/4 cup of red wine, dried thyme and the chilli flakes and fish sauce if you’re using them. Stir, then turn the heat to low and simmer for about 20 minutes, until it’s lovely and thick.
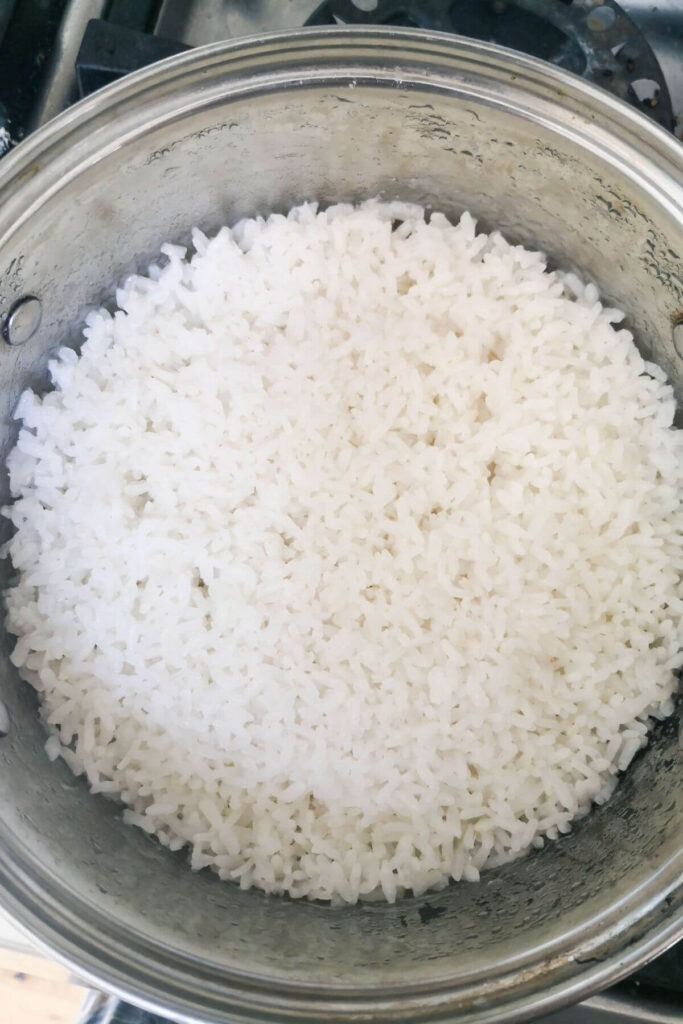
- Cook the rice. While the bolognese sauce is simmering, add 1 cup of rice to a pot you have a lid for, then add 1 teaspoon of salt and 2 cups of cold water. Set the pot over medium heat. When you start seeing foamy bubbles on top, turn the heat right down and pop the lid on for 12 minutes. After that, remove the rice from the heat and let it sit with the lid still on for another 10 minutes to finish steaming and cooking. Leave it to cool slightly before adding the other rice ingredients. PRO TIP: If you don’t have a pot with a lid, use a wooden board or a dinner plate, just be careful when you remove it if you use a plate as it will be hot.
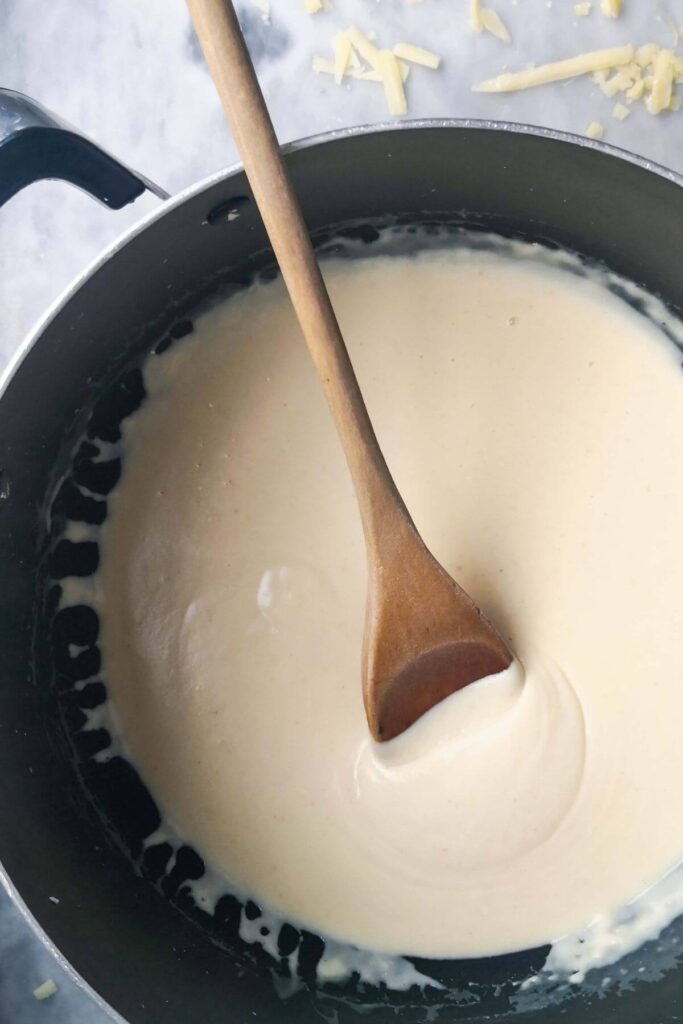
- Make the cheesy bechamel sauce. You can do this while the rice and bolognese are cooking. Melt 2 tablespoons of butter in a saucepan, then add 2 tablespoons of flour. Whisk into a thick paste (roux) and cook and stir for another couple of minutes so the raw flour cooks. Slowly pour in the milk, whisking as you go. Keep pouring and whisking as the sauce thickens up. Once it’s thick, remove from the heat and add 1 cup of grated cheese, a good grind of black pepper and the chilli flakes. Stir as the cheese melts into the sauce. Taste, and season with salt if needed (this will depend on the saltiness of the cheese you use).
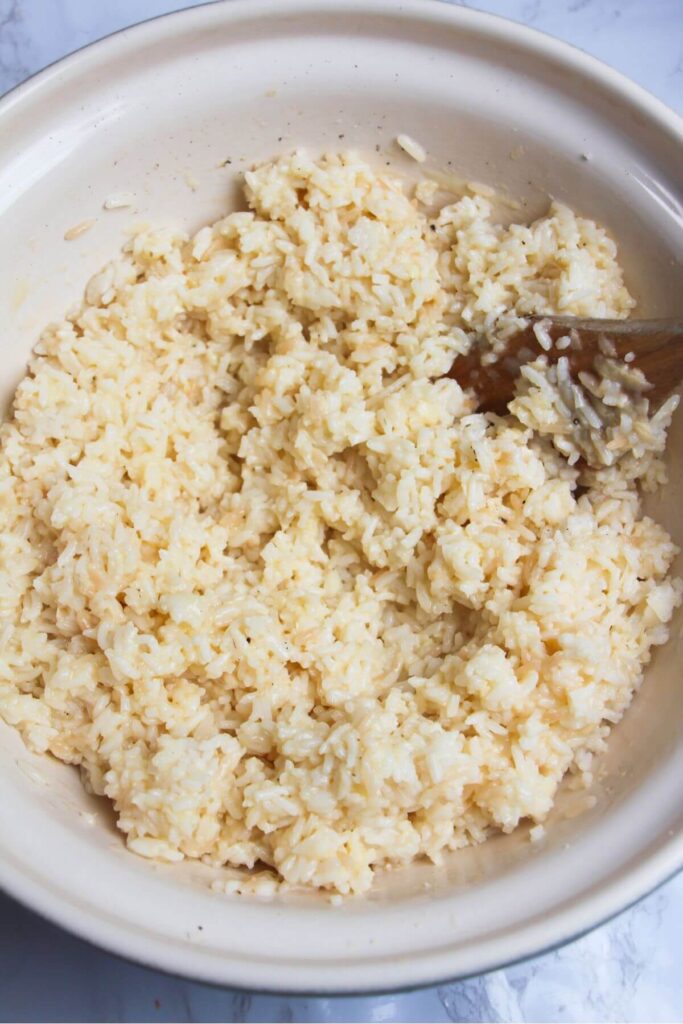
- Mix the rice. Once your rice has cooled slightly, add 1 tablespoon of melted butter, the crushed garlic, ½ cup of grated parmesan and the whisked egg to it, and mix really well so that every grain is coated. PRO TIP: Make sure your rice isn’t steaming hot when you do this – if it is, your egg may scramble.
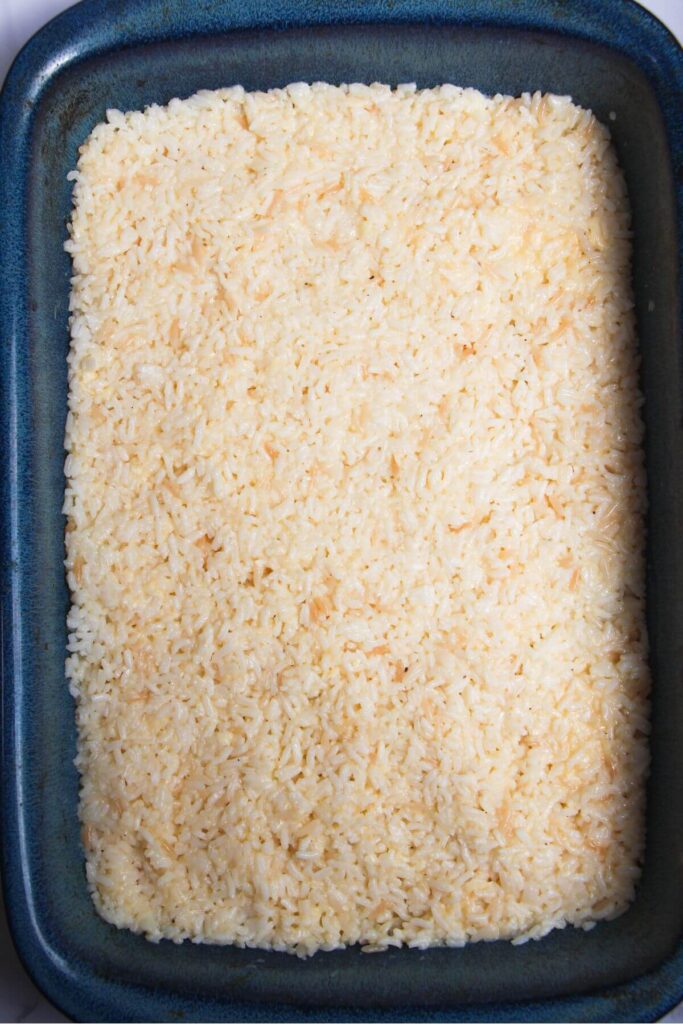
- Assemble and bake. Grease your oven dish with butter or olive oil and heat your oven to 180C/360F fan. Transfer the rice to the dish and use the back of a spatula to press it out onto an even layer that covers the entire base of the dish. Press down to flatten it into the dish. Spoon the bolognese sauce on top, again using a spatula to press it right into the edges and all over the rice. Finish by pouring the cheesy bechamel sauce on top, using the back of a spoon to smooth it over the bolognese layer. Scatter over the remaining cheese, then transfer to the oven and bake for 30 minutes. The top should be deeply golden brown and you should see the sauce bubbling up the sides. At this point, carefully remove it from the oven.
- Slice and serve. Leave it to cool for about 10 minutes, then dollop over the basil pesto and fresh basil leaves if you’re using them, then slice and serve while the cheese is gooey and molten.
Notes
PREP AHEAD: Every element of this bake can be made ahead of time (and makes assembly even easier). The bolognese will keep well for 5 days in the fridge, the cheesy bechamel will be fine for 4 days, and the cooked rice will keep well for 2 days (don’t mix it with the egg and cheese until you want to bake it though). You can either make the separate elements, then assemble and bake later, or assemble the whole thing, pop it (covered) in the fridge, and bake it within 2 days.
INGREDIENT NOTES: To add more vegetables, I often stir a couple of big handfuls of spinach leaves into the bolognese sauce once it’s nearly finished (or throw in some frozen spinach). You can also layer in spinach leaves when you assemble the bake – I like to put it on top of the rice layer, then pour the bolognese on top.
SERVING SUGGESTIONS: I like a fresh arugula (rocket) salad on the side (just drizzle a couple of handfuls of arugula with a little olive oil, balsamic vinegar and a little salt and pepper). You could also serve this with fresh bread, like this soft focaccia or rosemary parmesan bread, with roasted garlic butter or confit garlic on the side.
- Prep Time: 10
- Cook Time: 50
- Category: comfort food
- Method: oven
- Cuisine: american
Nutrition
- Serving Size: 1 slice
Keywords: bolognese bake


Made this last night – the kids loved it (and so did we!) Have stacks of leftovers too for lunch today
★★★★★
Yay!! So happy you all loved it x