Is there anything more fun and festive than a crispy, cheese-stuffed, tear and share Christmas tree pastry party centrepiece? Just spread sundried tomato pesto onto puff pastry, top with loads of cheese then cover with more pastry, cut your tree out and bake. Easy, SUPER impressive and perfect for entertaining.

This is such a fabulous one to serve up at any Christmas party or for Christmas day grazing – it’s simple to prepare, quick and can be prepped up to a day in advance.
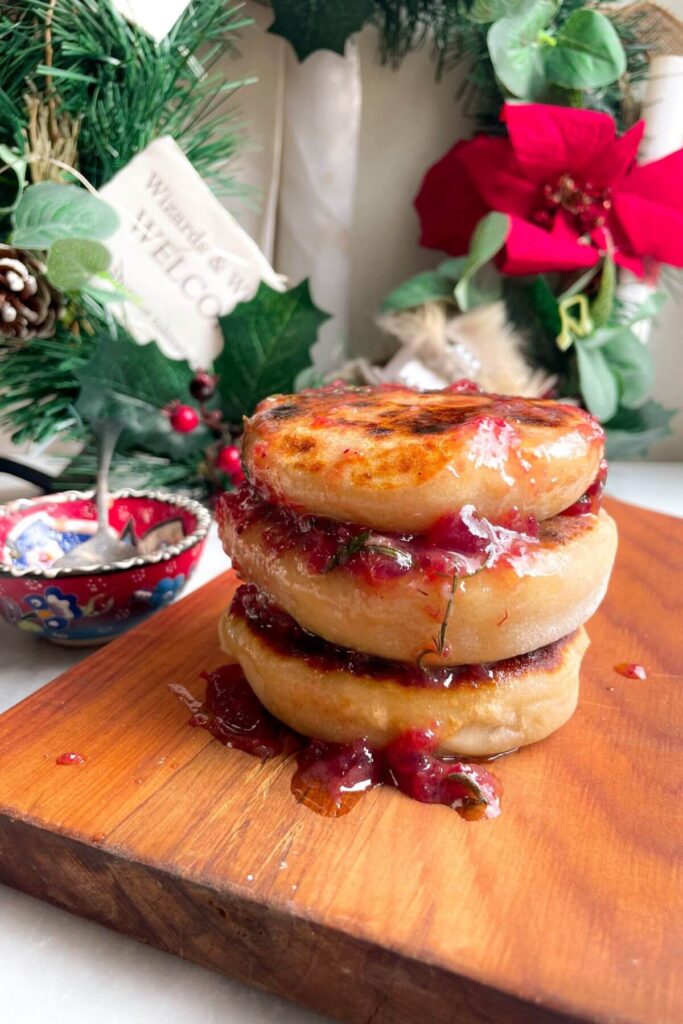
I’ve gone for sundried tomato pesto filling here because I think it’s just so gorgeous and festive (that red!) and it brings SO much flavour to the tree. It also uses store cupboard ingredients that are available all year round. A three-cheese blend (hello mozzarella, gruyere and parmesan) fills things out to make a super cheesy, super savoury party snack everyone will love. A drizzle of sweet chilli jam and a scattering of chopped rosemary finish it off to add another layer of festive colour.
I love to use the pastry that gets cut away to make cute little Christmas shapes to decorate the tree with.
Ingredients
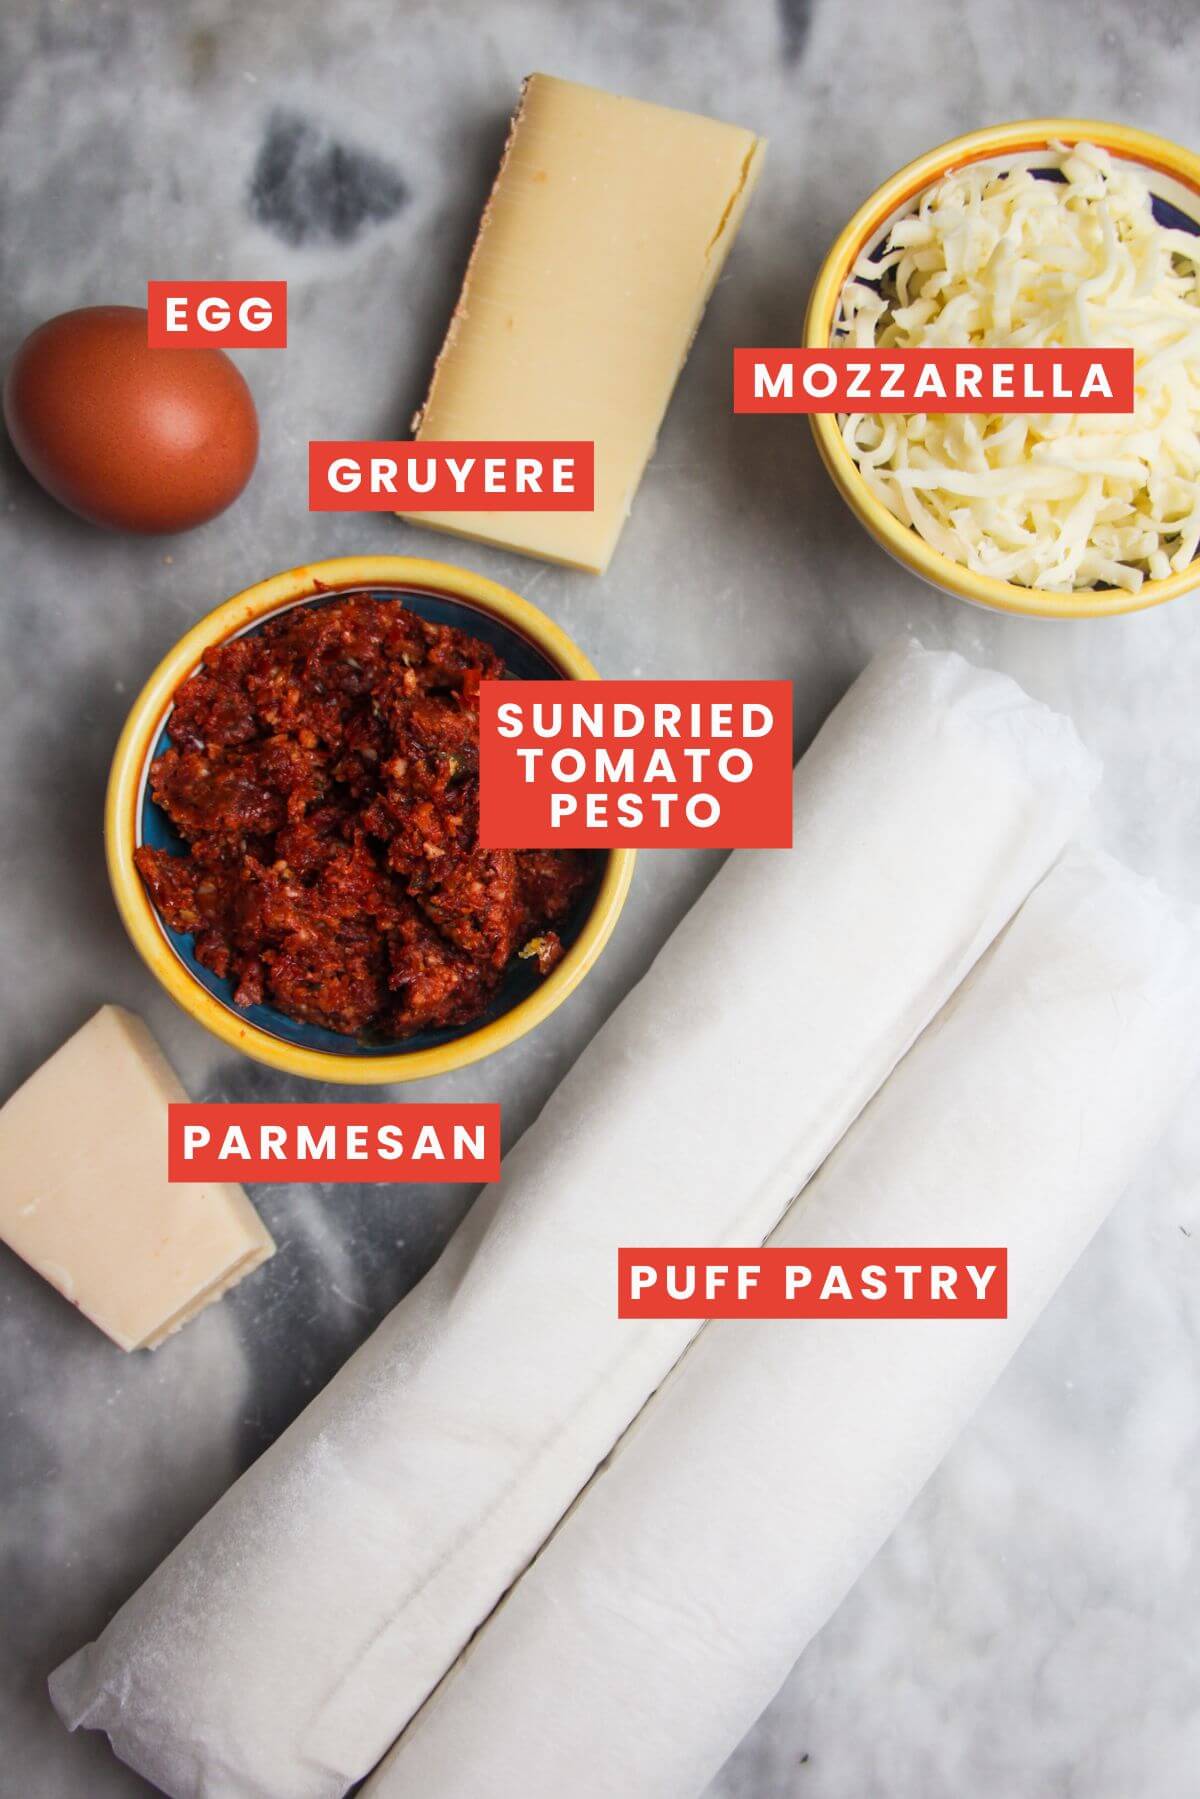
- Puff pastry. You’ll need two sheets of puff pastry to make the tree – if you can find it, go for all-butter puff pastry for the best flavour.
- Sundried tomato pesto. I LOVE how festive this makes the tree look, and it’s a delicious alternative to your typical basil pesto. But, you can absolutely use regular basil pesto if you prefer.
- Cheese. I’m using a mix of grated mozzarella (pre-grated is fine), gruyere and parmesan. I like to mix something mild and stretchy (mozzarella) with something strongly flavoured (gruyere and parmesan in this case) but you can play around based on what you like. Blue cheese, manchego, cheddar or pecorino would be great alternatives.
How to make it
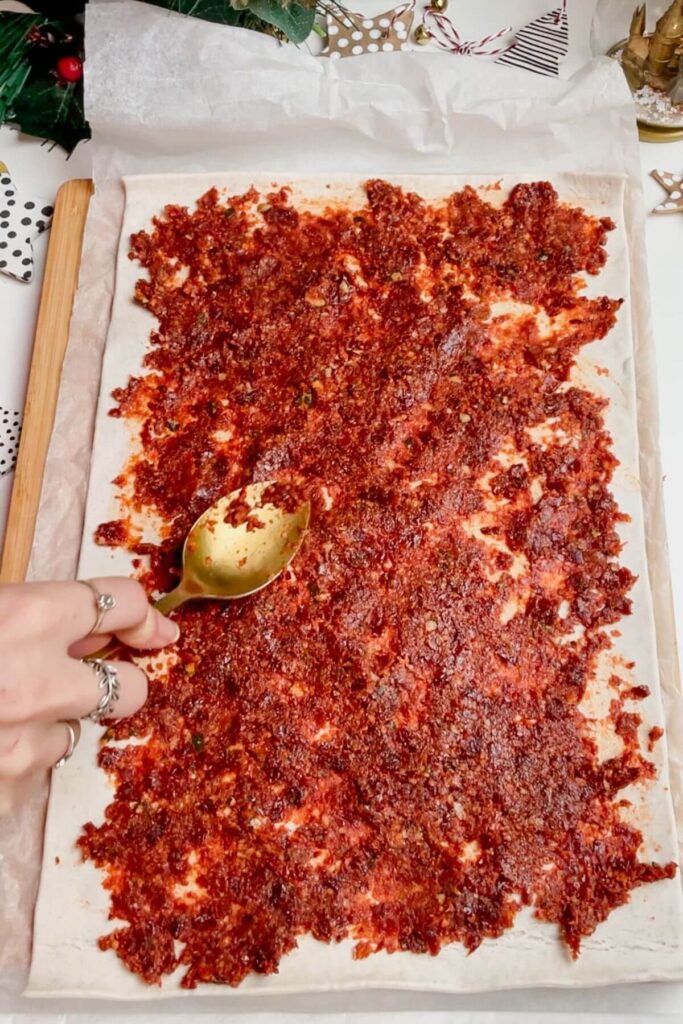
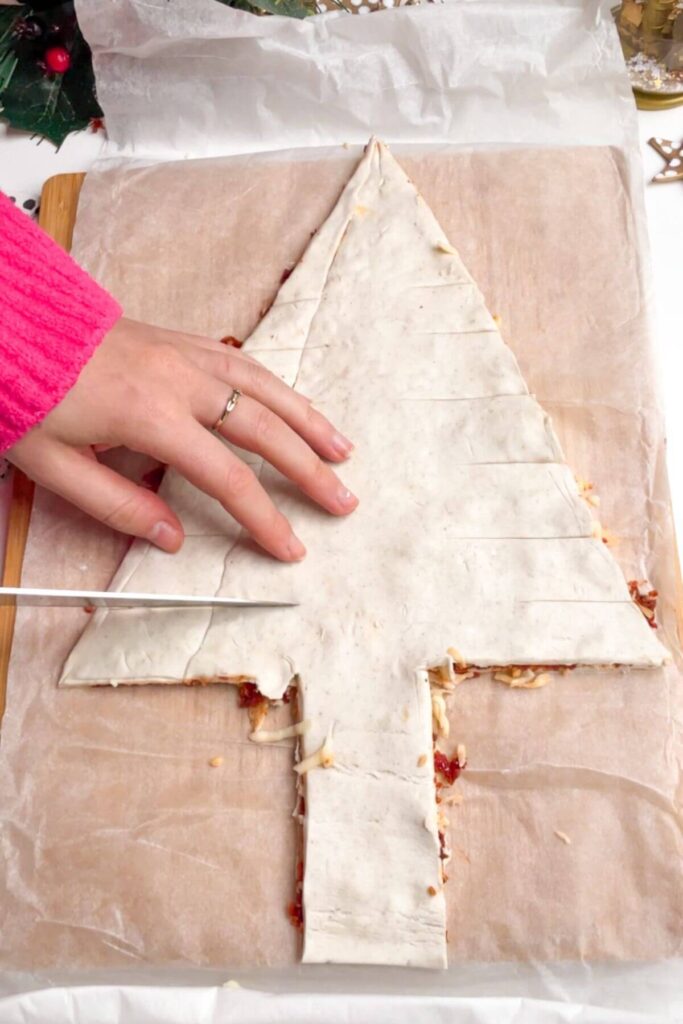
Spread your sundried tomato pesto over one puff pastry sheet, then top with the three-cheese mix. Lay the other sheet of pastry directly on top, then use a sharp knife to make two diagonal cuts down the pastry, to create a rough triangle.
Make two slices into the bottom of your triangle, leaving about two inches in the middle still attached to the triangle tree. This is your trunk. Without slicing into the middle, make small cuts into the triangle tree, to form your branches. Don’t worry if this gets a little messy – it will still look and taste great even if it’s a little uneven!


Gently twist your branches around a couple of times (the same way you’d twist a puff pastry cheese straw). Use the sliced-off pieces of pastry to cut out Christmas shapes to decorate your tree – I’ve mainly gone for stars on the tree itself, with a couple of little Christmas trees to bake separately. I use mini cookie cutters for this (I picked up this set from Amazon which is super useful) but you could also cut out stars by hand.
Brush the tree with egg wash, then place your decorations all over the tree. I like to make a bigger star to place on top of the tree, and then decorate the rest of it with smaller shapes. Brush the decorations with egg wash, then bake until super golden and crispy.
PRO TIP: If you have a lot of excess pastry left over, don’t waste it! Either cut them into little shapes and bake them with the tree, or twist them into mini cheese straws.


Got a question?
Of course! Use Nutella or Biscoff spread instead of the pesto and cheese for a sweet version, then dust it with icing sugar once it’s baked.
You can assemble the tree, cover it with clingfilm and store it overnight in the fridge. Then, pop it into the oven when you’re ready to serve.
You could use basil pesto rather than sundried tomato pesto, or use sweet chilli jam, bacon and blue cheese (like these gorgeous cheese twists do).
Like this recipe? You’ll love these festive party food ideas too


If you make this recipe, I’d love to hear from you! You can leave me a comment below.
Print
Cheesy Puff Pastry Christmas Tree
- Total Time: 35 minutes
- Yield: 10 servings 1x
- Diet: Vegetarian
Description
Is there anything more fun and festive than a crispy, cheese-stuffed, tear and share Christmas tree pastry party centrepiece? Just spread sundried tomato pesto onto puff pastry, top with loads of cheese then cover with more pastry, cut your tree out and bake. Easy, SUPER impressive and perfect for entertaining.
Ingredients
For the Christmas tree –
- 2 sheets of ready-rolled puff pastry
- 1/2 cup sundried tomato pesto
- 1 cup grated mozzarella
- ½ cup grated gruyere
- ½ cup grated parmesan
- 1 egg, whisked
Optional, to serve –
- 2 tablespoons sweet chilli jam (or hot honey sauce)
- 2 sprigs of rosemary, chopped
Instructions
- Prepare the pastry. Heat your oven to 200C/390F. Roll the first sheet of puff pastry out onto a large wooden board. Keep it on the baking paper it’s wrapped in – this way you can easily move it to a baking tray when you’re ready to bake it. Use the back of a spoon to spread the pesto all over the pastry, then scatter the mozzarella, gruyere and parmesan evenly over the pesto. Lay the second sheet of pastry on top and press gently to seal the layer.
- Cut your Christmas tree out. Use a ruler to guide you and make two even slices down the sides of your pastry, to form a rough triangle (it won’t be perfect at the bottom so don’t worry too much). Remove the excess pastry (but don’t throw it away).
- Form your branches and trunk. Leaving at least a couple of inches at the bottom for your trunk, make slices into your triangle, to create your branches. Don’t slice all the way through your tree – you want to leave a couple of inches in the middle for your trunk. Gently twist each strip around a couple of times to create your branches. Slice down below the bottom twisted branches, to create your base trunk.
- Make your decorations. Use the excess pastry you set aside to make little decorations for the tree. I like to use mini cookie cutters to do this (I bought this set from Amazon which is great). Make one larger star to place at the top of your tree, then cut out little stars and other Christmas shapes to place all over the tree. If you have leftover excess pastry, cut out more shapes and bake them next to the tree.
- Bake the tree. Brush the tree all over with the whisked egg, then place the stars all over the tree, and brush those with egg wash too. Bake for 25 minutes, until deeply golden brown and crispy. Remove from the oven, then drizzle with sweet chilli jam if you like, and scatter with the chopped rosemary. Serve while hot, crispy and oozy.
Notes
PREP AHEAD: You can assemble the tree, cover it with clingfilm and pop it into the fridge for up to 24 hours, then just bake it when you’re ready.
INGREDIENT NOTES: You could use regular basil pesto (or wild garlic pesto) instead of sundried tomato if you like, or use chutney or jam like sweet chilli jam or fig and tamarind chutney. Use whatever cheese you like – blue cheese, manchego or smoked cheddar would be lovely.
STORAGE INSTRUCTIONS: The tree is best enjoyed hot and crispy from the oven, but it’s still lovely cold as well. It’ll keep well for 3 days, stored in an airtight container. After this it will start tasting a little stale.
- Prep Time: 10
- Cook Time: 25
- Category: appetizers
- Method: oven
- Cuisine: american
Keywords: christmas tree pastry


this was such a hit!! thank you
★★★★★
Yayy! So pleased to hear that x