You’d never guess that this lusciously creamy roasted cauliflower cheese soup uses no cream at all! It’s silky smooth, ultra cheesy, and made with simple, everyday ingredients. Ready in under an hour with minimal hands-on time, it’s perfect cozy-season food. Top with a drizzle of chili oil and serve with crusty bread for a wonderful, warming bowl of good-for-you comfort.

Right, I know cauliflower soup may not sound very exciting, but I promise this one is SERIOUSLY tasty. Cauliflower and cheese are a classic flavor pairing, and it’s easy to see why.
This roasted cauliflower cheese soup is unbelievably creamy… with no cream in sight. So many recipes add loads of cream or potato to get that silky smooth texture, but after testing this recipe multiple times, I can confidently say it doesn’t need it. Plus, it comes together in under an hour and is incredibly easy.
The soup is delicious on its own, but adding some lovely fresh bread is always a good idea. I love it with this easy no-knead chili cheese focaccia, no-knead rosemary parmesan bread, or no-knead seeded bread. For a little extra texture, try adding a few crunchy parmesan crisps on top.
Why You’ll Love This Roasted Cauliflower Cheese Soup
- Ultra creamy, without cream. When soft and tender, cauliflower blitzes into a luxuriously smooth soup that combines perfectly with sharp cheddar, creating a bowl that’s still super rich and creamy, but feels lighter and is low-carb to boot.
- Easy and hands-off. From prep to table in under an hour, and most of that time is hands-off while the oven does all the hard work.
- Deep, roasted flavor. An extra step that’s absolutely worth it. The nutty, caramelized flavors you get from roasting the cauliflower and garlic add a depth of flavor you just can’t get by boiling.
- Versatile crowd pleaser. Perfect for weeknight dinners, meal prep, working from home lunches, or cozy dinner parties, and fabulous for freezing.
- Make it your own. Top the soup with spicy chili oil, crunchy parmesan crisps, crispy chorizo or bacon, or stir through shredded rotisserie chicken or white beans to up the protein content.
Ingredients You’ll Need
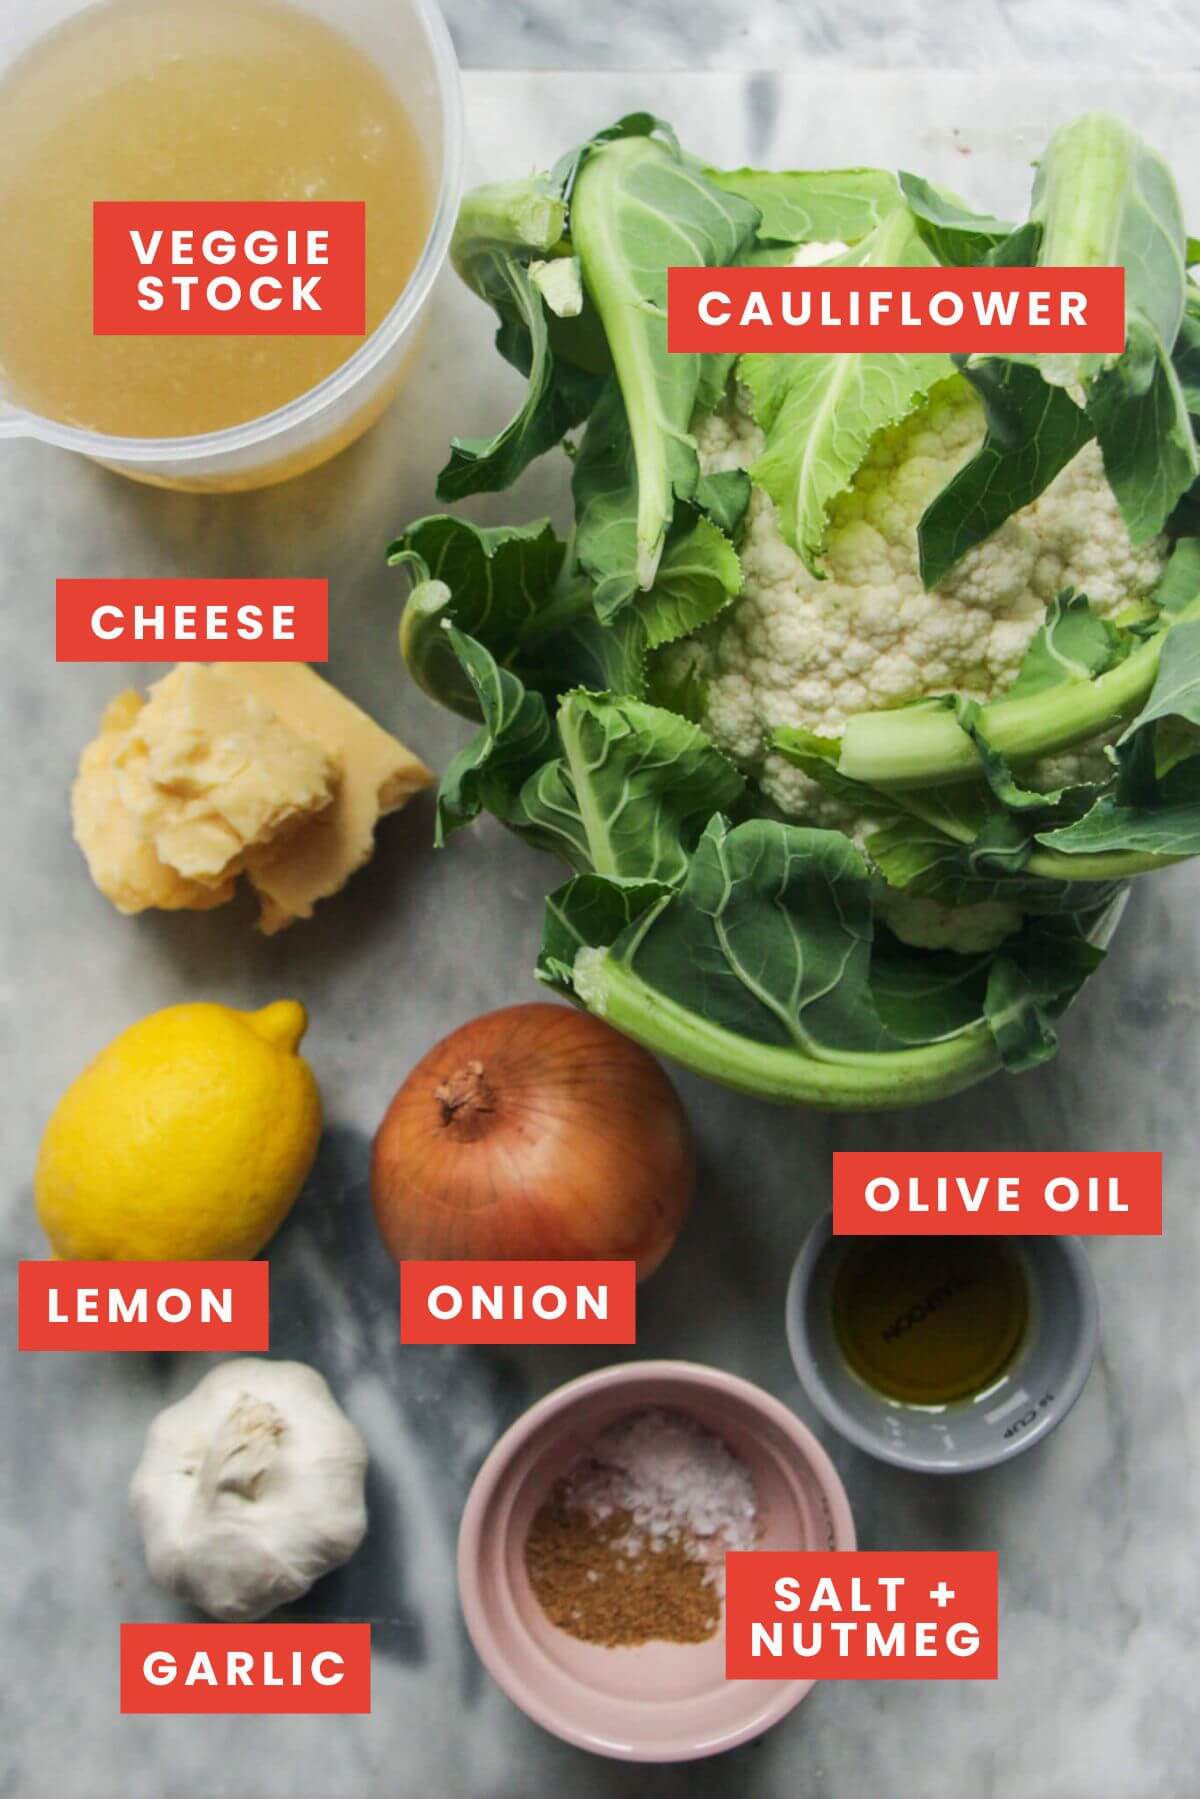
- Cauliflower. One large head of cauliflower works perfectly – roughly 4 cups of florets. Don’t throw away the stem; you can chop it up and use it too.
- Cheese. You want a strong, sharp cheese here – I like sharp cheddar or Gruyere. Creamy blue cheese is also lovely. This is the key for making the soup taste indulgent, without the cream. I recommend grating the cheese yourself – the pre-shredded stuff from the grocery store won’t melt as well into the soup (it’s often coated with an anti-caking agent to stop it sticking together in the packet).
- Vegetable or chicken stock. Either works well. You can use water if you don’t have stock, but add a little extra salt or a little white miso paste to bring out the flavor.
- Garlic. A whole head of roasted garlic adds sweetness and depth. If you’re skipping the roasting step, add 3 crushed garlic cloves to the pot when you cook the onion.
- Lemon juice. Along with salt, acid is key to bringing out the flavor of the cauliflower, and balances the richness of the cheese.
How to Make Roasted Cauliflower Cheese Soup
This is a step-by-step photo overview of how to make cauliflower cheese soup – the full recipe with ingredient quantities and instructions is at the bottom of the page for you.
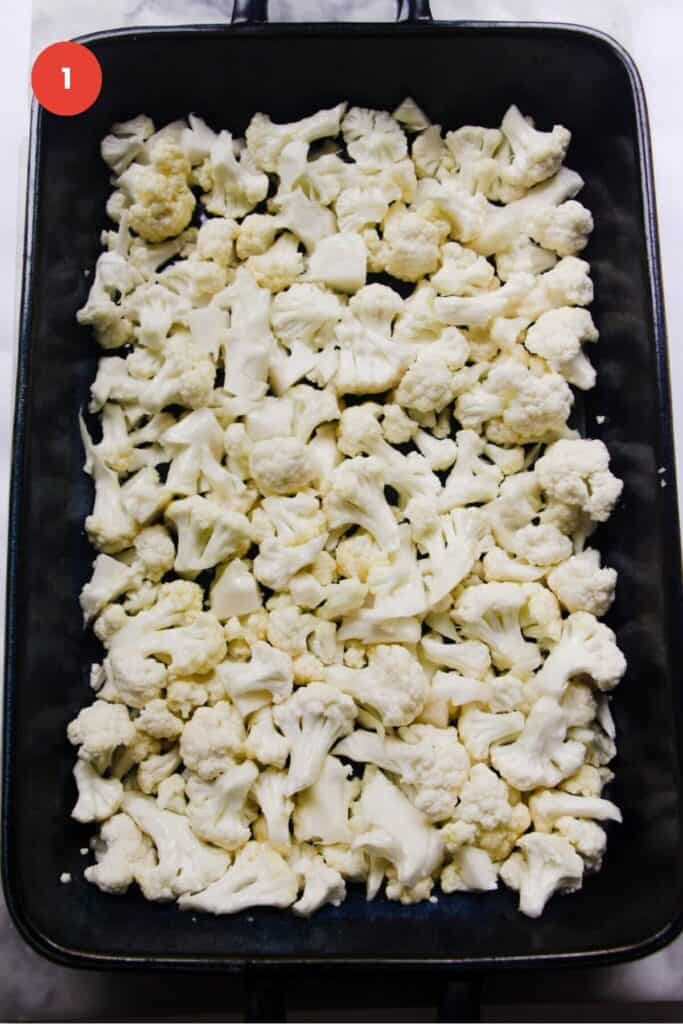
1. Arrange your cauliflower florets in a baking dish, then toss with salt and olive oil.
PRO TIP: I find it easier to cut through the cauliflower stem and then break off the florets with my hands, rather than try to chop them up. One of my biggest kitchen pet peeves is the little cauliflower bits that go everywhere when you chop them, and this avoids that.
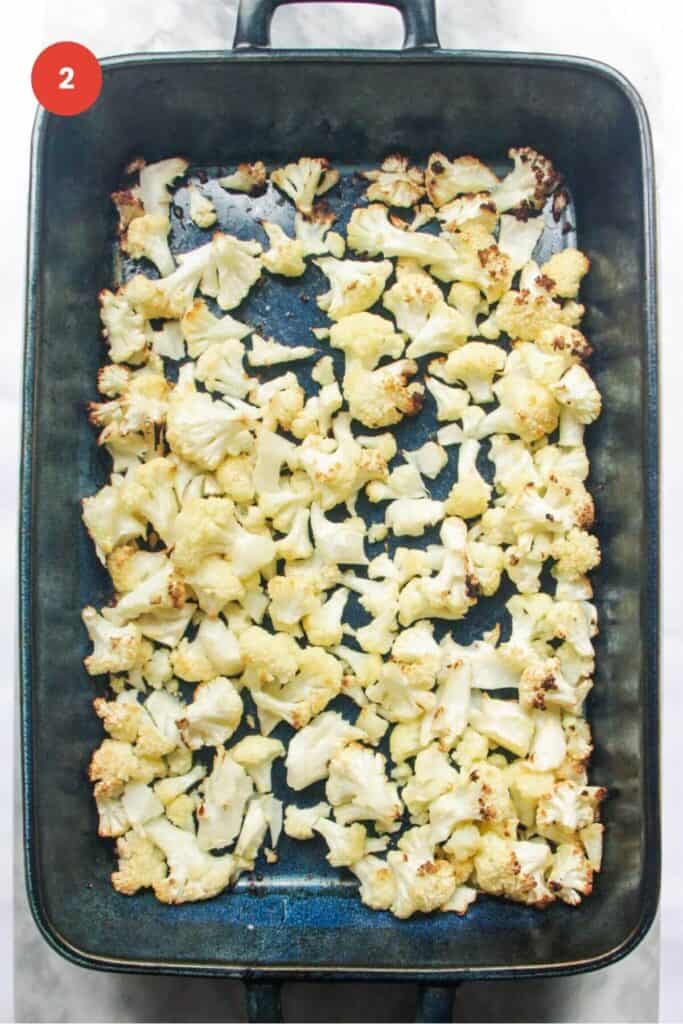
2. Roast the cauliflower until gorgeously charred around the edges.
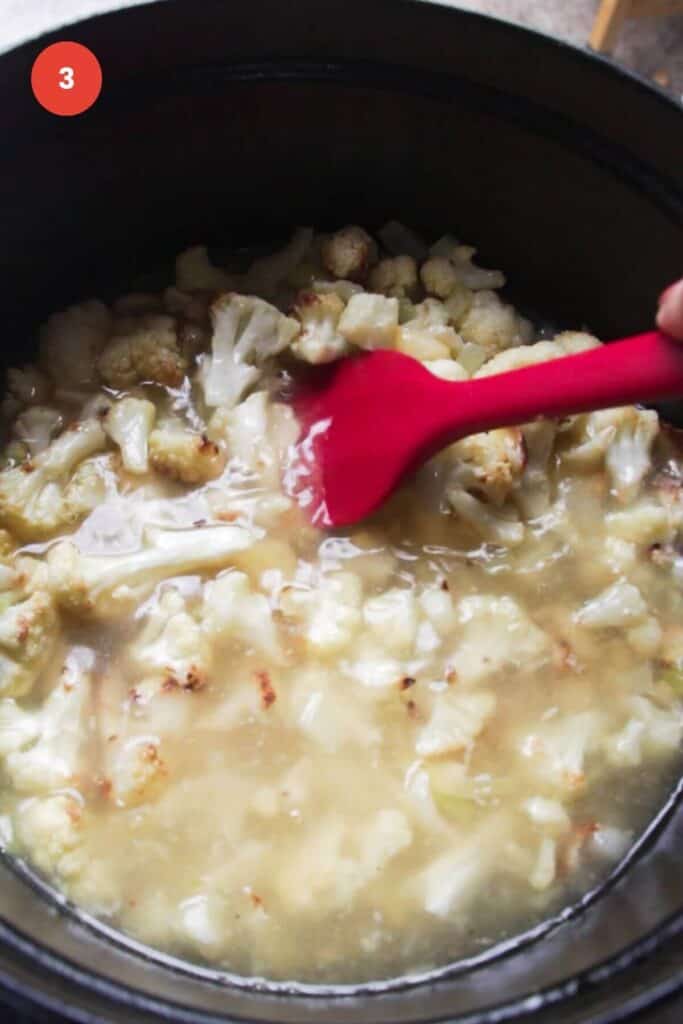
3. Meanwhile, cook your onion until it softens. Then add the stock, roasted cauliflower, and garlic. Bring to a simmer.
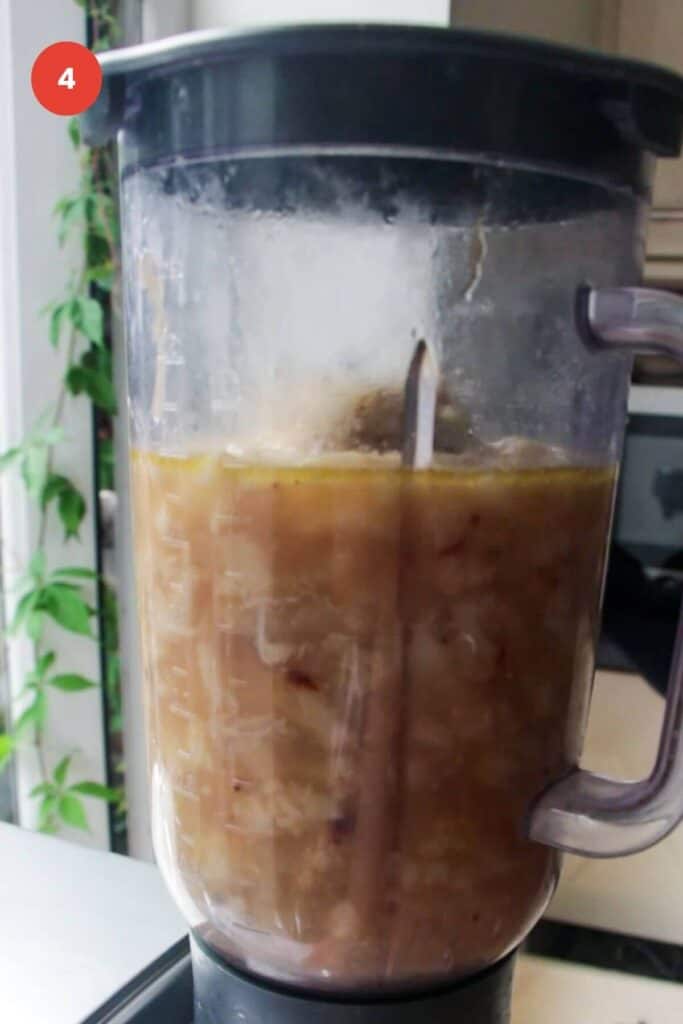
4. Either blitz the soup in a stand blender or use an immersion blender. An immersion blender is easier and creates less washing up, but you’ll get a silkier result in a regular stand blender.

5. Reduce the heat, then add your grated cheese to your soup, and stir it through as it melts into it. Taste, then season with the lemon juice and a little more salt if you think it needs it.

6. Divide the hot soup between bowls, then add your desired toppings. I recommend chili oil and a little extra cheese, but you can play around here based on what you like. Serve with crusty bread for a lovely, cozy meal.
Roasted Cauliflower Cheese Soup FAQs
Yes! It freezes really well. Let it cool completely, then store it in airtight containers or zip-lock bags for easy storage and quick defrosting. You can defrost on the stovetop, in the microwave, at room temperature, or in the fridge overnight.
You can really get creative! I love using a strong, sharp cheddar so you can properly taste it, and it melts beautifully to give the soup that rich, cheesy flavor. Gruyere, Parmesan, or Manchego are also excellent choices. Or, use a creamy blue cheese if you like it.
Avoid pre-shredded cheese if possible – it’s often coated with anti-caking agents, which can prevent it from melting properly into the soup.
You can, but roasting it brings out a gorgeous, nutty, deep flavor that you can’t replicate with boiling.
Yes! It works well and skips a step, so it’s a great option. Just spread it on your baking dish or baking sheet, and roast it slightly longer than fresh to get those beautiful caramelized, charred edges.
Yes, it can – you’ll just need to switch out the cheese. Swap it for a plant-based cheese, or use nutritional yeast. Adding a little white miso paste can also help you achieve a gorgeous, deep flavor, without the cheese itself.
Like this recipe? Here are more comfort food favorites to try


If you make this recipe, I’d love to hear from you! You can leave a recipe rating and a comment below. And remember to tag @DishedByKate on Instagram, Facebook and TikTok if you’ve made one of my recipes. Seeing your recreations really makes my day 😊.
Print
Roasted Cauliflower Cheese Soup (No Cream)
- Total Time: 55 minutes
- Yield: 4 servings 1x
- Diet: Vegetarian
Description
You’d never guess that this lusciously creamy roasted cauliflower cheese soup uses no cream at all! It’s silky smooth, ultra cheesy, and made with simple, everyday ingredients. Ready in under an hour with minimal hands-on time, it’s perfect cozy-season food. Top with a drizzle of chili oil and serve with crusty bread for a wonderful, warming bowl of good-for-you comfort.
Ingredients
For the soup –
- 1 large head of cauliflower
- 3 tablespoons olive oil
- 3 teaspoons salt
- 1 whole head of garlic
- 1 white onion, diced
- 4 cups vegetable or chicken stock
- 2 tablespoons lemon juice
- 1 cup grated cheese (I like using sharp cheddar)
- 1/4 teaspoon ground nutmeg
To serve –
- Reserved roasted cauliflower florets and leaves
- 1 tablespoon chili oil (try this 30 minute chili oil) or olive oil
- 2 tablespoons crumbled cheese
Equipment –
- Blender or immersion (stick) blender
Instructions
- Prepare your cauliflower. Start by heating your oven to 425°F (220°C fan). Chop your cauliflower into bite-sized florets. Don’t throw the stalk or leaves away! Chop the stalks up to roast, and set aside the small leaves. Add the cauliflower florets and chopped stalks to an oven dish or parchment paper-lined oven tray. Drizzle with 2 tablespoons of olive oil and 1 teaspoon of salt.
- Roast the cauliflower. Give the cauliflower a good mix so it’s well coated in oil and salt. Cut the whole head of garlic in half, so you’re cutting across the cloves. Drizzle the exposed cloves with 1 tablespoon of olive oil, then wrap in a piece of aluminum foil. Transfer the cauliflower and garlic to the oven, then roast for 30 minutes. You want the cauliflower to be slightly charred on top and the garlic to be soft and squeezable.
- Cook the onion. While the cauliflower and garlic are roasting, add 1 tablespoon of olive oil to a large pot over medium heat, then add the diced onion and ½ teaspoon of salt. Cook, stirring, as the onion starts to soften. If you find it starts to burn, add a splash of water to slow the cooking down. Once the onion is soft, pour in 4 cups of stock.
- Simmer the soup. Remove the cauliflower and garlic from the oven, then set aside a handful of the florets to scatter on top of your finished soup. Transfer the rest into the pot with the onion and stock. Leave the garlic to sit for a few minutes to cool slightly before squeezing the cloves out of their skins and adding them to the pot. Simmer for 10 minutes to soften the cauliflower further and for the flavors to meld.
- Roast the cauliflower leaves (optional). While the soup simmers, add the reserved cauliflower leaves to the empty oven dish and drizzle with a little olive oil. Roast for 5 minutes until the leaves are a little charred, then set aside.
- Blend the soup. You can use either an immersion blender or a stand blender for this step. If you’re using a stand blender, you’ll want to let the soup cool slightly before adding it to your blender. Blitz for a couple of minutes, then add 2 tablespoons of lemon juice, 1 ½ teaspoons of salt, and the ¼ teaspoon of nutmeg, then blitz again until super smooth and creamy.
- Add the cheese. Pour the soup back into the pot (if you’ve used a stand blender), then add the cheese and stir so it melts into the soup. Taste, and add a little more lemon juice or salt if it needs it – the salt level will differ based on the cheese you use, so taste it and see. If it tastes like something is missing, it needs a little more salt and lemon juice. Add little bits at a time, as it’s easy to add too much. Divide between bowls, top with a little more crumbled cheese, the reserved cauliflower florets and leaves, then drizzle with chili or olive oil.
Notes
SAVE TIME: I love the added flavor you’ll get through roasting the cauliflower; HOWEVER, you can skip this step if you’re low on time. Just add the florets straight into the pot with the onion and stock and simmer for 15 minutes until soft and tender. If you’re doing it this way, add 3 crushed garlic cloves to the pot along with the onion.
STORAGE INSTRUCTIONS: This soup keeps well in an airtight container in the fridge. It will last for 5 days, so you can use it throughout the week – it makes a wonderful lunch. You can also freeze the soup. I like to portion it into zip-lock bags for easy storage and quick defrosting. You can defrost in a pot on the stovetop, in the microwave, or let defrost at room temperature or overnight in the fridge.
INGREDIENT NOTES: Make sure you shred your own cheese here – pre-shredded cheese comes with a coating (usually corn or potato starch) to prevent it from sticking together in the packet. This means it won’t melt as seamlessly into the soup and could end up grainy.
MAKE IT YOUR OWN: Play around with your toppings – crispy bacon, chorizo, or crumbled sausage makes for an excellent addition. You can also bulk it out and add extra protein by stirring through shredded rotisserie chicken, white beans, or chickpeas, to serve.
- Prep Time: 10
- Cook Time: 45
- Category: soups
- Method: stove top
- Cuisine: british
Nutrition
- Serving Size: 1 bowl
- Calories: 229
- Sugar: 4.5g
- Sodium: 355mg
- Fat: 15.25g
- Saturated Fat: 6.1g
- Unsaturated Fat: 8.9g
- Trans Fat: 0g
- Carbohydrates: 15g
- Fiber: 3.6g
- Protein: 10g
- Cholesterol: 26mg


I was skeptical about the no cream, but it totally works!! Tastes like loaded potato soup without the heaviness, thank you. I added crispy bacon on top