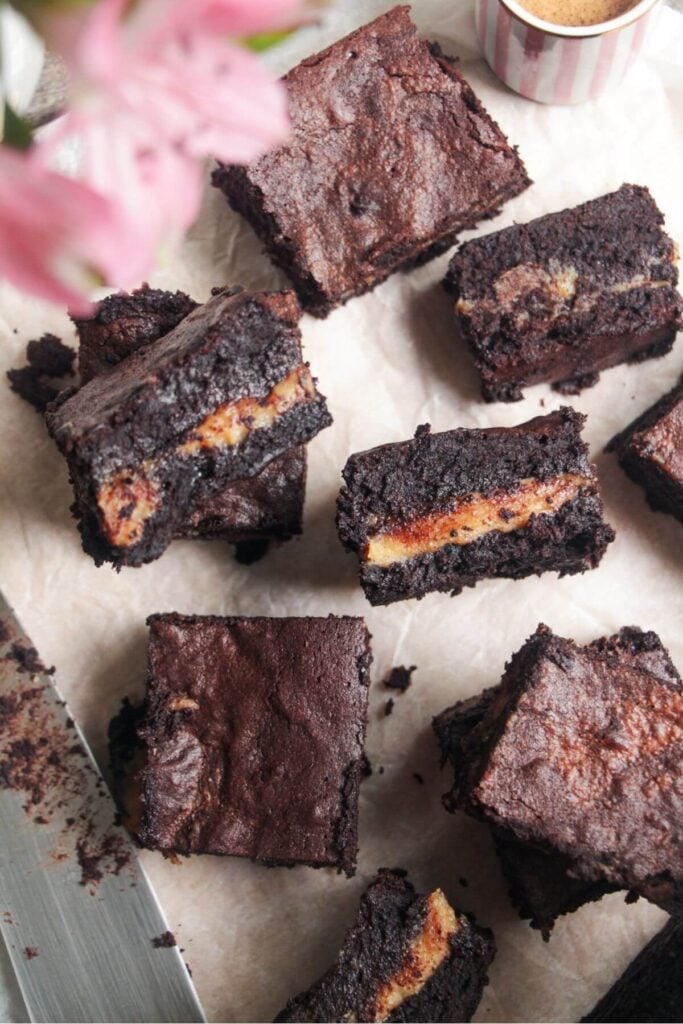
If you’re looking for a super fudgy brownie, sandwiched with a luscious salted caramel, you’ve come to the right place. These salted caramel brownies are wickedly delicious. So moist, rich and perfectly balanced with salty-sweet flavors. You’re going to love them.

A brownie is good, but an intensely fudgy dark chocolate brownie, stuffed with luscious, gooey salted caramel? YES PLEASE.
This recipe uses an easy cheat salted caramel that comes together in less than five minutes. A classic caramel is made by melting sugar to a specific temperature before adding butter and cream.
The problem with this is you need a candy thermometer to make sure you’re doing it right – it’s so easy to not cook the caramel long enough, or take it too far so it burns and solidifies. It’s also fiddly – you have to be careful that the sugar doesn’t crystallize. Basically, it’s a lot of work! This cheat’s version uses condensed milk as a super quick shortcut to a delicious caramel that thickens up gorgeously.
I’m also sharing a few tips and tricks to help you bake a delicious, fudgy brownie every time. No cakey, dry brownies in sight! The recipe makes a big batch, but the brownies freeze well and will last for at least a week stored in a sealed container at room temperature or even longer in the fridge.
Ingredients
Everything you need for these brownies you’ll easily be able to pick up at a store.

- Dark chocolate. I love using dark chocolate with at least 70% cocoa content. I’ll usually use the Lindt 70% cocoa dark chocolate. If you’re lucky enough to be in New Zealand, Whittaker’s 72% dark Ghana chocolate is the best one to use.
- Sweetened condensed milk. This one is key for the cheat’s salted caramel. If you’ve not used it before, sweetened condensed milk is exactly what it says on the tin – milk that’s been condensed (most of the water is cooked out to create a concentrated flavor), and sugar is added. It essentially can be used in place of anything that calls for sugar and cream (making it perfect for caramel). This recipe uses a whole tin to minimize waste!
- Butter. I’m using unsalted butter in this recipe, but use salted if that’s what you can find. It’s generally not salty enough to make a big difference in this recipe, so don’t worry about ending up with salty brownies. Another bonus about this recipe is that you can use it straight from the fridge – no need for it to be at room temperature.
- Cocoa powder. You can use any cocoa powder here – regular or Dutch-processed. You can use cacao powder instead – just be aware that it’s got a slightly different flavor so it’s not quite as chocolatey.
- Flour. Plain, all-purpose flour is fine here.
- Eggs. Always free range, and at room temperature here if possible.
- Sugar. I’m using a combination of white caster (superfine) sugar and dark brown sugar – I love the rich, caramel hit the brown sugar brings, but you could use all caster sugar if that’s what you have.
How to make them
Start by making the salted caramel. Get the condensed milk into a small pan then add golden syrup and butter. Turn the heat to low and then cook, stirring, for 3 minutes. You’re looking for the caramel to get a little more golden and thicken up slightly.
It can quickly burn so make sure you are stirring and keeping the heat on low. Once the caramel hits a thicker consistency, remove from the heat then sprinkle over the flaky sea salt. Mix it through the caramel then set it aside. PRO TIP: Taste the caramel at this point to make sure it’s salty enough for you.


Melt your butter and chocolate in a microwave-safe bowl (I find it easier to do this way rather than over the stove in a double boiler but it’s up to you!) Set it aside to cool a little.


Add your eggs and sugar into the bowl of a stand mixer (or use an electric whisk or a hand whisk). My first trick for a super fudgy, gooey brownie is to vigorously whip the eggs and sugar. That’s because the whipping means the sugar is fully dissolved and incorporated into the eggs. It also gives you that lovely crinkly, meringue-like top! Whip the eggs and sugar together for about five minutes, until they look fluffy and bubbly.
Pour in the cooled chocolate/butter mix (make sure this isn’t hot when you add it or you could end up with scrambled eggs). Whisk the mixture again, until it’s super glossy and thick. At this point, add in the dry ingredients. I like to measure them out in a separate bowl, and then use a sieve to sift them in.
Finally, you’re going to ‘fold’ the mixture together. The easiest way to describe this is to perform a figure of 8 movement in your bowl with a large spatula. You want to slowly perform this move, scooping up from underneath to ensure everything is mixed well. You want to do this gently to keep the airiness you just spent time creating by whisking the eggs. Once the ingredients are JUST mixed, it’s time to assemble the brownie.


Pour about half of your brownie mixture into a lined dish, smoothing it out so it coats the base. Follow with the salted caramel, smoothing it out to cover the brownie layer. Finish with the rest of the brownie mix and spread it out across the caramel. Don’t worry if it’s a little messy and the caramel gets mixed in with the brownie – it will have a gorgeous marbled look and taste delicious. Bake for about 35 minutes, then (if you can!) leave to cool completely before cutting and devouring.
My second trick for a perfectly fudgy brownie is to slightly UNDERBAKE it. The brownies will keep cooking and setting as they come out of the oven and cool, so by the time that’s happened, they’ll be at the perfect consistency. It’s also important to let it cool because if you cut into it too soon, it’ll be tricky to cut cleanly and will fall apart. You can pop the dish in the fridge if you like – this will make the slicing even easier.


Got a question?
I like using super dark chocolate in this recipe – so anything at 70% cocoa content or above. In the UK, I use the Lindt 70% or 90% cocoa dark chocolate or the Green & Blacks 70% or 85% cocoa dark chocolate. And in New Zealand, I ALWAYS use Whittaker’s (the 72% dark Ghana is where it’s at).
Baking is very precise, so I wouldn’t recommend tinkering with the quantities here because you won’t get the same result. Sugar isn’t just present in baking for sweetness – it plays a crucial role in keeping things moist and fudgy, which is key here. No one wants a dry brownie, which is what will happen if you reduce the sugar content.
I find these brownies will last for at least a week in a sealed container at room temperature, and even longer in the fridge. You can pop them in the microwave for 15 seconds to warm up slightly if you like.
You can! I’ve given instructions for this in the recipe card below and in the step-by-step instructions above – but the only part of the recipe I use a stand mixer for is whipping the eggs and sugar. You can do this with a regular electric handheld whisk or you can do it with a regular whisk, it will just take a little longer (and some elbow grease!) to get the fluffy result.
Like this recipe? Here are some more sweet recipes you might enjoy


If you make these brownies I’d love to hear what you think! You can leave me a comment below.
Print
Salted Caramel Brownies
- Total Time: 50 minutes
- Yield: 16 brownies 1x
- Diet: Vegetarian
Description
If you’re looking for a super fudgy brownie, sandwiched with a luscious salted caramel, you’ve come to the right place. These salted caramel brownies are wickedly delicious. So moist, rich and perfectly balanced with salty-sweet flavours. You’re going to love them.
Remember, if you’re looking for US measurements, use the ‘Units’ section below and click on ‘US’.
Ingredients
For the salted caramel –
- 397g sweetened condensed milk (1 can)
- 80g butter
- 3 tablespoons golden syrup
- 3 teaspoons flaky sea salt
For the brownie –
- 300g butter
- 300g dark chocolate (use one with at least 70% cocoa)
- 6 eggs, at room temperature
- 200g caster sugar
- 100g brown sugar
- 3 teaspoons vanilla extract
- 1 teaspoon salt
- 100g cocoa powder (or cacao powder)
- 150g plain flour
Equipment –
Deep 24cm x 32cm baking tray. This is my favourite baking tray to use for brownies.
Baking paper to line the tray.
Stand mixer, electric whisk or hand-held whisk.
Instructions
- Make the salted caramel. Before you start, get your oven heating to 360F/180C fan and line your baking dish. Add the condensed milk, butter and golden syrup to a small pan over low heat. Cook, stirring for about 5 minutes, until it’s thickened and looks more golden. Keep an eye on it because it can quickly burn! Once it’s thickened up, remove the pan from the heat and stir through the three teaspoons of flaky salt. Set aside while you make the brownie. PRO TIP: I like to taste it at this point to make sure it’s salty enough.
- Melt the butter and chocolate. Add 300g of butter and 300g of dark chocolate in a microwave-safe bowl and melt, at 30-second intervals in the microwave. Stir the chocolate and butter after each burst (it should take roughly three bursts of 30 seconds). You can also do this on the stovetop, with a pan set over a pot of simmering water, but I find the microwave easier and it creates fewer dishes. Let it cool slightly.
- Whisk the eggs and sugar. This is the key to getting a super soft, fudgy brownie with a crackly top. Add 6 eggs, 200g caster sugar, 100g brown sugar, 3 teaspoons of vanilla extract and 1 teaspoon of salt into the bowl of a stand mixer with the whisk attachment fitted. Whisk the mixture for at least 5 minutes – you want it to be super fluffy and bubbly. If you don’t have a stand mixer: use an electric whisk or you can do this with a handheld whisk but it will be a workout!
- Add the melted chocolate and butter. Once the egg and sugar mix looks thick, fluffy and bubbly, pour in the cooled melted chocolate and butter. It’s important to ensure it has cooled slightly because if you add hot chocolate and butter to the eggs, they could scramble. Whisk again, until the chocolate is fully incorporated. The mix will look very glossy and chocolatey.
- Add the dried ingredients. Add 100g of cocoa powder and 150g of plain flour to a small bowl, then sift them into the whisked chocolatey mix. I find it easiest and less messy to do it this way. Now you want to GENTLY combine the two into a cohesive mix. This is where a ‘folding’ technique comes in handy. The easiest way to describe this is to perform a figure of 8 movement in your bowl with a large spatula. You want to slowly perform this move, scooping up from underneath to ensure everything is properly mixed. The reason to do this gently is to keep the airiness you just spent time creating by whisking the eggs and sugar. Once the ingredients are JUST mixed, it’s time to assemble the brownie.
- Bake the brownies. Pour roughly half the brownie mixture into your lined tray and smooth it out so the whole base is coated. Pour the salted caramel on top of the brownie layer, and smooth it out across the whole surface with the back of a spoon or a small spatula. Finish by pouring over the rest of the brownie mixture, smoothing it out to cover the salted caramel. Don’t worry if the brownie mixture mixes with the salted caramel – it’ll still taste delicious. Bake for 35 minutes, then remove from the oven and let it cool slightly before slicing and devouring.
Notes
The brownies will continue to set after they’re removed from the oven which is why they do need to cool completely before you cut into them. If you cut in too soon, they’ll be tricky to slice and will fall apart. So try and be patient if you can! They’re even easier to slice if you pop the tray in the fridge.
STORAGE INSTRUCTIONS: The brownies will keep well for a week in a sealed container at room temperature, and at least 10 days in the fridge. They also freeze well – just slice and portion into zip-lock bags.
- Prep Time: 15
- Cook Time: 35
- Category: baking
- Method: oven
- Cuisine: american
Nutrition
- Serving Size: 1 brownie