Once you realise how easy it is to make labneh, you’ll be making it over and over again. This creamy, thick, tangy strained yogurt is incredibly versatile – use as a dip, dollop over salads or flatbreads, roll it into little snacking cheese balls, use it as a cream cheese replacement – the possibilities are endless!

What is labneh?
If you’ve not tried labneh before, it’s essentially a super thick, strained yogurt. It’s often referred to as ‘yogurt cheese’ as it has a similar, spreadable consistency to cream cheese. Basically, it’s yogurt with most of the liquid drained out. This makes it thick, creamy, tangy and wonderful in both savoury and sweet dishes. I’m not a fan of runny yogurt in general, so labneh is PERFECT for me. It’s like a very thick Greek yogurt.
It’s not really something that’s easily found in grocery stores but luckily, it’s incredibly easy to make! Labneh-based dips are always a huge hit at parties – the creamy, tangy deliciousness is pretty hard to resist.
Ingredients
All you need is plain yogurt and a little salt.
- Ideally, you want to use a full-fat, plain, unsweetened yogurt – any will do. As a rule of thumb, the yogurt will halve in volume once strained. So 2 cups become 1 cup – that’s what I’m using for the recipe below. A thicker Greek yogurt gives you a bit of a head start, so I’ll often use that if I want a quicker labneh.
- You’ll also need a piece of cheesecloth or muslin to strain the yogurt through. You can use a tea towel at a pinch but because it’s thicker, it will take longer for the liquid to drain so just keep that in mind.
How to make it
It’s SO simple to make labneh, you just need a little time. It really is as easy as mixing yogurt and salt, then straining in a cheesecloth for a few hours to let the whey drain away. I’ve found that you really only need about 6 hours of draining until you’ve got a wonderfully thick, spreadable labneh. That’s the consistency I like but you can of course drain it for longer to get a thicker result. Traditionally it’s strained for 24 hours or more, but I often don’t have time for that and find you get great results with this shorter time frame.
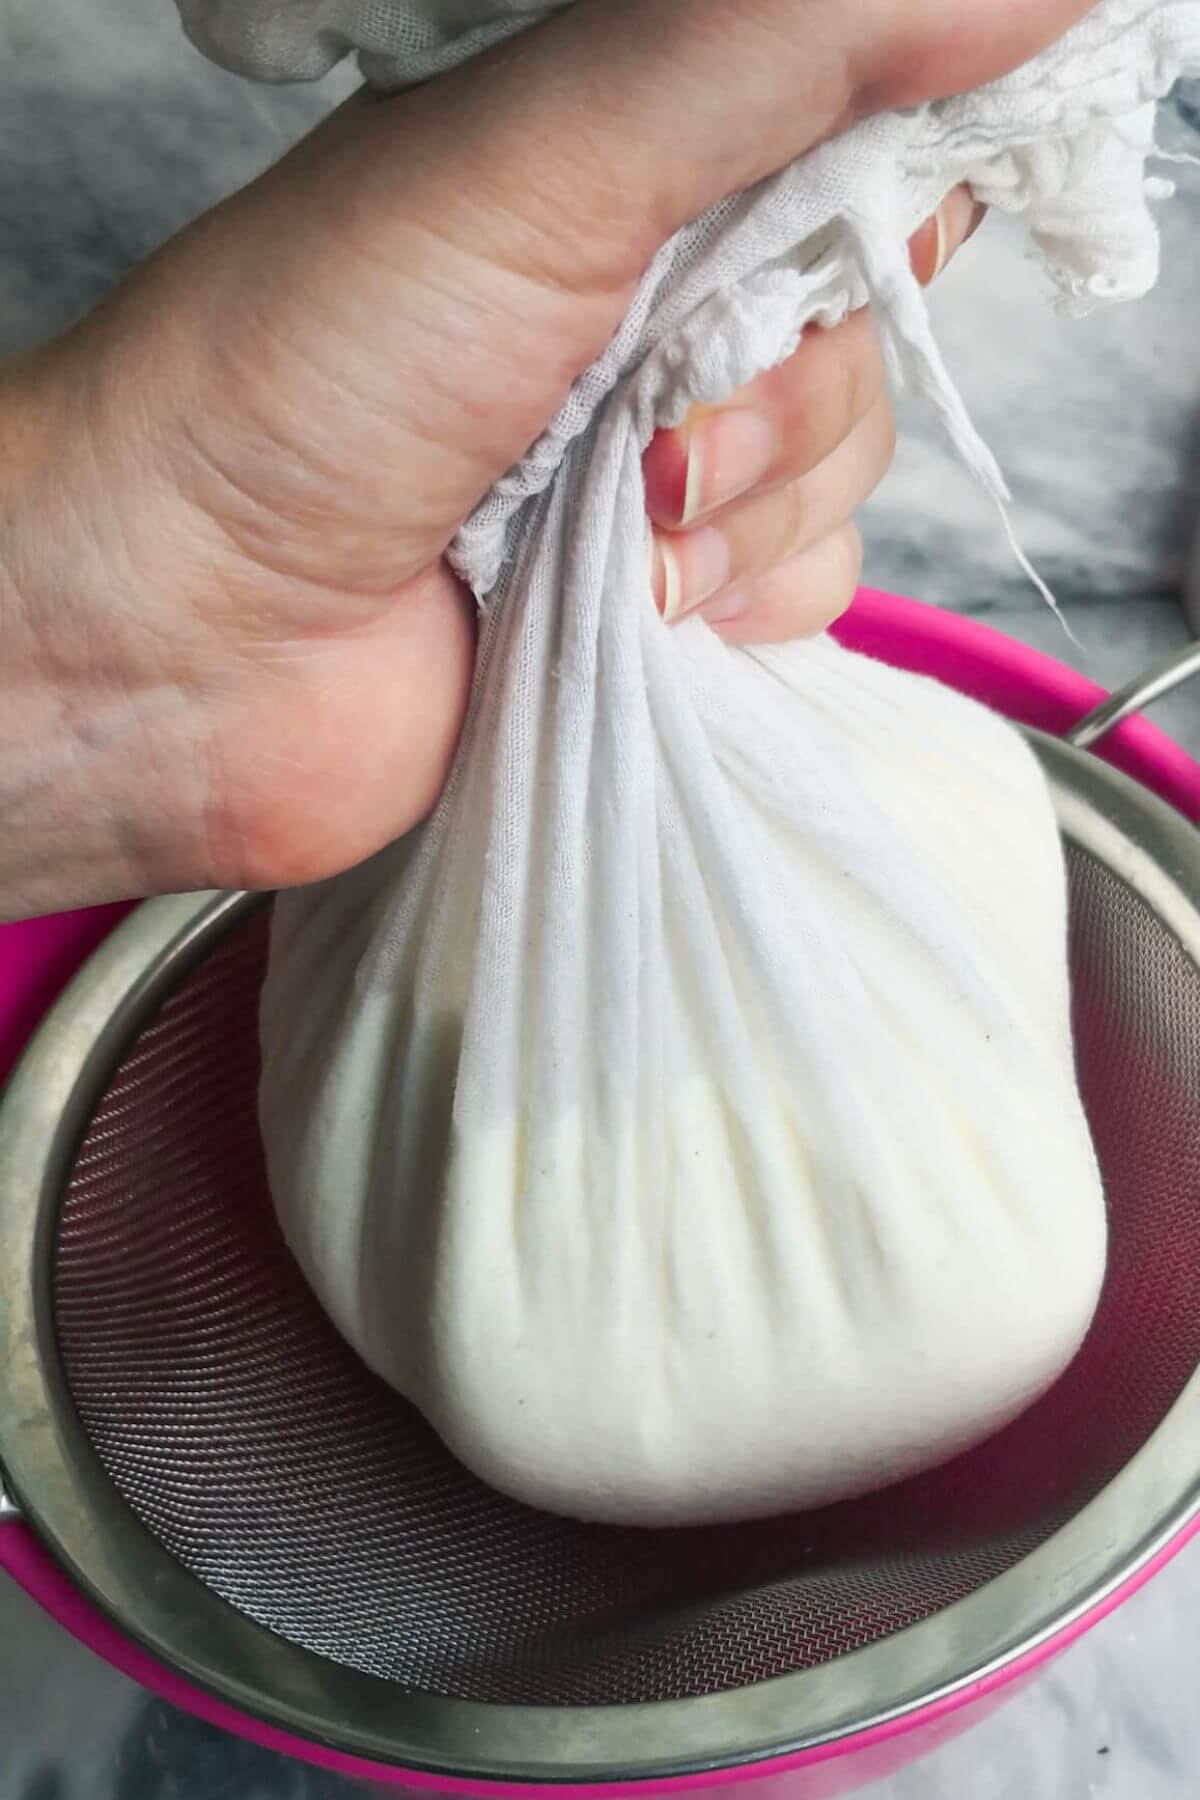
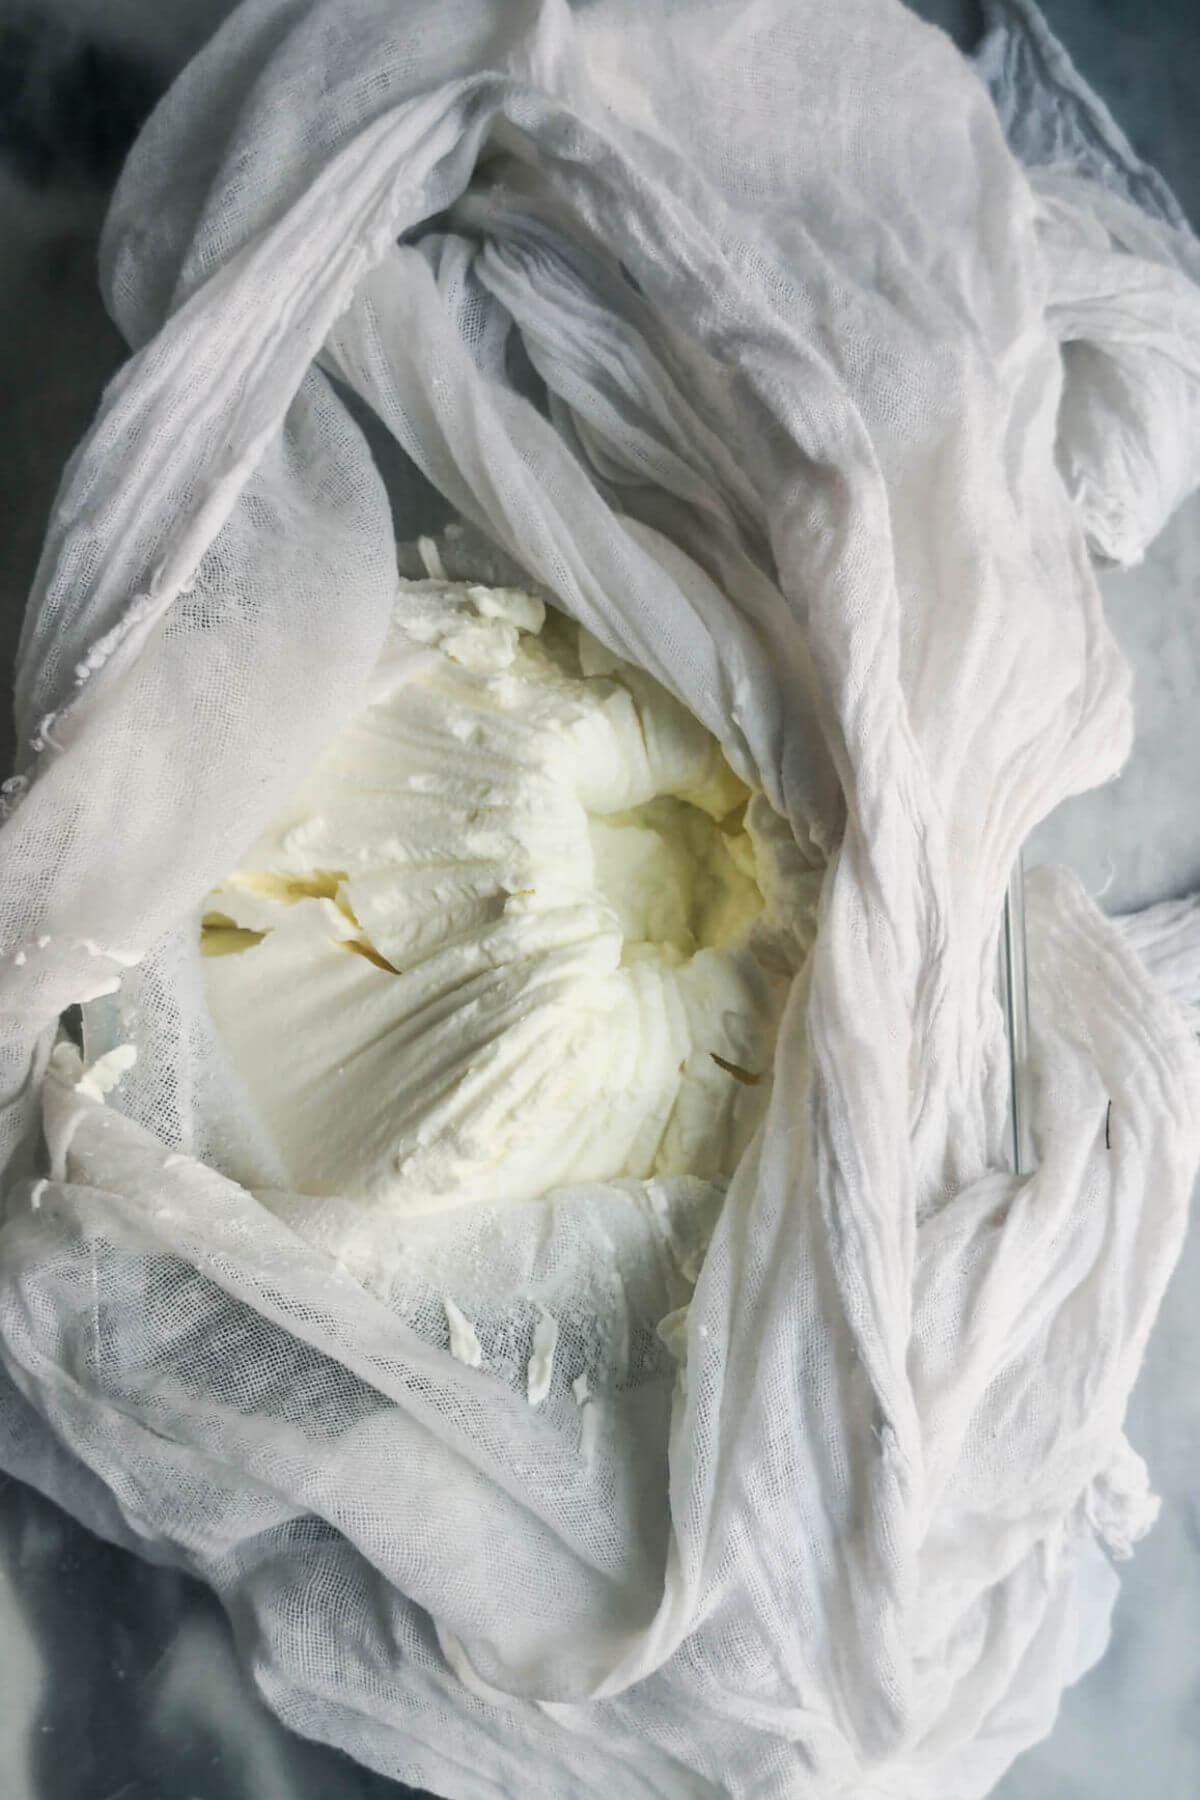
Mix your yogurt with a little salt, then pour it into a cheesecloth-lined colander set over a small bowl. Bundle the cheesecloth up so that the yogurt is in a ball, then secure it with a rubber band.
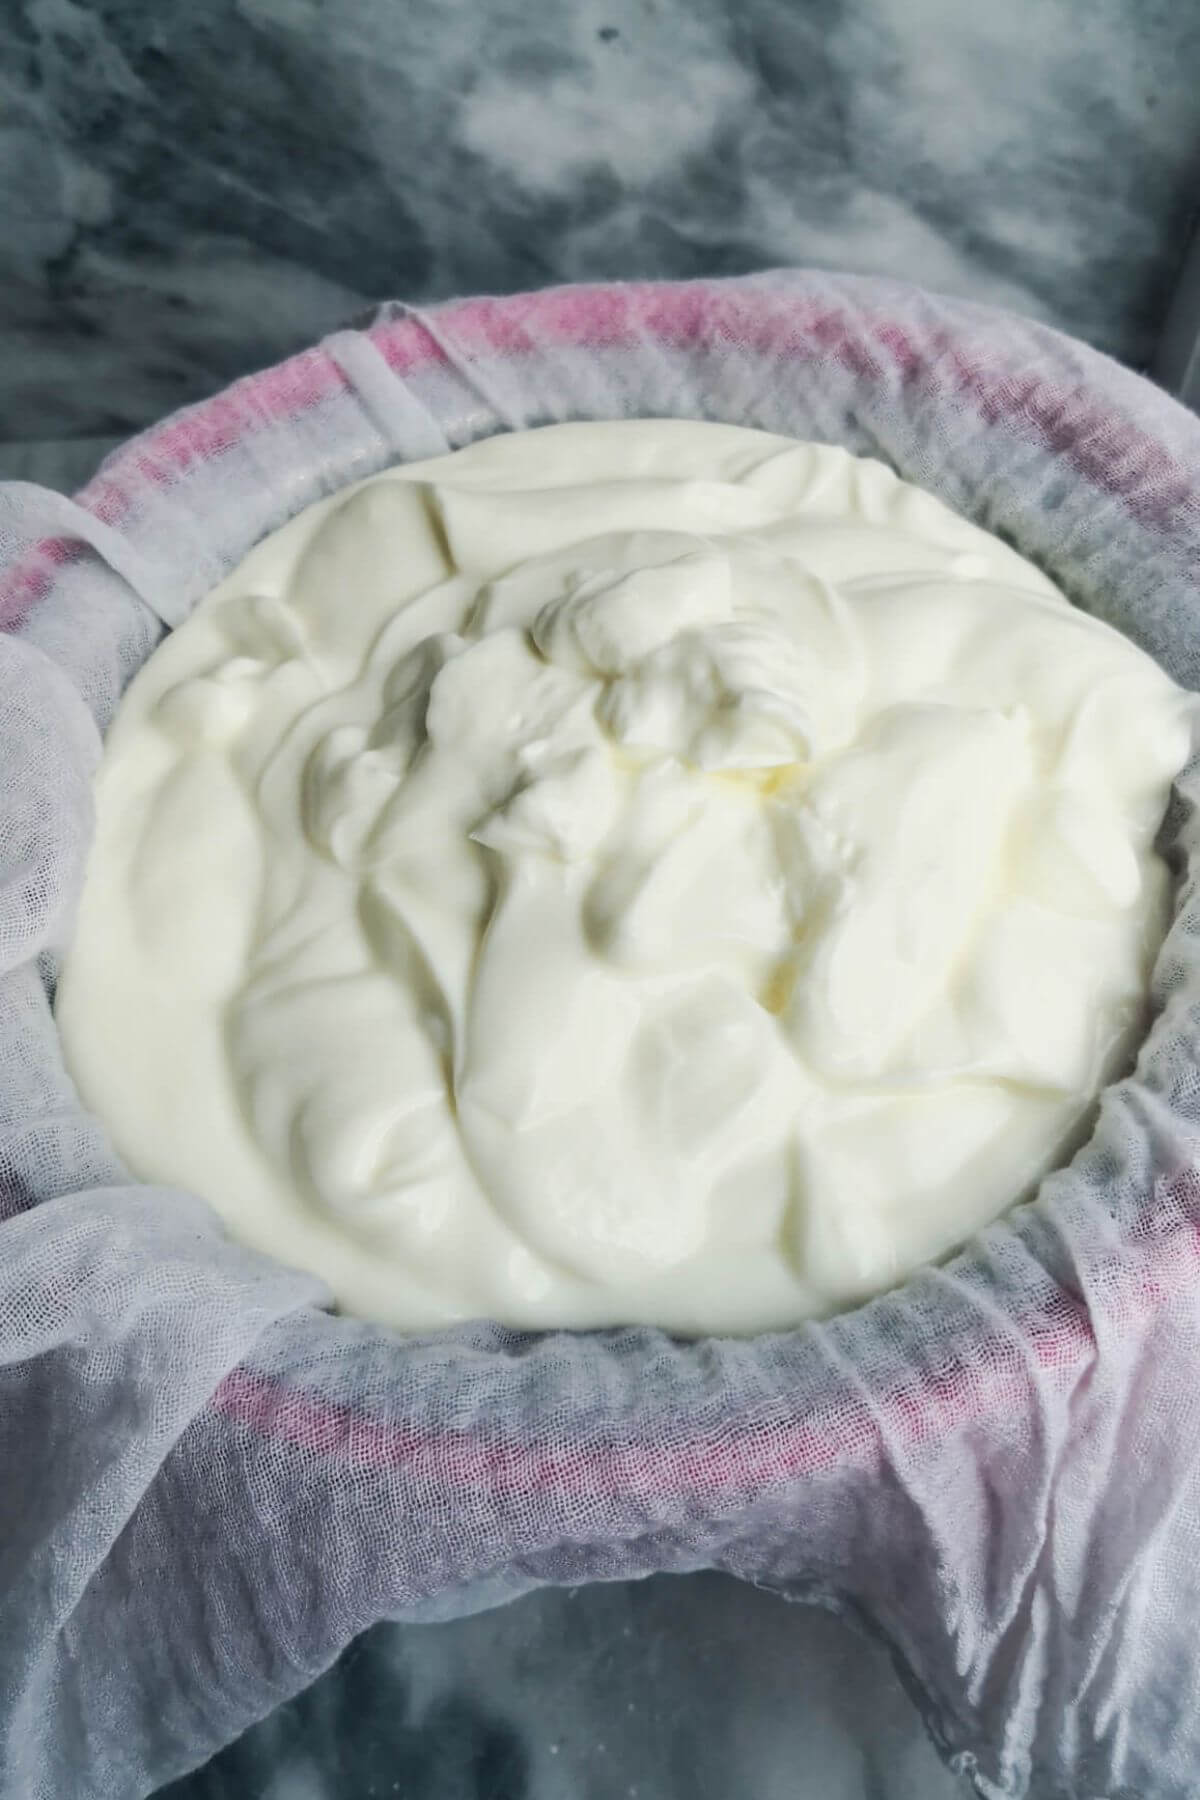
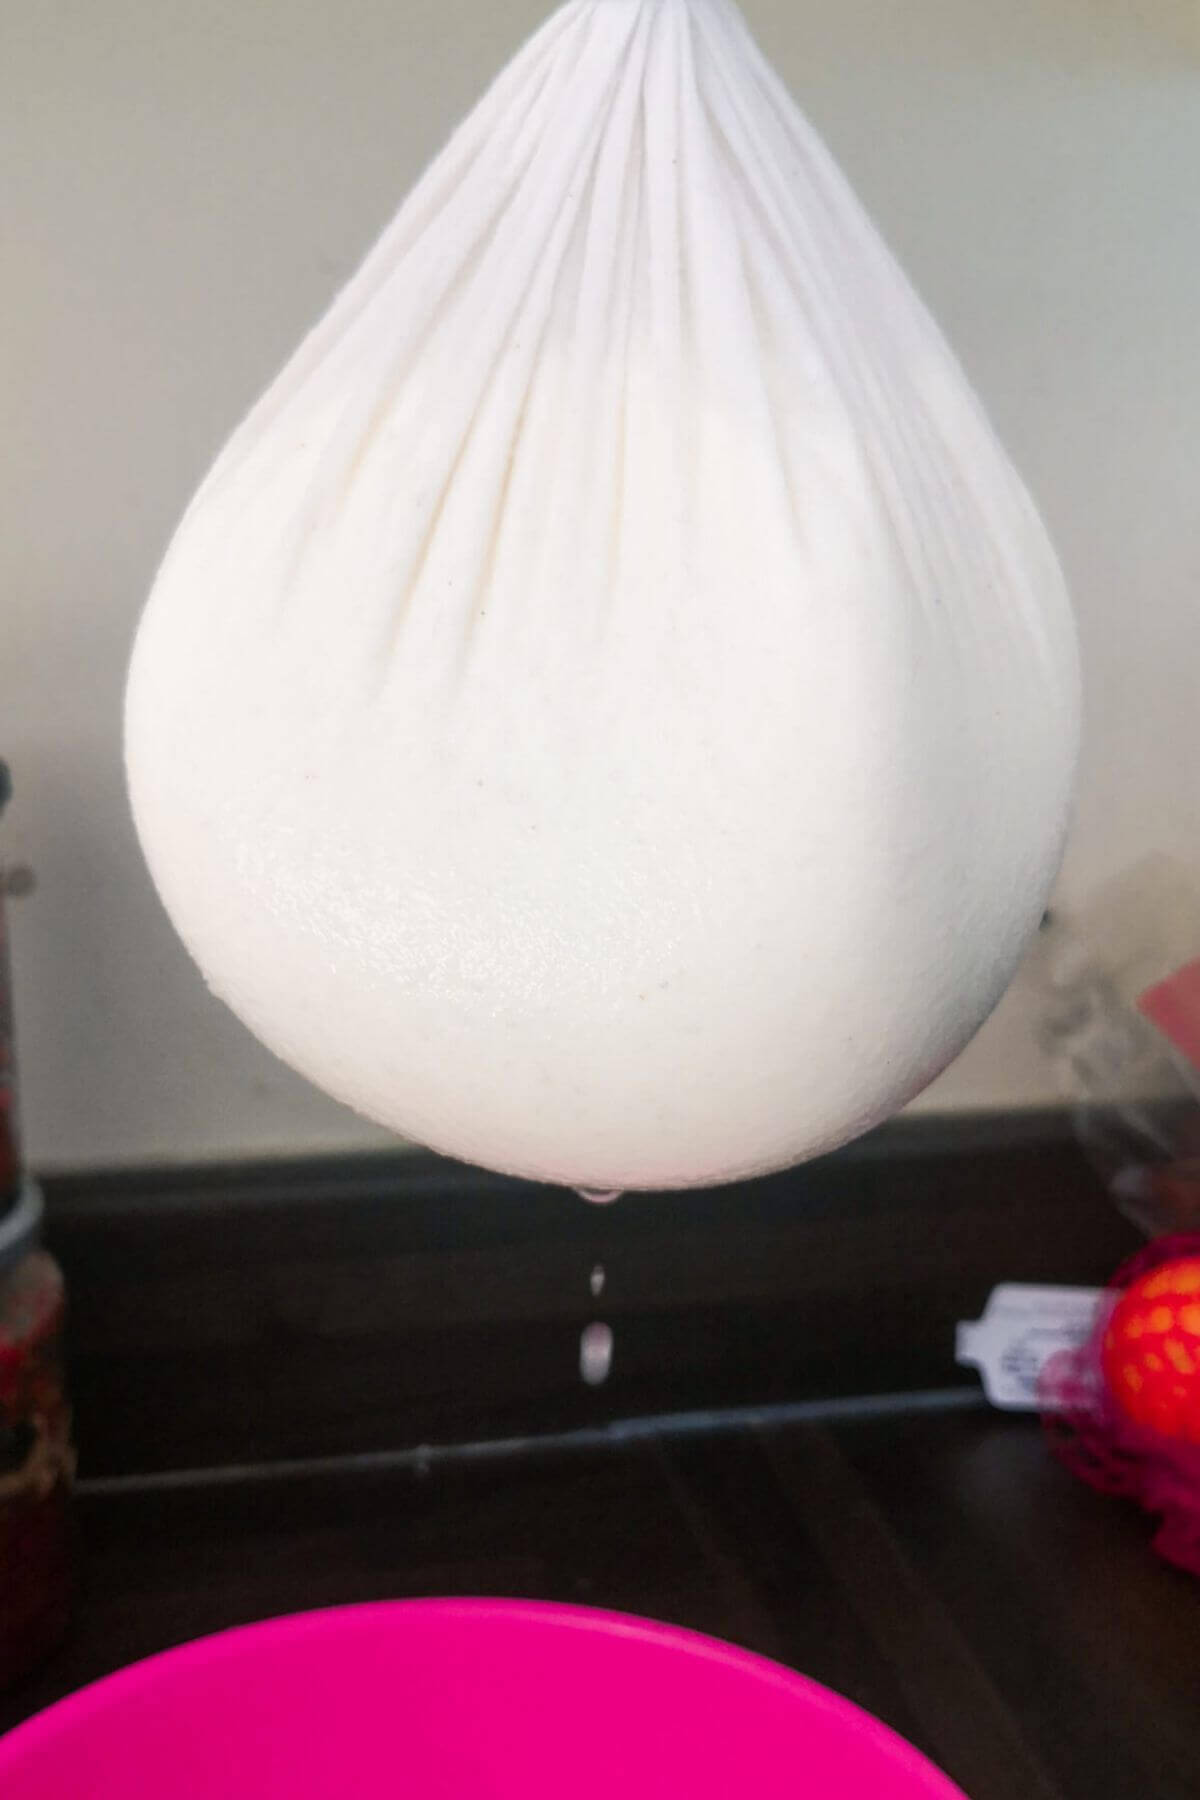
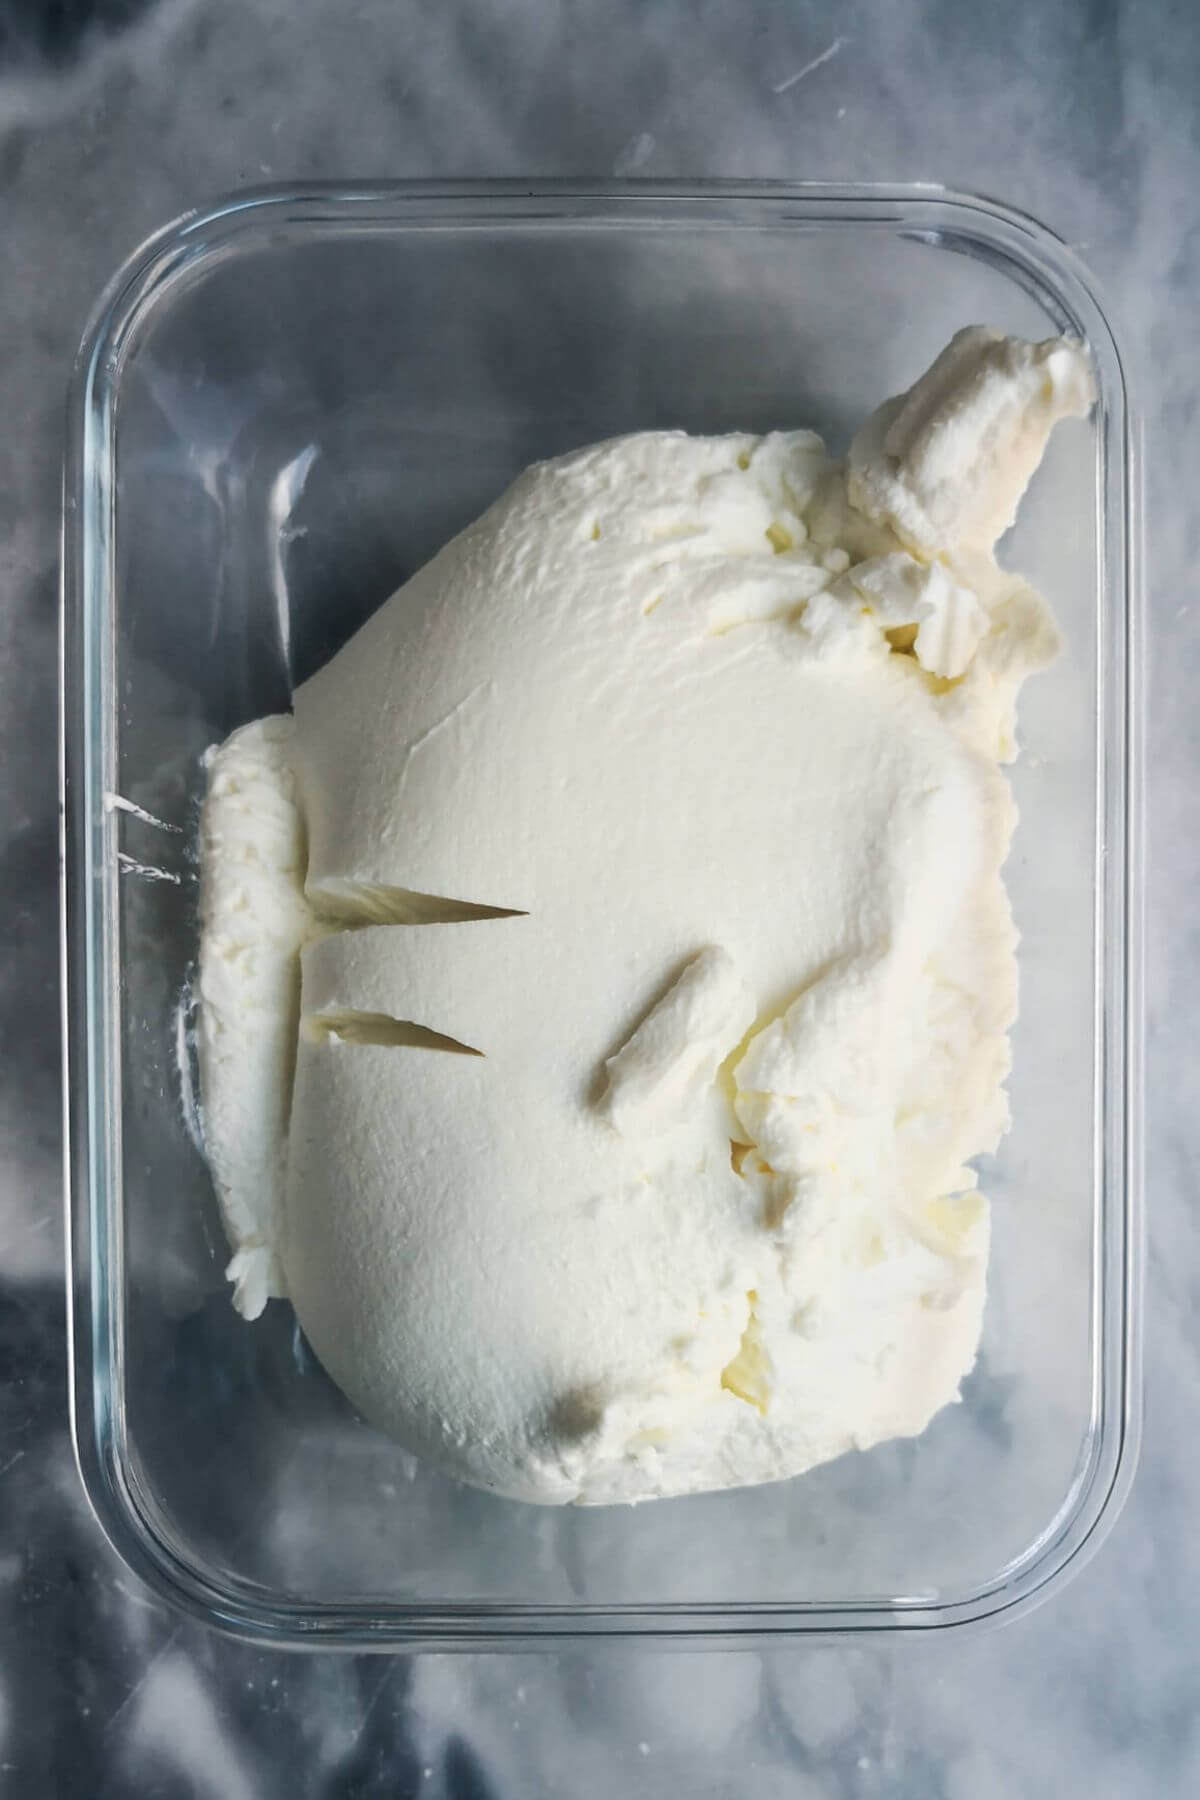
There are a couple of ways you can drain out the whey. I normally hang it from a cupboard set over a bowl to collect the draining liquid. I like to tie the top of the cheesecloth to the handle of one of my cupboards. You can also tie it to your tap over the sink, or weigh it down in the colander itself with a can. Leave for 6 hours (this is also good to do overnight), then remove from the cheesecloth. It should now look like a solid, creamy yogurt ball.
PRO TIP: The longer you leave it, the thicker it will get. If you want to make little cheese balls from the labneh, I would leave it for 24 hours because you want it to be really thick for that purpose.
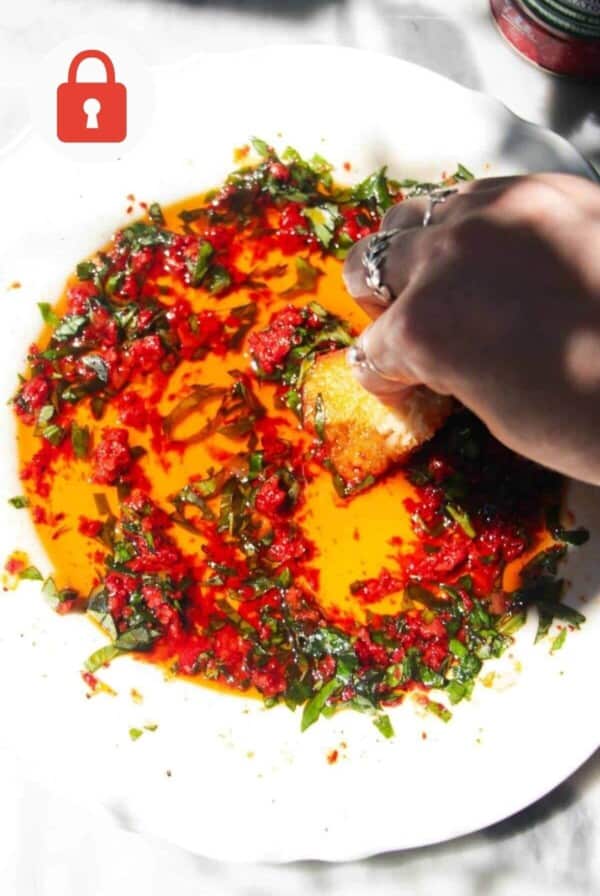
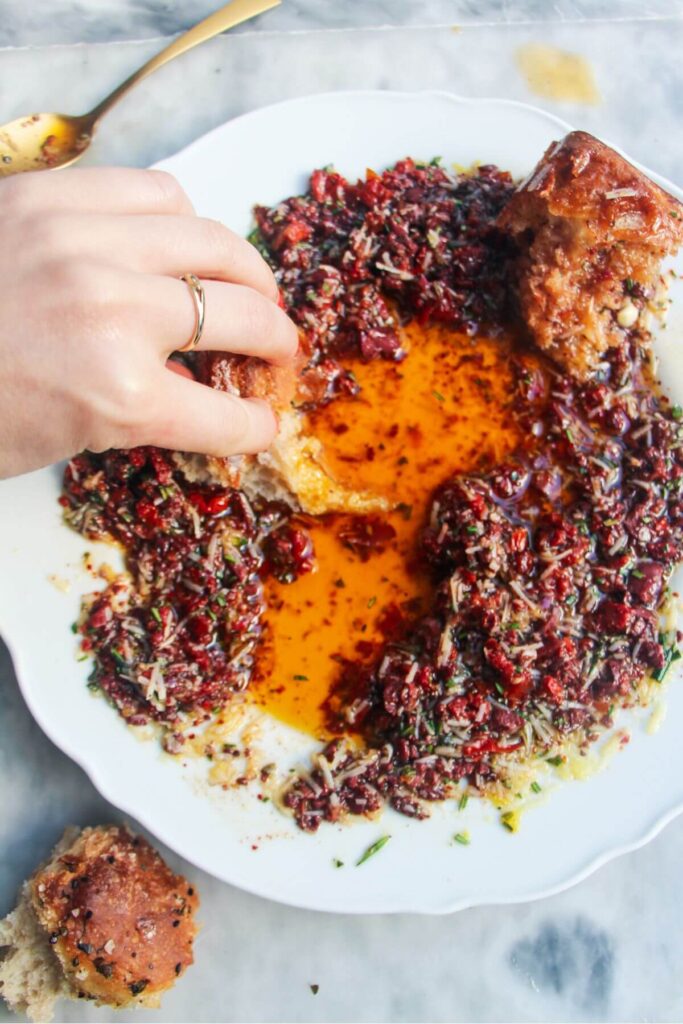
Remove from the cheesecloth and store in an airtight container for up to 4 weeks in the fridge. Use however you like – I love using it as a simple dip drizzled with olive oil, dukkah and a little confit garlic.

Four ways to use labneh
- Pile miso roasted sweet potatoes on top of it for the best side.
- Enjoy it as a gorgeous dip to enjoy with homemade pita chips or sourdough crackers. Just smooth it onto a plate and drizzle with olive oil, dukkah and some confit garlic.
- Spread it onto toast (it’s great on focaccia, rosemary parmesan bread or seeded Vogel’s bread) or a bagel and enjoy it with smoked salmon.
- Drizzle it with honey and enjoy it with fresh fruit for a gorgeous breakfast.
Got a question?
I actually get mine from Amazon – you can also normally find it in large supermarkets or kitchen stores.
It will last for up to 4 weeks when stored in an airtight container in the fridge. As with anything, make sure you’re using a clean spoon when you’re scooping some out to minimise contamination.
Yes! It’s lovely with lemon zest, dried herbs like thyme or oregano, chilli flakes, black pepper, or crushed garlic. You can also use toasted coconut, honey or a little cinnamon for a sweet version.
You can – it will just have a looser consistency. Most recipes will tell you to drain the yogurt for 24 – 48 hours but mine cuts this down considerably as I find the consistency after about 6 hours to be perfect for me. I love using it as a dip or as a base for roasted vegetable platters or salads, so I like it to be creamy and spreadable. You can of course mix a little water or olive oil in if you find you’ve left it for too long and it’s a little dry.
If you liked this recipe, here are more dips you might enjoy


If you make this recipe, I’d love to hear from you! You can leave me a comment below.
Print
How to Make Labneh
- Total Time: 6 hours 5 minutes
- Yield: 1 cup 1x
- Diet: Vegetarian
Description
Once you realise how easy it is to make labneh, you’ll be making it over and over again. This creamy, thick, tangy strained yogurt is incredibly versatile – use as a dip, dollop over salads or flatbreads, roll it into little snacking cheese balls, use it as a cream cheese replacement – the possibilities are endless!
All it takes is 2 ingredients and a little time.
Remember, if you’re looking for US measurements just use the ‘Units’ section below and click on ‘US’.
Ingredients
For the labneh –
- 2 cups plain, unsweetened yogurt
- 1/4 teaspoon salt
Equipment –
- Piece of cheesecloth or muslin cloth for straining
- Sieve or colander
Instructions
- Mix the yogurt and salt. Set a sieve or colander over a small bowl and line it with two layers of cheesecloth/muslin. Pour in the yogurt and ¼ teaspoon of salt. Give it a mix, then bundle up the cheesecloth into a ball. Secure it with a rubber band, so that there’s a tight ball of yogurt and a little overhanging cheesecloth.
- Drain the yogurt. There are a couple of ways you can do this. I like to tie the overhanging cheesecloth to the handle of a kitchen cupboard and set a small bowl underneath to collect the draining whey. You can also tie it to the tap over your sink, or set the ball in a sieve over a small bowl and weigh it down with a can. Leave the yogurt draining for 6 hours (or overnight).
- Remove and store. After 6 hours, there should be a lot of drained whey in your bowl. Untie the cheesecloth from your cupboard handle or tap, then unwrap the cloth. The yogurt should now be looking like a solid, creamy cheese ball. Transfer to a sealable container and store in the fridge.
Notes
You can store the labneh for up to a month in the fridge in a sealable container. Just make sure to always use a clean spoon whenever you’re scooping some out to use to avoid contamination.
The longer you strain the yogurt, the thicker it will be. I find after 6 hours it’s at a lovely, creamy, spreadable consistency that I like, but leave it longer if you’re looking for a thicker labneh that you can roll into balls.
There are so many ways you can use labneh – I love using it as a dip drizzled with olive oil, dukkah and roasted garlic or za’atar and enjoying with pita chips or sourdough crackers. It’s also wonderful in my miso roasted sweet potatoes dish and a great replacement for cream cheese. You can also try it with a drizzle of honey and a sprinkle of cinnamon with fruit for a delicious dessert or breakfast.
- Prep Time: 5
- Draining time: 6 hours
- Category: sauces
- Method: no cook
- Cuisine: mediterranean
Nutrition
- Serving Size: 2 tablespoons