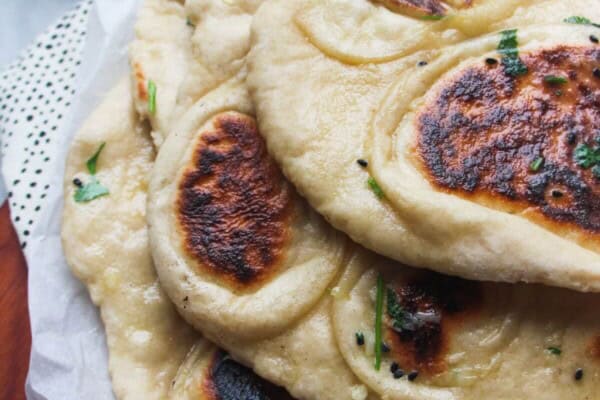
Can you believe you can make genuinely great Greek yogurt bagels with just two ingredients in 30 minutes? All you need is Greek yogurt and self-rising flour – no yeast, no long rise times, no fuss. Just soft, chewy bagels that toast beautifully and freeze like a dream.
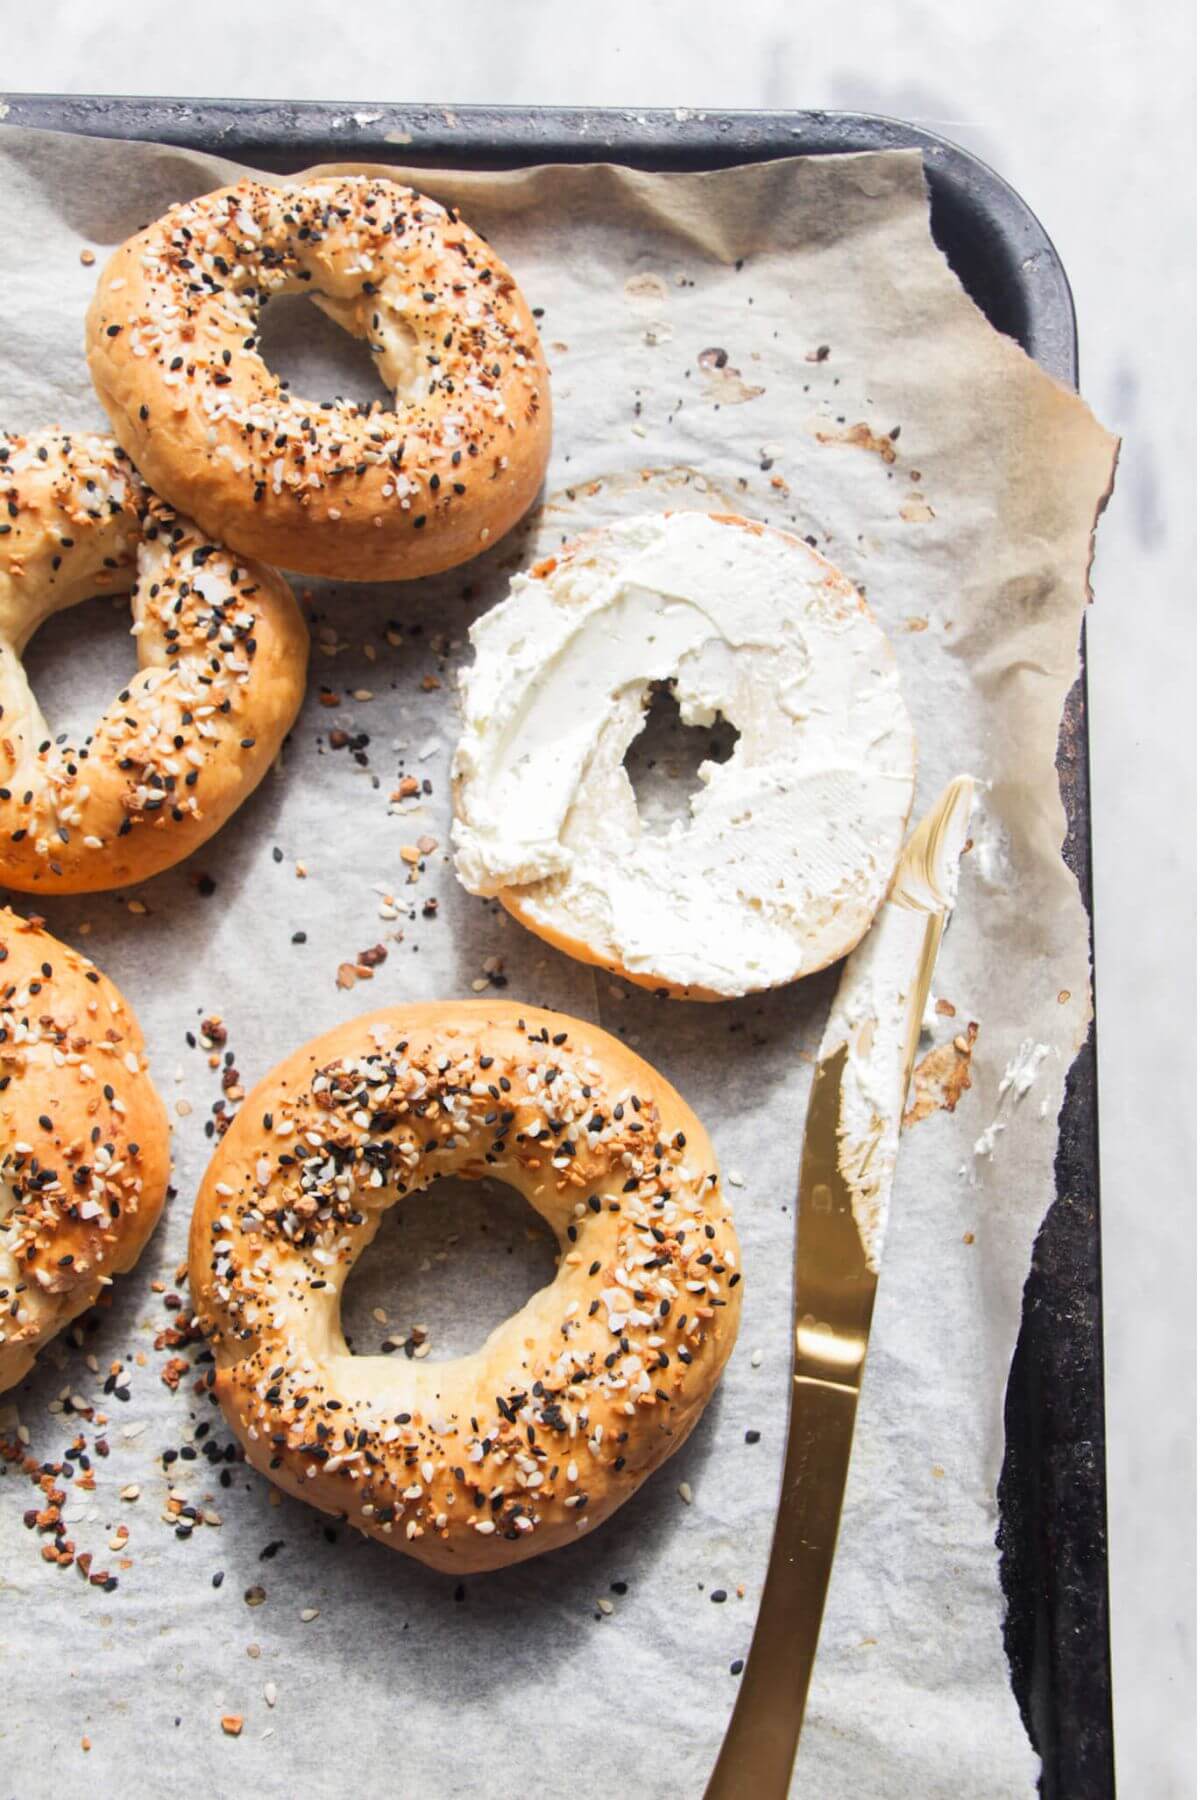
Table of Contents
- Greek Yogurt Bagels: At a Glance
- Why You’ll Love These Greek Yogurt Bagels
- Ingredients You’ll Need
- Can’t Find Greek Yogurt?
- Step-by-Step: How to Make Greek Yogurt Bagels
- Kate’s Top Tip
- Five Bagel Topping Ideas
- Troubleshooting Tips
- Watch How to Make Greek Yogurt Bagels
- Greek Yogurt Bagel FAQs
- Eight Brilliant Bagel Fillings
- Like this bagel recipe? Try these two-ingredient breads next
Greek Yogurt Bagels: At a Glance
- ⏰ Time: 30 minutes
- 🍽️ Makes: 4 bagels
- 🛒 Key Ingredients: Self-raising flour, Greek yogurt
- 🧠 Skill Level: Beginner friendly
- 👩🍳 Cooking Method: Oven or air fryer
- 🍳 Equipment Needed: One mixing bowl, baking sheet, parchment paper
- 💃 Perfect For: Busy weekday breakfasts and lunches, meal prep and freezing stocking, and whenever you’re craving a bagel but don’t have time to go to the store.
Why You’ll Love These Greek Yogurt Bagels
I’ve made bagels a few times, the classic way: make the dough, knead the dough, leave it to rise, shape the bagels, leave them to rise again, boil them, top them, and then finally, bake.
Even looking at that list exhausts me. That’s why this recipe is a HUGE game-changer:
- No rising or resting time. Just mix, shape, and bake.
- Make them in one bowl, with no special equipment needed.
- Quick and easy. They take about 30 minutes, all up.
- You only need TWO easy-to-find ingredients.
- Cook t
- Easy to customize with your favorite toppings.
- Fabulous for weekday mornings, meal prep, and they’re freezer-friendly.
They truly feel almost too easy for just how good they are.
I’ve seriously made these bagels more times than I can count – with different yogurt brands, in the oven, in the air fryer – and this recipe really is the most reliable, beginner-friendly one I’ve tested.
Soft and chewy, with a lovely tender crumb, I love using them for breakfast sandwiches, or toasting them and slathering them with a gorgeous topping (think creamy whipped feta or spicy whipped cottage cheese dip).
I just made some of these last night, 2 poppyseed & 2 sesame seed. They were SO good! My husband couldn’t believe it and thinks they’re better than store-bought bagels. These will be a staple for me from now on. Thank you so much.
Ingredients You’ll Need

- Self-raising flour. This is how the bagels rise and puff up without needing yeast. If you don’t have self-raising flour, you can use plain all-purpose flour and baking powder (as is pictured here). Use 1 teaspoon of baking powder for every cup of flour.
- Greek yogurt. You’ll get the best results with thick, proper Greek yogurt (Fage or Chobani are great options). Plain, natural yogurt may make your dough sticky, and you’ll need to add extra flour. I’ve found you can also use whipped or regular cottage cheese (try my no-blend cottage cheese bagels recipe), or sour cream, and non-fat Greek yogurt works well too.
You’ll also need whatever you’re topping your bagels with. Everything bagel seasoning is a classic choice, but sesame seeds, poppy seeds, nutty spiced dukkah (a lovely Egyptian spice mix), grated cheese, and pickled jalapeños, or flaky salt are great too.
![]()
Can’t Find Greek Yogurt?
If you can only find plain natural yogurt, you can drain some of the liquid using a fine sieve, or colander lined with cheesecloth. Let the yogurt sit for about 10 minutes in the sieve, then use it.
Step-by-Step: How to Make Greek Yogurt Bagels
This is a step-by-step photo overview of how to make the bagels – the full recipe with ingredient quantities is at the bottom of the page for you.
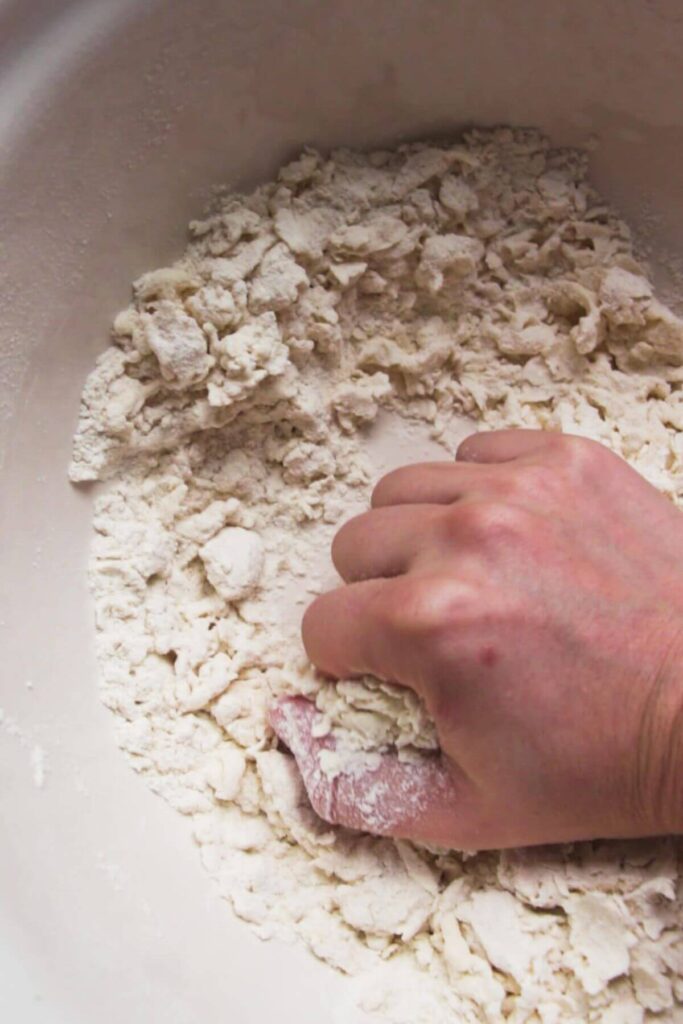
- Mix your self-raising flour, Greek yogurt, and salt. Once it looks lumpy, get your hands into the bowl and squeeze the mixture into a rough dough.
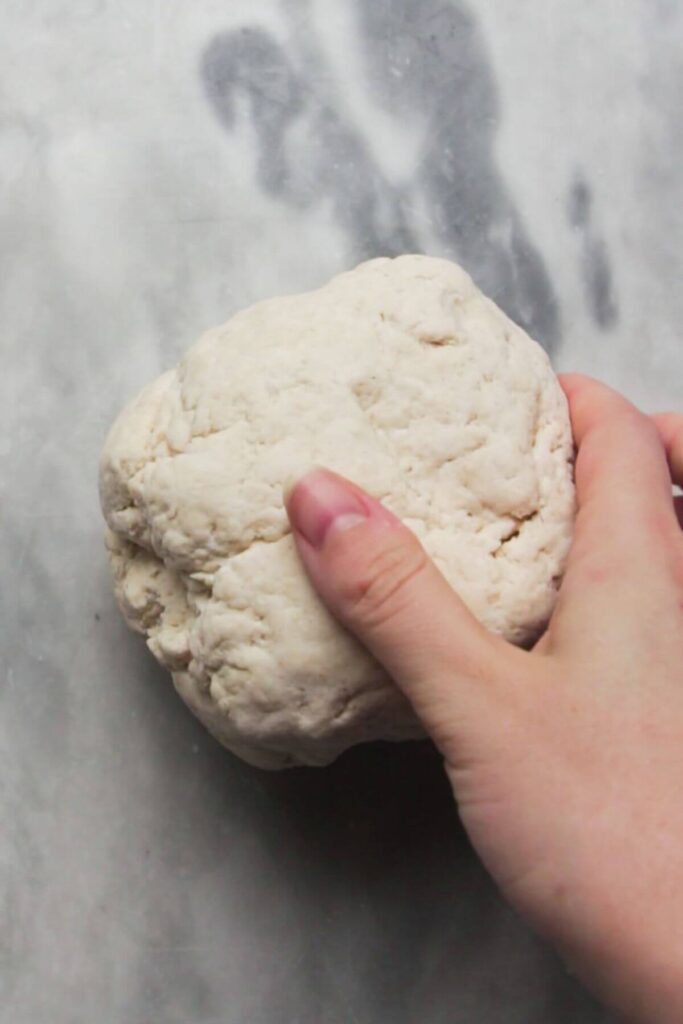
- I like to give it a couple of quick kneads in the bowl (press the heel of your hand down into the dough and then push it away from you, before folding the dough back over itself, giving it a quarter turn and repeating the process). After this, shape it into a rough ball.
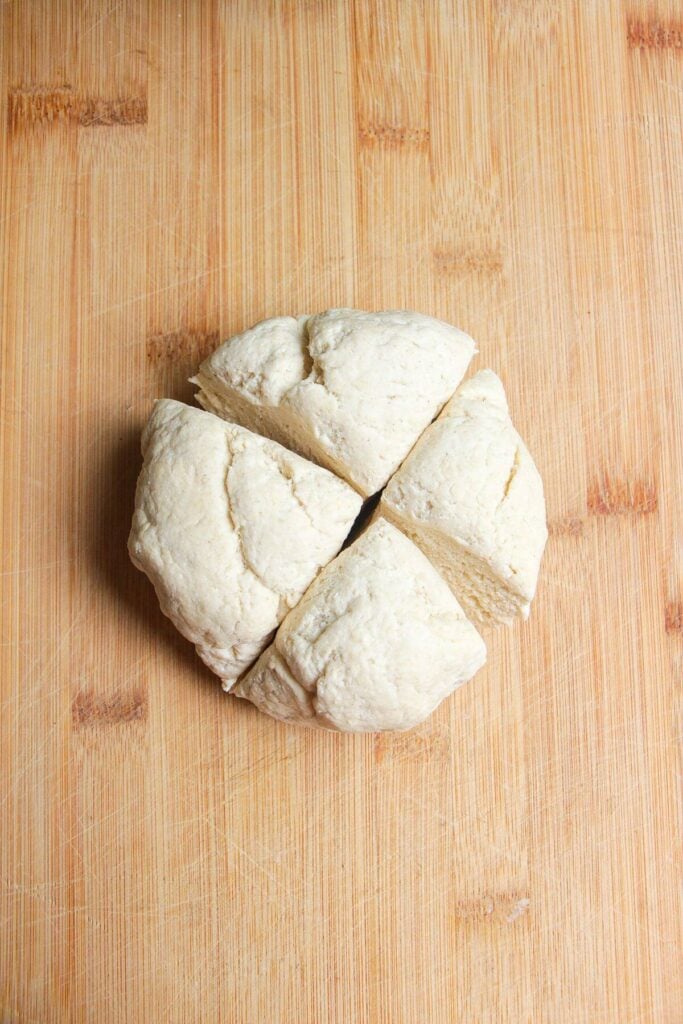
- Divide the dough into four roughly equal pieces (you can weigh them if you want to get precise).
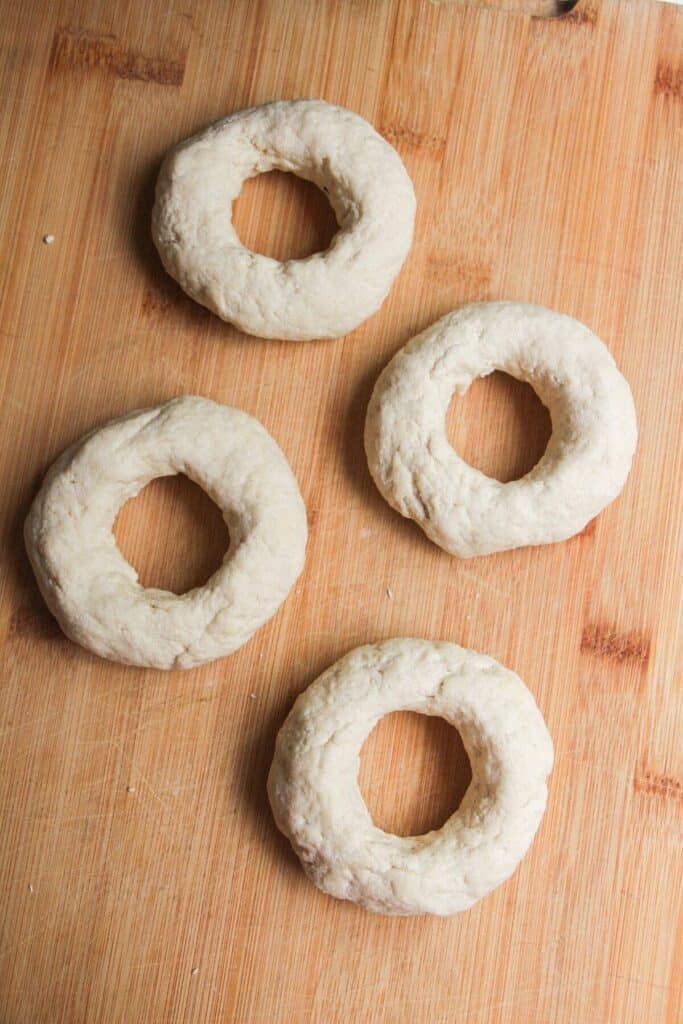
- Either roll each piece into a short rope, then bring the ends together to form your bagels, or shape them into rough circles, and use your fingers to make a hole in the middle and gently stretch them into bagels.
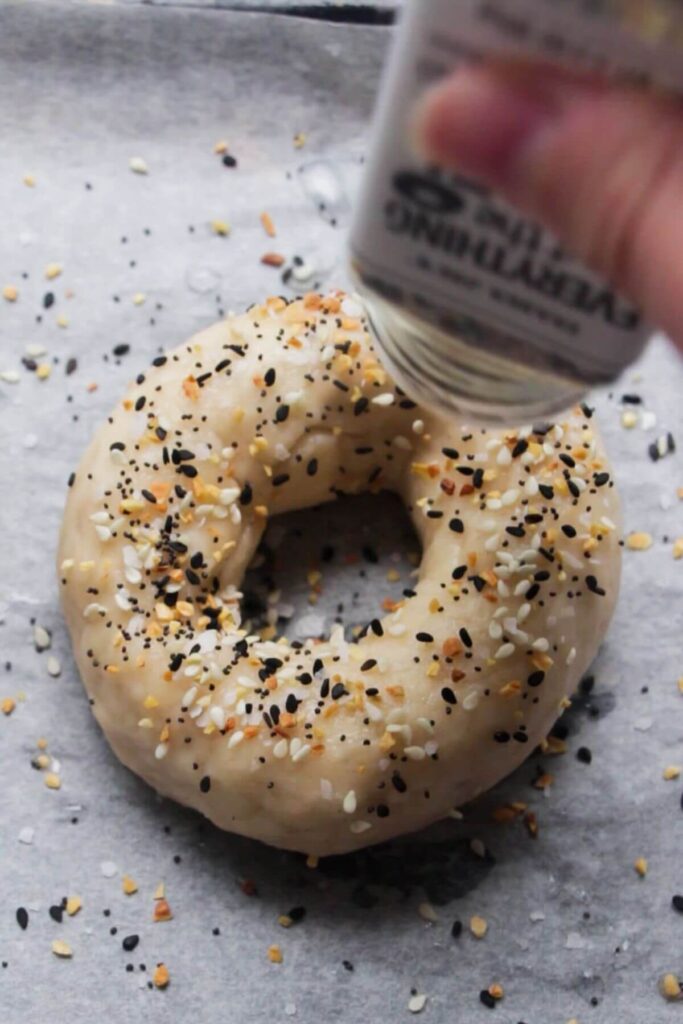
- If you’ve boiled the bagels, sprinkle your toppings directly on top as they come out of the water. Or, brush them with an egg wash, milk, or water, and then add your toppings so they stick.
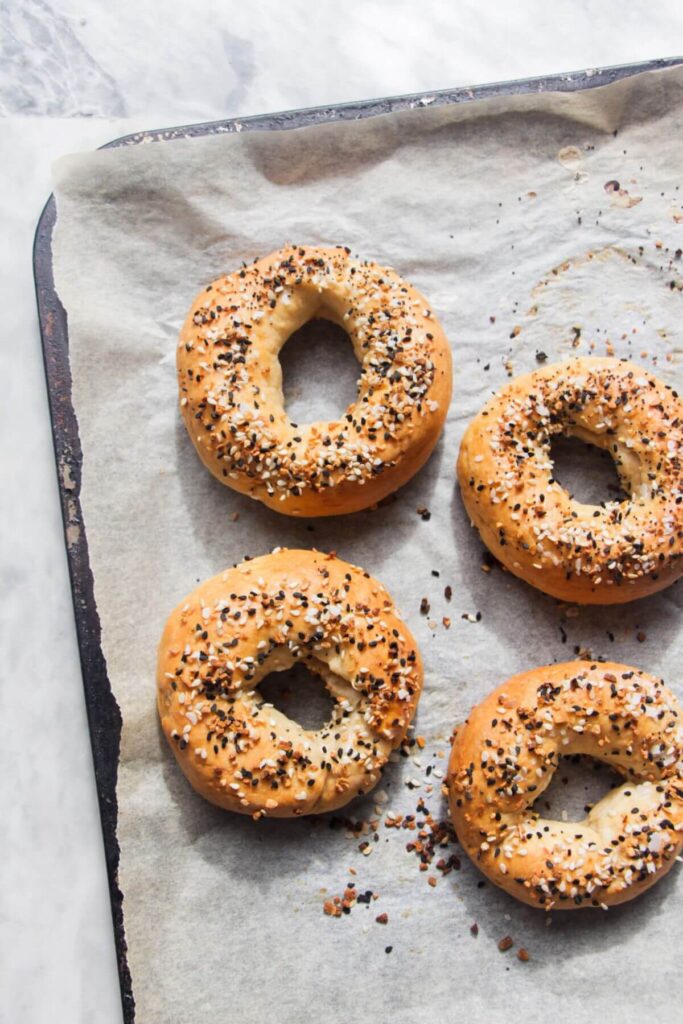
- Bake until gorgeously golden, puffy, and cooked through. You can do this in the oven, or air fryer.
![]()
Kate’s Top Tip
A classic bagel is boiled before baking to help develop that deliciously chewy crust.
You don’t have to boil these bagels if you don’t want to do the extra step (they work perfectly well without), but I find they taste more authentic when you do.
Five Bagel Topping Ideas
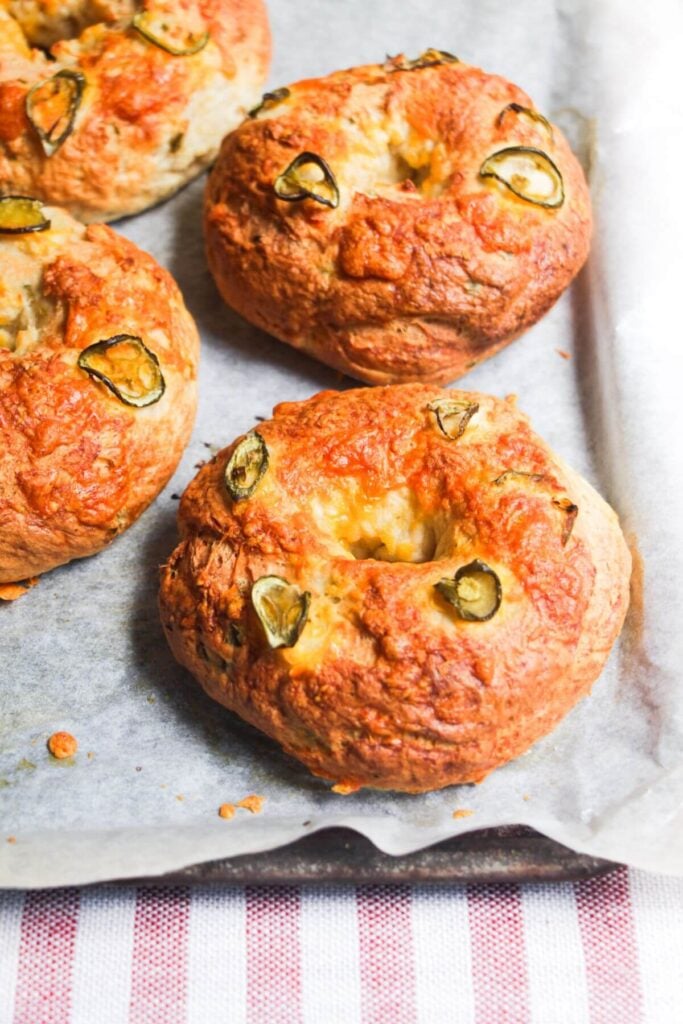
- Jalapeño and cheddar. Grate your favorite cheese (I love using parmesan or cheddar) and sprinkle it on top of the bagels, along with dried herbs (basil, thyme, or oregano are lovely). I like to mix about 1/4 cup of chopped pickled jalapeños and 1/4 cup of grated cheddar into the dough, too!
- Everything bagel seasoning. You can buy this flavor-packed seed and spice mix, but it’s really easy to make yourself.
- Za’atar. Sesame seeds, sumac, flaky salt, dried oregano, thyme, and/or marjoram form this delicious blend, another one of my favorites, and tasty on bagels.
- Dukkah. This fragrant and crunchy seed and nut mix is one of my most-used ingredients. It mixes sesame seeds, almonds, pistachios, cumin, coriander, fennel, and flaky salt. Try my easy dukkah recipe, and you’ll see how great it is.
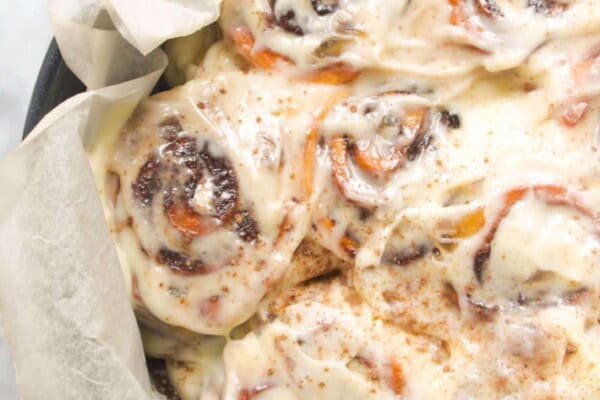
- Cinnamon and sugar. Why not switch things up and make sweet bagels? Cinnamon and sugar work wonderfully, or you could add Medjool dates to the dough.
Troubleshooting Tips
- My dough is super sticky. This is normal and very much depends on the Greek yogurt you use. If you’ve used a more runny yogurt, you may need to add a little extra flour to make the dough easier to work with. Add 1 tablespoon extra at a time, until you’re happy with the dough.
- My bagels stuck to the baking sheet. I highly recommend using parchment paper on your baking sheet. This should stop any potential sticking. It could also be because your dough is a little too sticky.
- My bagels are gummy inside. This means they’re a little underbaked. Pop them back into the oven for an extra five or so minutes. It also helps to let them cool before slicing.
Watch How to Make Greek Yogurt Bagels
Greek Yogurt Bagel FAQs
Thick, Greek yogurt is best here. It means you’ll end up with a dough that’s easy to work with and not sticky. I find that whenever I use a runnier, plain yogurt, the dough takes a while to come together, and I end up having to add a lot more flour. Fage or Chobani are good brands to look out for.
Yes! I’ve had great results using a fat-free Greek yogurt, so it’s totally fine to use in this recipe.
They’ll last for 3 days in a sealed container at room temperature, but after day one, it’s best to toast them first.
You can! These bagels are great to freeze.
I like to slice them in half and then freeze them in zip-lock bags – then you can just pop them in the toaster from frozen whenever you like.
You can freeze them whole; you’ll just need to let them thaw for a few hours before using them. I slice them because I normally want a bagel quickly, and end up slicing them to serve anyway!
Make them gluten-free by using a gluten-free self-raising flour mix, or you can use bread, wholemeal, or wholewheat flour and add baking powder.
I wouldn’t recommend freezing the dough – it doesn’t defrost well at all.
You can, however, put it in the fridge for 24 hours and return to it later, but I wouldn’t freeze it.
Yes, you can! I actually love doing this because it’s quicker. Preheat your air fryer to 400°F/200°C (just run it empty for 2 minutes). Place your topped bagels into your air fryer and air fry for nine minutes until lovely and golden.
Eight Brilliant Bagel Fillings
The sky’s the limit when it comes to fillings for these bagels. The classic is a big smear of cream cheese, but you can really do whatever you like. Here are eight options you could try:
- Make jalapeño popper chopped bagels – lay out 1/4 cup of cream cheese on a large board and top with a couple of slices of crispy bacon, 1/4 cup pickled jalapeños, a handful of chives, 1/4 cup grated cheddar, and salt and pepper. Chop everything together until you’ve got a cream cheese paste, then smear it onto your bagels.
- Creamy labneh, fresh homemade basil pesto, and sliced tomatoes.
- Smashed avocado (or pea and avocado hummus), quick marinated feta, and nutty dukkah.
- Scrambled eggs, 30 minute chili oil, and cheese.
- Sweet chili glazed halloumi, scallions, and cilantro.
- Cream cheese, smoked salmon, and capers.
- Spoon on any leftover Greek-style bread dipping oil, Mediterranean bread dipping oil, or loaded festive bread dipping oil
- Marmite and cheese (don’t knock it until you’ve tried it).

Like this bagel recipe? Try these two-ingredient breads next


If you make this recipe, I’d love to hear from you! You can leave a recipe rating and a comment below. And remember to tag @DishedByKate on Instagram, Facebook and TikTok if you’ve made one of my recipes. Seeing your recreations really makes my day 😊.

2 Ingredient Greek Yogurt Bagels (No Yeast)
- Total Time: 30 minutes
- Yield: 4 bagels 1x
- Diet: Low Calorie
Description
Can you believe you can make genuinely great Greek yogurt bagels with just two ingredients in 30 minutes? All you need is Greek yogurt and self-rising flour – no yeast, no long rise times, no fuss. Just soft, chewy bagels that toast beautifully and freeze like a dream.
I’m including the option to boil the bagels before baking here, as is the traditional method, but you can skip this step if you like.
Ingredients
For the bagels –
- 300g (2 cups) self-rising flour (or use all-purpose flour and add 2 teaspoons of baking powder)
- 280g (1 cup + 2 tablespoons) thick Greek yogurt (I use Fage or Chobani)
- 1 teaspoon salt
- 1 egg, whisked (for the egg wash if you’re not boiling the bagels – or use milk or water)
Topping ideas –
- Everything bagel seasoning
- Za’atar
- Dukkah (try my easy dukkah recipe)
- Sesame seeds
- Poppy seeds
- Grated cheddar and pickled jalapeños
- Flaky sea salt
- Cinnamon and sugar
Instructions
- Make the bagel dough. Heat your oven to 400°F (200°C fan) and line a baking sheet with parchment paper. Add 300g (2 cups) self-rising flour, 280g (1 cup + 2 tablespoons) of Greek yogurt, and the salt to a large mixing bowl. Mix with a large wooden spoon or spatula until it looks like crumbly breadcrumbs. Then get your hands into the bowl to bring the mixture into a rough dough. You’ll need to give it a couple of kneads in the bowl – just press down on the dough with the palm of your hand, then fold the part you just pushed away back over itself and repeat for about 30 seconds. The dough shouldn’t be sticky – if it is, add a tiny bit more flour and work it into the dough with the kneading motion. Need more help with kneading? Check out my guide all about how to knead dough.
- Shape the bagels. Get your dough out onto a lightly floured flat surface and cut it into 4 roughly equal pieces. You can weigh them if you want to get precise. There are two ways you can form the bagels. You can roll them out into ropes with your hands, approximately 6 inches long, then join the ends to form a circular bagel, and press the two ends of the dough together to seal. Or, form your dough into a rough circle, then press down with your hands to create a flatter disc. Use your fingers to make a hole in the middle, then gently stretch the dough out into a bagel shape. Place the bagels onto the prepared, lined baking sheet.
- Boil the bagels (optional). This is an optional step, but I find it creates a more authentic-looking and tasting bagel. All you have to do is bring a large pot of water to a boil on the stovetop (you’ll want enough water in there so the bagels will be fully covered). Lower the bagels into the water and give them a little nudge with a large wooden spoon or fish slice so they don’t stick to the bottom. Boil for one minute, then carefully flip them over with a fish slice, and let them boil for another 30 seconds. Use a fish slice to remove the bagels from the water and place them back onto your lined baking sheet.
- Top the bagels. If you’ve boiled your bagels, you can sprinkle your toppings straight on top of them on the sheet (the water will help the toppings stick). If you’ve skipped the boiling step, brush the tops of the bagels with the whisked egg (or use milk/plant-based milk or water).
- Bake the bagels (oven instructions). Transfer the baking sheet to the oven and bake for 20 – 25 minutes, until they look golden brown and glorious. I like to rotate the baking sheet halfway through to make sure they’re all cooking and browning evenly. Remove from the oven and let them sit for at least 10 minutes before slicing them – they can be a little gummy if you slice them straight away.
- Cook the bagels (air fryer instructions). Preheat your air fryer to 400°F (200°C). If your air fryer doesn’t have a preheating setting, just run it empty for 2 minutes. Place your topped bagels into your air fryer basket, and air fry for nine minutes until lovely and golden.
Notes
INGREDIENT NOTES: It’s important to use a thick, Greek yogurt here, or you’ll have trouble with the dough (it’ll be very sticky). You can use a fat-free Greek yogurt, I’ve found it works well. You could also use sour cream or cottage cheese (or try my no blend cottage cheese bagels recipe). If you only have plain yogurt, you can drain some of the liquid using a fine sieve lined with – let it sit for about 10 minutes.
DOUGH STICKY? If it is too sticky, it’s likely your yogurt is a bit runny. Try adding a little extra flour, 1 tablespoon at a time, and lightly knead your dough to bring it together.
GUMMY BAGEL CRUMB? There are two reasons this can happen. 1) Your bagels need a little extra time in the oven (ovens vary widely – some run a little hot or a little cold, and that can impact your bake). Pop them back into the oven, or air fryer, for five or so extra minutes. 2) Sometimes, if you slice the bagels too early, they can seem a little wet, dense, or gummy in the middle. Try to let them sit for at least 10 minutes before slicing them – when they first come out of the oven, the inside is still finishing cooking from the residual heat. Greek yogurt dough is more moisture-dense than regular bread dough, so letting the bagels sit for even 10 minutes helps any steam to escape and makes sure the crumb is properly set.
STORAGE: The bagels will keep for 3 days, stored in an airtight container at room temperature. Just pop them in the toaster to freshen them up. They also freeze really well – I normally slice them in half and freeze them in zip-lock bags. You can then defrost from frozen in your toaster.
SERVING SUGGESTIONS: There are so many ways you can serve these bagels – go for a classic smear of cream cheese, load them up with smashed avocado and sweet chili glazed halloumi, try combining scrambled eggs, 30 minute chili oil and cheese or go for cream cheese or creamy labneh with smoked salmon and capers.
HERE FROM SOCIAL? HERE’S HOW TO MAKE CHOPPED JALAPENO POPPER BAGELS: Lay out 1/4 cup of cream cheese on a large board and top with a couple of slices of crispy bacon, 1/4 cup pickled jalapeños, a handful of chives, 1/4 cup grated cheddar and salt and pepper. Chop everything together until you’ve got a cream cheese paste, then smear it onto your bagels.
NUTRITION NOTES: The nutrition values will depend on the brand of Greek yogurt you use – using full-fat or low-fat, or higher protein Greek yogurt will increase and decrease the calorie, fat, and protein content slightly.
- Prep Time: 5
- Cook Time: 25
- Category: baking
- Method: oven
- Cuisine: american
Nutrition
- Serving Size: 1 bagel
- Calories: 315
- Sugar: 2.4g
- Sodium: 608.1mg
- Fat: 2.1g
- Saturated Fat: 0.4g
- Unsaturated Fat: 0.5g
- Trans Fat: 0g
- Carbohydrates: 58.7g
- Fiber: 2.3g
- Protein: 14.9g
- Cholesterol: 3.5mg


I only have fat-free Greek yogurt. Will that work?!
Hi! Yes, fat free will work fine 🙂
Followed the recipe exactly (boiled them as well). Came out perfect. Such a great way to eat bread without the added nasties. Thanks!
Yum!!!!!! These were so easy – I’m not normally a baker but these were a big hit, will make again
Will these cook ok if I don’t make them into bagels, just make little buns for burgers?
They should be fine!
Omg! Sooo good. I will never buy store bought bagels again. Thanks so much 🙂
Do I make any adjustments for high alltitude baking?
Hi Joan, I haven’t tested these at high altitude so I’m not sure how you’d adjust this – I’ve found this guide from King Arthur Baking which may be helpful – it sounds like reducing the oven temperature and slightly increasing the liquid and flour are probably changes you’ll need to make.
How long will these last after cooking?
Hi Catherine! I find they keep well at room temperature for 3 – 4 days (I’d toast them after the first day though), and they freeze really well – just slice them in half before freezing them in a ziplock bag – then you can toast them straight from frozen xx Kate
Fantastic! I’m gluten free and these are the best bagels I’ve had. I needed to add a bit of water (1/4 cup) to get the dough to come together, but I’m sure that’s because of my gf flour. Thank you so much!
I’m SO happy to hear this Maddie!! You’re so so welcome, and that’s a super helpful note about adding a little more water to account for the GF flour too 🙂
I tried boiling mine and they completely fell apart…what happened?
Oh no!! That’s never happened when I’ve made them so I’m not sure what could have gone wrong – unless your dough was very wet? Did you use thick Greek yogurt? Or perhaps they were just in the water too long? The boiling helps to seal them and create that signature bagel style crust, so it’s very strange that they fell apart, I’m sorry you had trouble.
I will say they tasted really good! I will definitely make them again!
but my bagels turned out a little undercooked/gummy in some parts, I must have done something wrong… I did cut them when they were warm…
Oh no! I do find it’s best to wait a little bit before cutting them to prevent any lingering gumminess – they may need a little longer in your oven if they’re still a little under (oven’s are so annoyingly all over the place so it could well be that x)
Will the dough hold overnight?
I think overnight it should be fine in the fridge x
For anyone who thinks they can sub yogurt for dairy free yogurt…DON’’T do it! I experimented this morning and ended up with literal rocks I couldn’t cut or eat. We had a good laugh. But trust me on this one, this recipe needs the originally recommended Greek yogurt. They’re really good made as intended!
Mine turned out doughy. I didn’t boil the boil and it seemed like they needed to be put in the oven for a longer time. I ended up putting them in the air fryer and they still were doughy. I won’t give up! Any suggestions?
Oh no! You could try letting them sit and cool a bit after baking? Sometimes when you cut into them right after they come out of the oven they can be a little gummy in the middle. Could also be worth trying the boiling step to see if that helps x